The modern podcasting landscape has radically transformed from its nascent, grass-roots origins over fifteen years ago into a highly lucrative, globally dominant broadcasting medium.1 Following the unprecedented mainstream explosion catalyzed by investigative narrative shows like Serial in 2014, major media conglomerates—including the BBC, NPR, The New York Times, The Wall Street Journal, and Spotify—have entered the ecosystem, establishing exceptionally high production standards.1 As listenership rapidly scales to tens of millions of weekly consumers, the threshold for acceptable audio quality has risen commensurately.2 A podcast's ultimate success, audience retention rate, and monetization potential are no longer dictated solely by the caliber of its editorial content or the charisma of its hosts; they are equally, if not primarily, dependent on the acoustic integrity of its technical execution.2
Substandard audio engineering introduces immense cognitive load for the listener, accelerating acoustic fatigue and significantly increasing episode abandonment rates.5 In a fiercely competitive market, listeners will simply not tolerate distracting room echo, harsh digital distortion, or unpredictable volume fluctuations.5 Therefore, securing a pristine audio take requires a comprehensive mastery of acoustic physics, hardware engineering, digital signal processing (DSP), and human biological tendencies. This analysis provides an exhaustive, expert-level framework for executing professional-grade podcast audio, detailing the scientific principles and practical methodologies required to capture, process, and finalize elite spoken-word content.
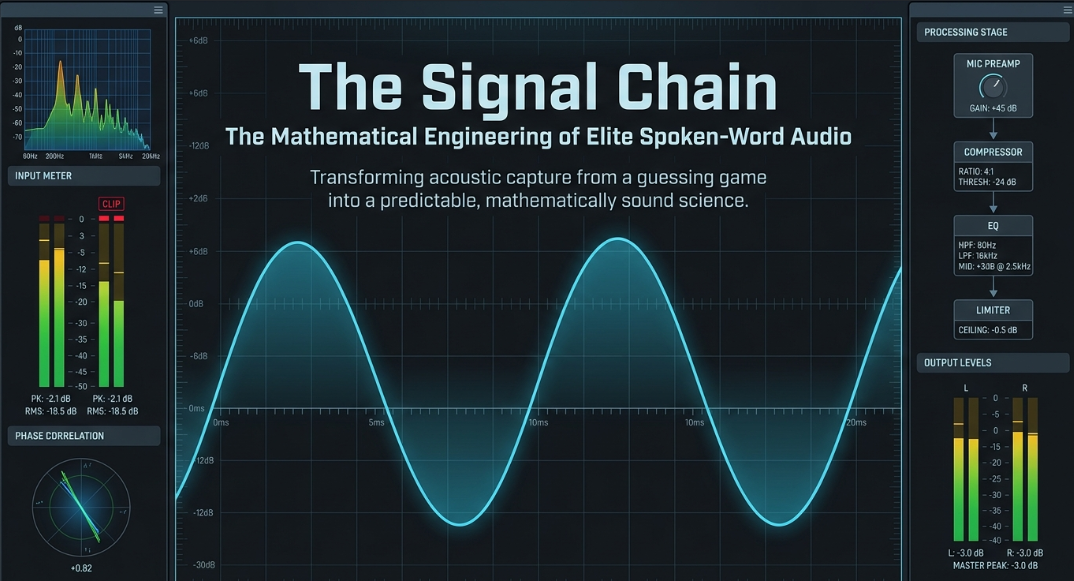
Sound Check... Check... 1... 2...
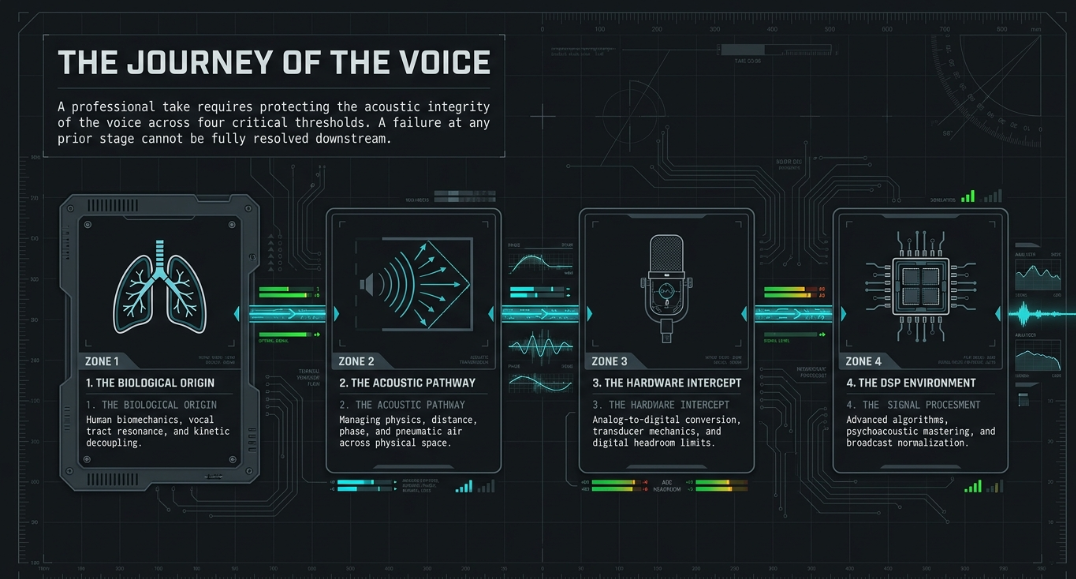
The pre-production phase, culminating in a rigorous and systematic sound check, serves as the critical foundation of any professional audio recording. Far from a perfunctory or casual exercise of simply speaking into a microphone to verify that a signal exists, a proper sound check is a meticulous calibration of the entire acoustic and digital chain.3 Thoughtful preparation prior to engaging the recording mechanism effectively mitigates the need for destructive, time-consuming restorative processing during post-production.3
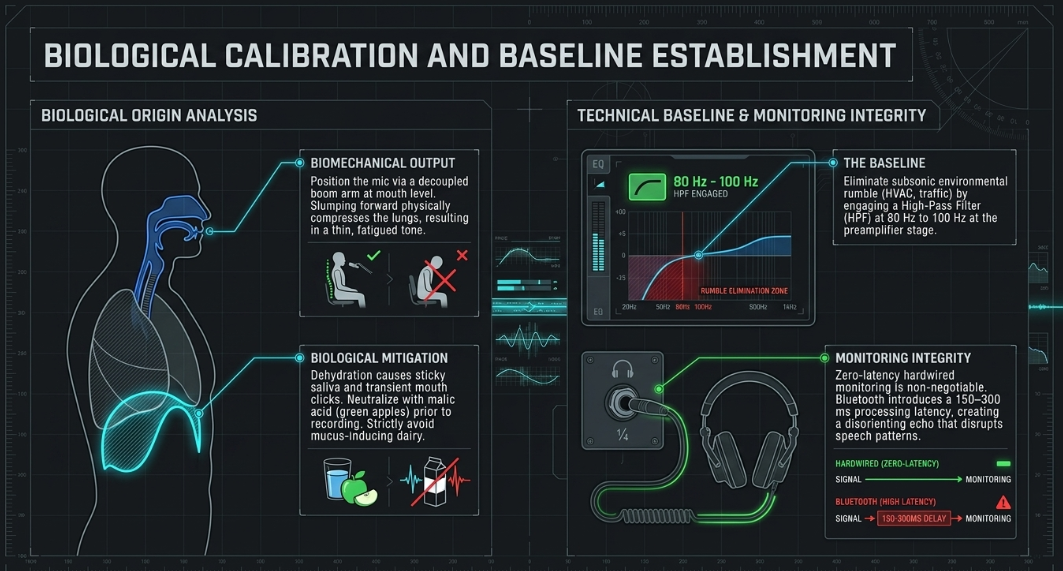
The primary objective of a comprehensive sound check is the establishment of a clean, optimized baseline. When guiding talent through this procedure, the audio engineer must independently configure the gain structure, High-Pass Filter (HPF), phase alignment, and equalization (EQ) for every individual input source.8 Initiating the check involves monitoring the ambient room noise prior to any human speech.6 Even in highly treated, professional acoustic environments, external variables such as HVAC systems, computer cooling fans, and distant vehicular traffic inevitably introduce low-frequency rumble into the signal path.9 An HPF, commonly engaged at 80 Hz to 100 Hz directly on the microphone preamplifier or within the digital mixing console, surgically eliminates these non-vocal subsonic frequencies before they can consume vital digital headroom.10
Routing constitutes the second, highly critical phase of the check. In multi-participant environments, each input must be brought up incrementally in the performer’s individual headphone monitor mix, ensuring that latency-free, zero-delay monitoring is established.8 Real-time, analog-routed monitoring allows the speaker to self-regulate their vocal volume naturally; if the headphone mix is too quiet, the speaker will instinctively shout to compensate, thereby ruining the take through over-projection.12 Furthermore, utilizing hardwired headphones is mandatory; Bluetooth headphones introduce a processing latency of 150 to 300 milliseconds, creating a disorienting echo effect that actively disrupts the host's speech patterns.13
If an engineer is working solo or operating remotely, utilizing a secondary mobile device, such as a tablet or iPad connected wirelessly to the digital console, allows for rapid stage adjustments without interrupting the physical workflow or requiring the engineer to abandon their listening position.8 The sound check is also the appropriate psychological juncture to establish non-verbal communication signals among the production team and the talent.8 Suggesting and agreeing upon a standardized set of hand signals ensures that technical adjustments—such as requesting more volume in a monitor or signaling a break—can be requested during the show without audibly interrupting the conversational flow.8 By standardizing this operating procedure, the production team ensures maximum audio fidelity prior to committing any data to disk.
Positioning the Microphone for Recording Speech
Microphone placement dictates the fundamental frequency response, intelligibility, and acoustic isolation of the recording. Even the most prestigious, industry-standard broadcast microphones—such as the Shure SM7B or the Electro-Voice RE20—will yield decidedly amateur results if positioned incorrectly.4 The complex interaction between the human vocal tract and the sensitive microphone capsule is highly susceptible to spatial orientation.
Professional execution requires decoupling the microphone entirely from physical disturbances. Desk stands, while convenient and ubiquitous in amateur setups, are highly susceptible to mechanical coupling; any interaction with the table surface—such as tapping fingers, typing on a keyboard, or shifting a coffee mug—transmits low-frequency structural vibrations directly through the stand and into the microphone body, registering as deep, disruptive thuds.12 To mitigate this, a heavily articulated boom arm is universally recommended by audio professionals.4 Boom arms suspend the microphone in three-dimensional space, utilizing specialized shock mounts to acoustically isolate the capsule from external kinetic energy.3
Positioning is also inextricably linked to human biomechanics, as ergonomics directly influence acoustic output. The cardinal rule of audio engineering is that the microphone must be brought to the speaker, not the speaker to the microphone.5 If a microphone is placed too low on a desk, the host will naturally hunch forward to reach it. This slumping posture physically compresses the diaphragm, restricts lung expansion, and compromises vital breath support, resulting in a thin, shallow, and highly fatigued vocal tone.19 A high-quality boom arm allows the capsule to be positioned precisely at mouth or nose level, enabling the host to sit upright with a fully open chest cavity.13
Furthermore, establishing proper breathing mechanics prior to recording ensures a consistent, authoritative vocal presence. Hosts should be coached to focus on the out-breath first; by sighing out completely, the body will naturally allow a deep, relaxed breath to drop low into the belly.20 Practicing vocal exercises, such as releasing a breath on a buzzy "th" sound while gently pulling the belly button toward the spine, engages the diaphragm and provides the necessary breath support to sustain long, conversational podcast recordings without the voice deteriorating into a vocal fry.20 Finally, the simple act of smiling while speaking physically alters the shape of the vocal tract, naturally brightening the timbre of the voice and creating a more engaging, charismatic sonic profile for the listener.
Setting the Best Angle for the Microphone
The angle of incidence between the speaker's mouth and the microphone capsule fundamentally alters the spectral balance of the recorded audio and governs the management of transient acoustic anomalies. Speaking perfectly on-axis—meaning directly into the center of the microphone capsule—is an intuitive but frequently flawed approach for professional spoken-word recordings.
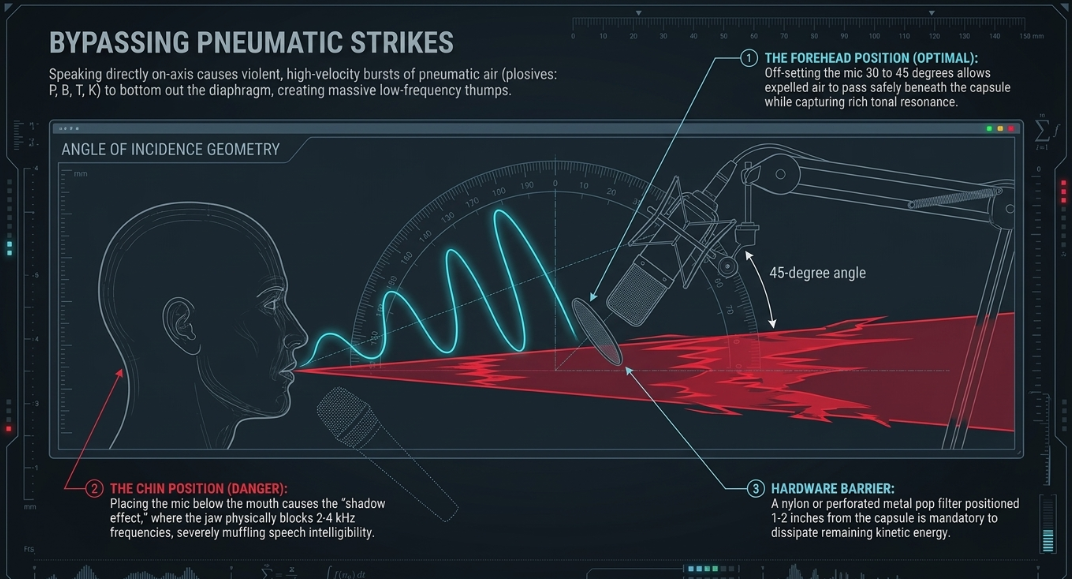
When a human speaker pronounces plosive consonants (most notably "P," "B," "T," and "K"), they expel concentrated, high-velocity bursts of pneumatic air.3 If the microphone is positioned directly in front of the mouth, these violent air blasts strike the sensitive diaphragm head-on, causing it to aggressively bottom out. This mechanical failure registers electronically as a massive, distorting low-frequency thump that can easily trigger digital clipping.12 Similarly, high-frequency sibilant sounds ("S" and "Sh") project directly forward with intense acoustic energy, resulting in harsh, piercing frequencies that cause listening fatigue.22
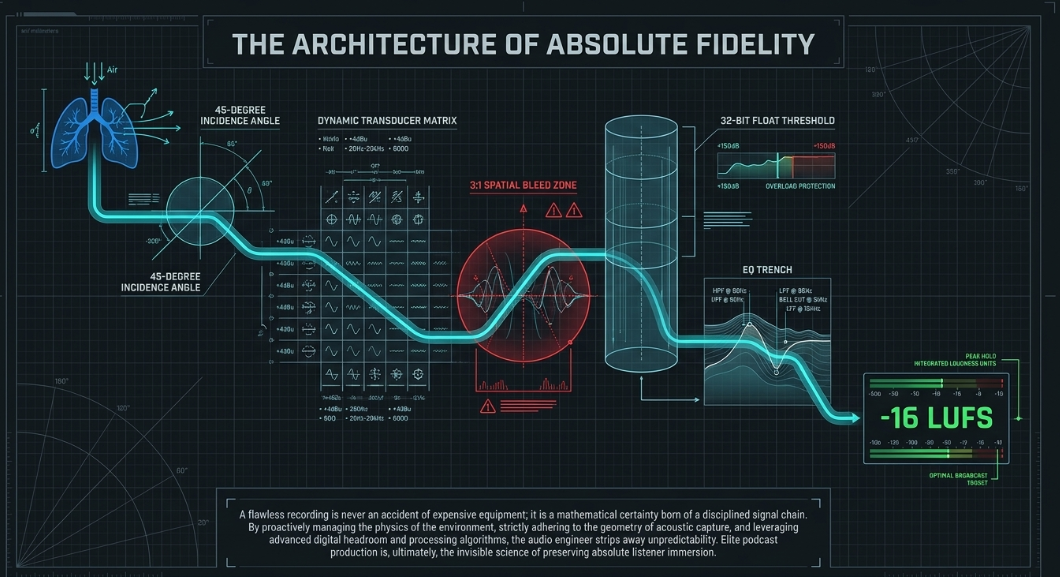
To mitigate these issues purely through applied physics, off-axis positioning is strictly required.17 The microphone should be offset by a 30 to 45-degree angle relative to the direct trajectory of the mouth.22
There are two primary vertical strategies for achieving this optimal angular offset:
From Above (The Forehead Position): The microphone is inverted on a boom arm, suspended above the mouth, and angled downward so the capsule points toward the bridge of the nose or the upper lip.18 This strategic placement allows the host to speak comfortably "under" the microphone. Because expelled air from plosives travels straight ahead or slightly downward, the percussive bursts pass safely beneath the capsule, drastically reducing the capture of plosive thumps and harsh sibilance.18 Additionally, this configuration clears the host's direct sightline, which is vital for reading scripts, monitoring levels, or maintaining crucial eye contact during video podcasts.18
From Below (The Chin Position): Alternatively, the microphone is positioned below the mouth and angled upward, stopping near the chin.21 While this is also effective for avoiding direct air blasts, extreme caution must be exercised by the audio engineer. Placing the microphone too far below the chin results in the "shadow effect," an acoustic phenomenon where the physical mass of the jaw blocks higher frequencies from reaching the capsule.5 This effectively rolls off the critical 2-4 kHz range of the sound spectrum, resulting in a muffled recording that severely compromises speech intelligibility.25
By aiming the microphone toward the cheek, chin, or forehead at a 30 to 45-degree angle, the strongest bursts of air bypass the capsule entirely, capturing the rich tonal resonance of the voice without the destructive pneumatic impact.
Setting the Distance Between the Microphone and the Speaker
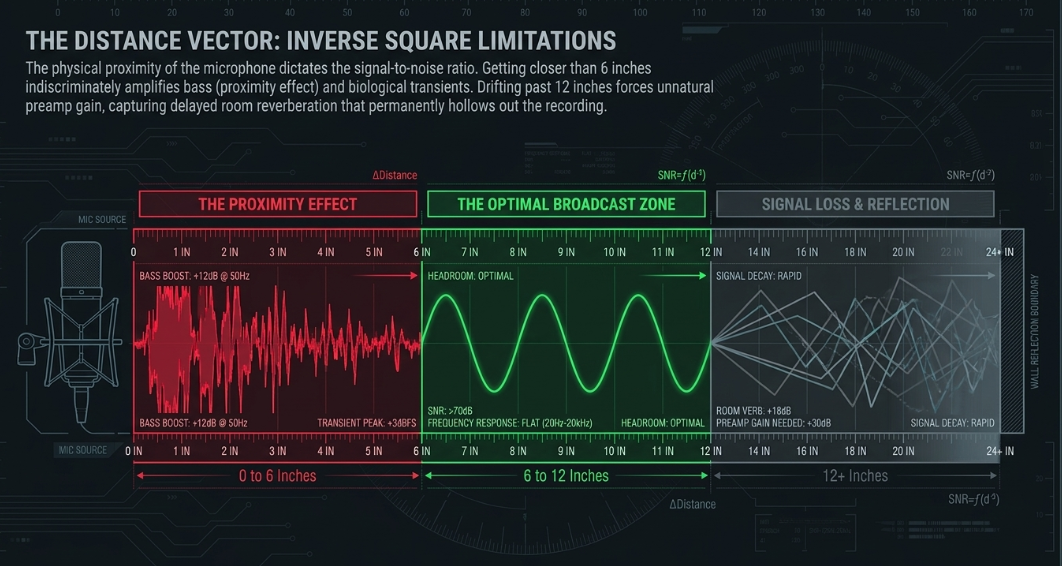
Distance is the primary physical regulator of the signal-to-noise ratio in any recording environment. The inverse square law of acoustics dictates that sound intensity drops exponentially as the distance from the source increases. Therefore, the physical proximity of the microphone to the speaker is arguably the most critical variable in podcast engineering, heavily influencing both tone and environmental rejection.
The universally accepted, optimal distance for a dynamic broadcast microphone is between 6 and 12 inches (approximately 15 to 30 centimeters) from the speaker's mouth.9 This specific distance is a carefully calculated compromise designed to maximize vocal intimacy while simultaneously rejecting ambient environmental noise.
Positioning the microphone closer than 6 inches introduces a well-documented acoustic phenomenon known as the proximity effect. Prevalent in highly directional (cardioid and hyper-cardioid) microphones, the proximity effect causes an artificial, non-linear exaggeration of low-frequency bass output as the sound source moves closer to the capsule.4 While some hosts deliberately "eat the mic" to achieve a booming, resonant "Voice of God" radio tone, extreme proximity comes with severe liabilities. It indiscriminately amplifies wet mouth noises, lip smacks, and erratic breathing patterns, while also making the recording highly susceptible to volume spikes if the host moves even a fraction of an inch.9
Conversely, positioning the microphone further than 12 inches away fundamentally degrades the integrity of the recording. As the primary vocal signal weakens over distance, the audio engineer must artificially increase the input gain on the preamplifier to achieve a usable digital recording level. This gain increase is indiscriminate; it amplifies everything in the room, including HVAC hum, computer fan noise, and, most destructively, room reverberation.4 When the host speaks, the sound waves bounce off flat walls and return to the capsule milliseconds after the direct vocal signal.21 This delayed capture results in a hollow, distant, and highly echoic sound that cannot be effectively removed in post-production, permanently marking the podcast as an amateur production.17 Maintaining the strict 6 to 12-inch rule ensures a direct, dry, and professional vocal presence.
Avoiding the Recording of Mouth Noises
Mouth noises—encompassing plosive thumps, excessive sibilance, lip smacks, tongue clicks, and saliva crackles—are the absolute bane of professional audio editing. These highly transient, microscopic acoustic events disrupt the listener's immersion, require hours of surgical post-production repair, and can trigger misophonia in a significant percentage of the audience. Combating mouth noise requires a multi-tiered approach spanning human biology, acoustic barriers, and meticulous hardware selection.
Biological and Preparatory Mitigation
The root physiological cause of excessive clicking and smacking is often localized dehydration. A dry mouth causes saliva to become viscous and sticky, creating sharp snapping sounds as the tongue and lips part during natural articulation.22 Hosts must maintain consistent hydration, keeping a glass of room-temperature water readily available during the session.9 Dairy products and sugary beverages coat the throat and stimulate thick mucus production, and must be strictly avoided prior to and during recording.22 An industry-standard technique for temporarily neutralizing sticky saliva involves having the host consume a slice of green apple prior to stepping up to the microphone; the naturally occurring malic acid acts as a powerful astringent, instantly thinning the saliva and dramatically reducing acoustic artifacts at the source.
Acoustic Barriers
A pop filter is an absolute, non-negotiable requirement for any professional vocal setup.3 Unlike cheap foam windscreens, which generally only protect against light air currents, a dedicated external pop filter—typically constructed of stretched nylon mesh or perforated metal—is positioned 1 to 2 inches directly in front of the microphone capsule.16 When a harsh plosive burst ("P" or "B") hits the filter, the mesh diffuses the concentrated low-frequency air blast, physically breaking it apart and safely dissipating the energy before it can strike the microphone diaphragm.3
Hardware Selection
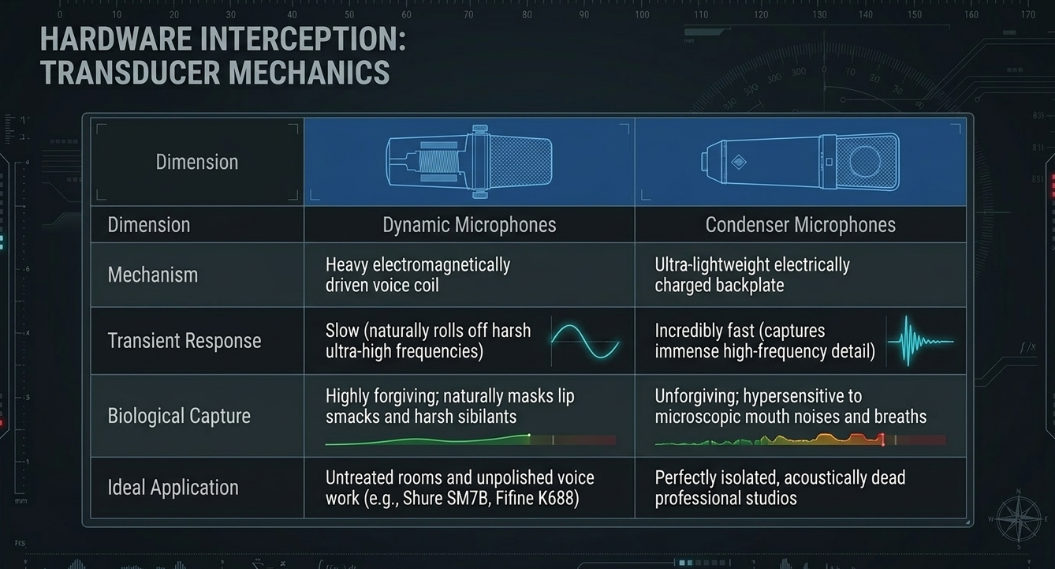
The physical design and transducer mechanism of the microphone itself drastically influences the capture of subtle mouth sounds. Audio engineers generally categorize podcast microphones into two distinct types: condensers and dynamics.
Condenser Microphones: These microphones utilize an electrically charged, ultra-lightweight backplate and diaphragm. Because the moving mass is so light, they possess an incredibly fast transient response, capturing immense high-frequency detail and nuance.3 However, this extreme sensitivity makes them highly prone to capturing every subtle lip smack, breath, and high-frequency sibilant hiss in microscopic detail, making them punishingly unforgiving for hosts with poor mic technique.22
Dynamic Microphones: These microphones utilize a heavier, electromagnetically driven voice coil attached to a diaphragm. Because the physical mass of the coil is heavier, dynamics possess a slower transient response, naturally rolling off harsh ultra-high frequencies.3 This physical limitation works to the podcaster's advantage, as it inherently smooths out harsh sibilance and effectively masks subtle wet mouth noises.22 For unpolished voice work in untreated rooms, specific dynamic broadcast models like the Fifine K688, Fifine Tank1, or the ubiquitous Shure SM7B are preferred because they naturally soften sharp sibilants and clicks at the point of capture.14
If mouth noises do infiltrate the final recording, advanced digital restoration software becomes necessary. Plugins utilizing machine learning, such as iZotope RX 10, feature dedicated "Mouth De-Click" and "De-Esser" modules that algorithmically identify and suppress these high-frequency transients without degrading the underlying fundamental voice tone.
Positioning the Microphone for Different Types of Recordings
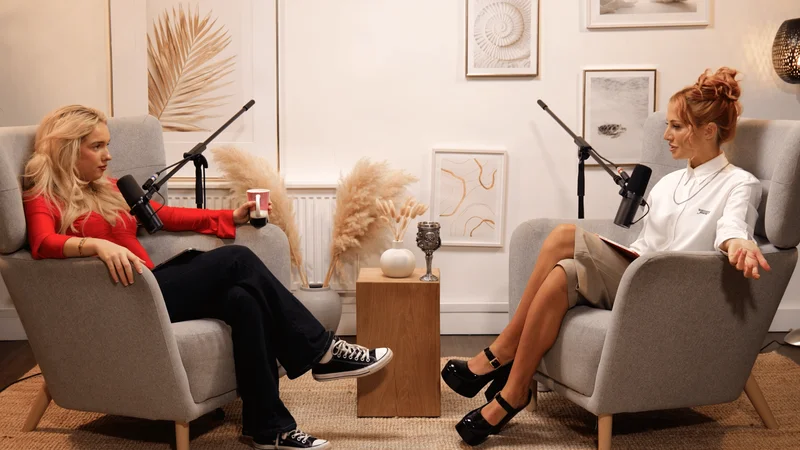
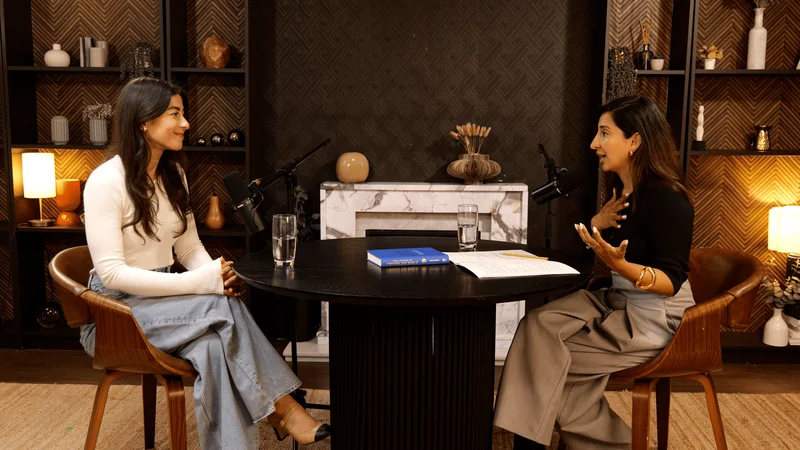
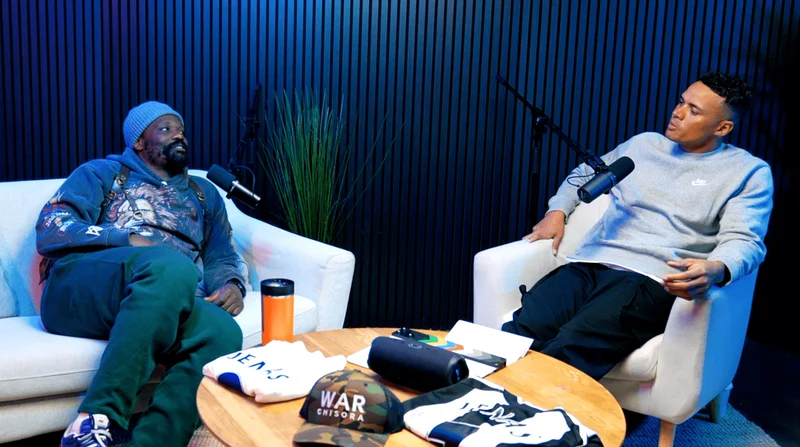
The geometric arrangement of microphones must adapt dynamically to the specific format of the podcast. The acoustic physics of a solo recording differ radically from the complexities of a multi-guest roundtable or an on-location field interview, requiring entirely different engineering methodologies.
The Solo Recording
Solo formats, where a single host addresses the audience directly, are structurally simple, allowing for immediate feedback and a closed-loop workflow.1 The primary concern is achieving total acoustic isolation. The speaker acts directly on a single axis. In this highly controlled environment, the host can afford to construct localized acoustic treatment—such as utilizing a dedicated reflection filter, hanging moving blankets, or installing high-density foam panels—to create an artificial dead space, effectively neutralizing the room's reverb characteristics entirely.27 For solo remote recordings featuring a distant guest, utilizing dedicated local-recording platforms like Riverside, Zencastr, or Descript ensures that high-quality, uncompressed audio is saved directly to each user's local machine, circumventing the data compression and dropouts inherent to standard internet VoIP calls.27
Roundtable and Multi-Guest Formats
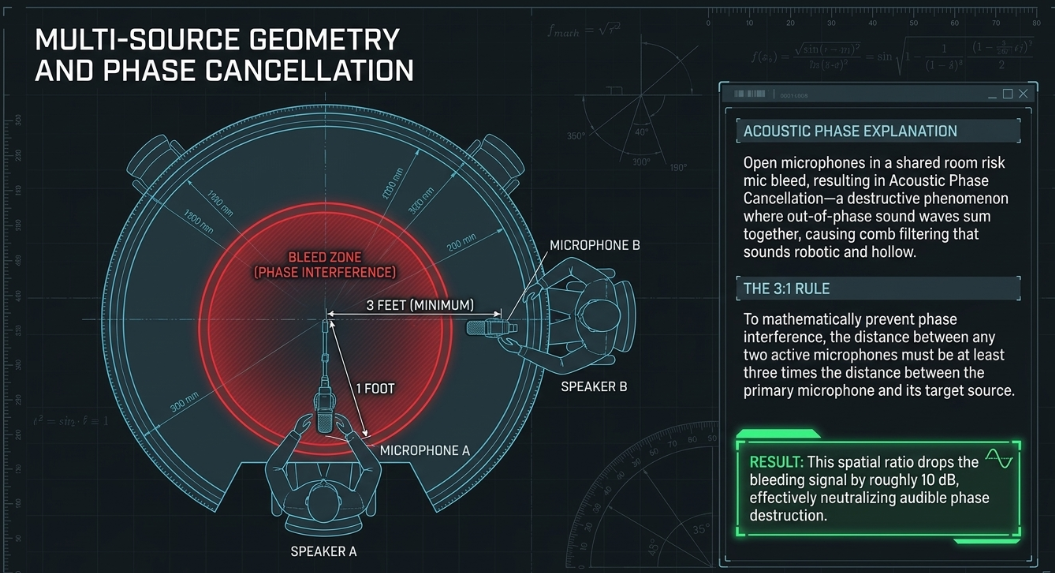
Introducing multiple open microphones into a single acoustic space introduces complex phase geometry and the persistent danger of "mic bleed".33 Mic bleed occurs when Speaker A's voice is captured not only by their own primary microphone but also slightly later, and slightly quieter, by Speaker B's microphone.
When these individual multitrack files are summed together in the final mix, the minute time-of-arrival difference between the primary mic and the bleeding mic creates a highly destructive phenomenon known as Acoustic Phase Cancellation.34 Identical sound waves arriving out of phase will destructively interfere with one another, causing comb filtering. This results in the summed vocal sounding hollow, robotic, and severely lacking in fundamental bass frequencies.34
To mathematically prevent phase cancellation, audio engineers strictly enforce the 3:1 Rule of Microphone Placement.34 The physics of this rule dictate that the distance between any two active microphones must be at least three times the distance between the primary microphone and its target sound source.34
Practical Application: If Speaker A sits exactly 1 foot away from Microphone A, then Microphone B must be placed a minimum of 3 feet away from Microphone A.34
By adhering to this spatial ratio, the bleed signal entering the secondary microphone will drop by roughly 10 dB relative to the primary source, effectively neutralizing the audible phase interference.36 Further bleed reduction is achieved by seating guests opposite one another and utilizing the natural rejection nulls (the rear) of cardioid pattern microphones.33 Another highly effective mixing workaround to mitigate phase issues is to pan the different microphones slightly left and right in the stereo field; by the nature of panning, the conflicting signals are isolated in separate acoustic channels, significantly reducing destructive summing.
Setting Levels
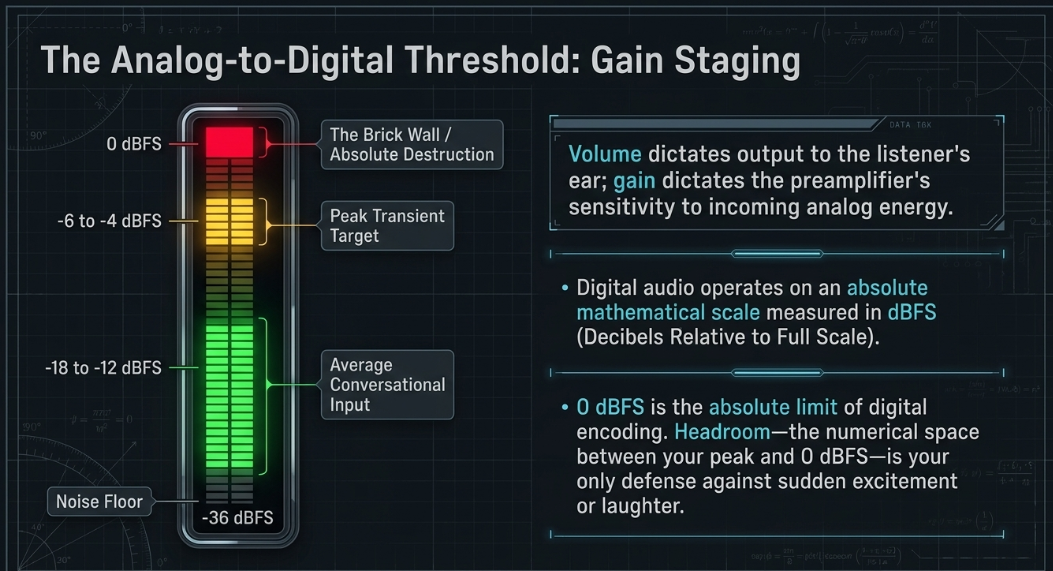
Setting proper levels—commonly referred to in audio engineering as gain staging—is the fundamental mechanism by which analog acoustic energy is converted into optimized digital data. Misunderstanding the vital distinction between volume and gain is a common point of failure for amateur producers. Volume dictates how loud the final, processed output is pushed out of a speaker or headphone driver to the listener's ear; gain, conversely, dictates how sensitive the preamplifier is to the incoming analog signal at the initial point of capture.30
Digital audio operates on a stringent, absolute mathematical scale measured in Decibels Relative to Full Scale (dBFS). On this digital scale, 0 dBFS represents the absolute maximum limit of digital encoding; it is the "brick wall" of the system.38 Because a computer cannot process a volume louder than its maximum bit depth allows, all viable audio information must exist in the negative integers.39
Engineers visualize this energy via scrolling waveforms and hardware Volume Unit (VU) meters.6 A waveform represents the amplitude of the signal over time. The horizontal center line represents nominal silence, while the peaks stretch upward and downward toward the absolute limits of the scale.6 Monitoring via hardware or software VU meters relies heavily on a universal color-coding system to indicate signal health:
Green Zone: Generally ranges from the noise floor (-36 dBFS) up to -12 dBFS. This represents a safe but potentially weak signal that may require excessive boosting later.6
Yellow Zone: Generally ranges from -12 dBFS to -3 dBFS. This is the optimal modulation range, representing a robust, healthy signal with excellent signal-to-noise characteristics.6
Red Zone: Anything approaching or hitting 0 dBFS. This is the danger zone where irreversible digital destruction and clipping occurs.6
The primary objective of setting levels is to configure the input gain so that the speaker's natural, conversational voice consistently bounces in the high green and low yellow zones, leaving adequate "headroom"—the empty numerical space between the highest peak and 0 dBFS—to safely absorb sudden bursts of excitement or loud laughter.6 When engineering a podcast live, the producer must engage in "riding the fader," manually adjusting the gain in real-time as the host's volume naturally fluctuates.
Recording Sufficient Audio Data
Achieving a professional podcast take necessitates capturing a dense, high-resolution digital footprint. The sheer volume of digital data recorded determines the accuracy of the acoustic reproduction and strictly limits how far the audio can be manipulated in post-production before it mathematically degrades and introduces artifacts. This data density is governed by three primary parameters: Sample Rate, Bit Depth, and Bit Rate.40
Sample Rate
The sample rate is the frequency at which the analog-to-digital converter takes microscopic "snapshots" of the incoming audio per second.40 Dictated by the Nyquist-Shannon sampling theorem, the sample rate must be at least twice the highest frequency intended to be recorded to prevent aliasing.
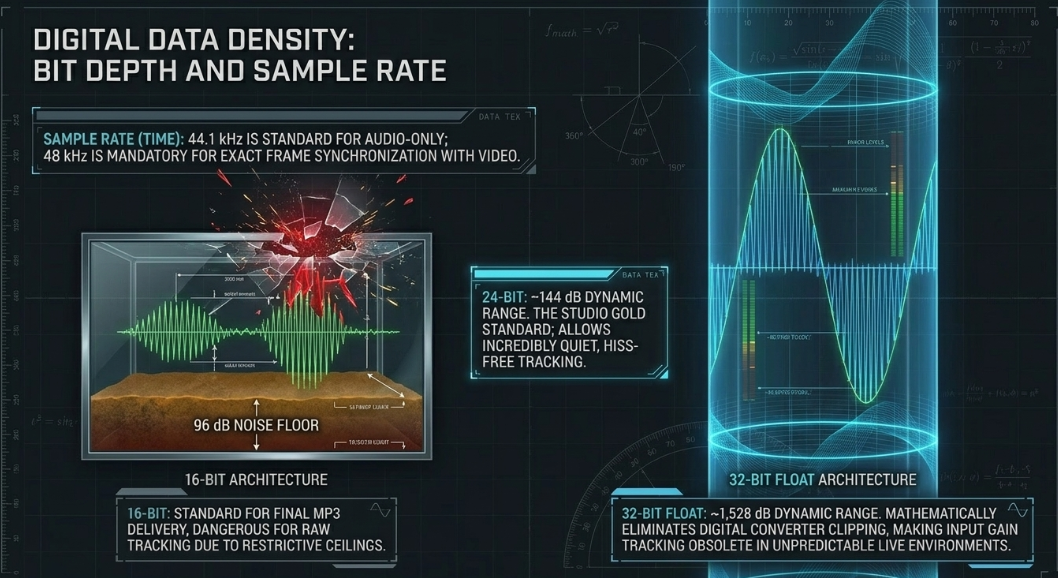
44.1 kHz: The foundational standard for CD audio and basic audio-only podcasting. By taking 44,100 samples per second, it perfectly captures frequencies up to 22.05 kHz, which comfortably exceeds the upper limit of human hearing (20 kHz).40
48 kHz: The mandatory standard for any podcast utilizing video or intended for synchronization with film. It operates seamlessly across all major digital audio workstations (DAWs) and video editors, providing marginal improvements in high-frequency detail and ensuring exact frame synchronization.42
Bit Depth
While sample rate captures time slices, bit depth captures amplitude (loudness). Bit depth determines the sheer number of possible amplitude values for each recorded sample, which directly governs the recording's dynamic range—the mathematical ratio between the quietest noise floor and the loudest clipping point.40
While 16-bit is perfectly acceptable for the final published file format (as no listener requires 144 dB of dynamic range in their car), it is increasingly viewed as a dangerous format for raw recording due to its restrictive ceiling and elevated noise floor.45 24-bit is the current gold standard for studio tracking; it lowers the noise floor so drastically that engineers can record at much quieter, safer input levels without introducing analog hiss when boosting the volume in post-production.
The 32-Bit Float Paradigm
The advent of 32-bit float recording represents a revolutionary paradigm shift in field recording. Rather than plotting data on a fixed integer grid, 32-bit float utilizes a floating-point calculation comprising a 24-bit mantissa and an 8-bit exponent.46 This generates a theoretical dynamic range of approximately 1,528 dB—a mathematical span larger than the difference between an anechoic vacuum and the sound of a nuclear detonation.46 With 32-bit float technology (featured in devices like the Zoom F3 or Tascam Portacapture), it is practically impossible to digitally clip the analog-to-digital converter, completely eliminating the need for input gain setting during unpredictable live events.46
Peaking
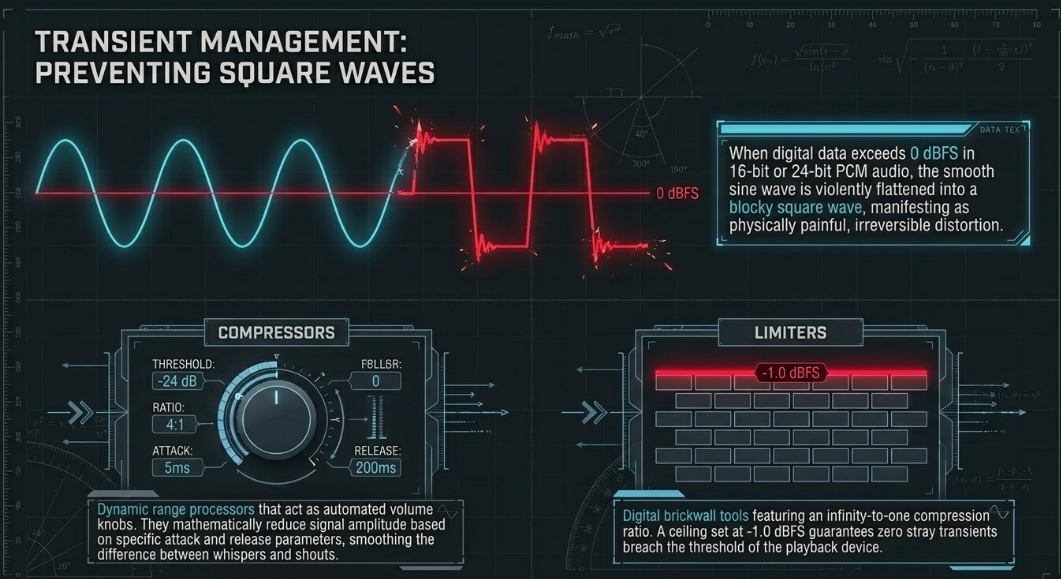
Peaking, often referred to as digital clipping, is the cardinal sin of digital audio engineering. When an incoming electrical signal exceeds the maximum voltage capability of the preamplifier, or when the digital data exceeds the absolute 0 dBFS ceiling, the recording system simply runs out of numerical headroom.4 Because a digital system cannot mathematically represent any amplitude value above 0, the tops and bottoms of the smooth sine waveform are brutally flattened off.6
This violent flattening transforms rounded, natural sound waves into aggressive, blocky square waves.49 To the human ear, this manifests as a harsh, distorted, crackling break-up of the voice that is physically painful to listen to.6 In traditional 16-bit and 24-bit linear PCM audio, digital clipping is permanently destructive; the acoustic data that existed beyond the threshold is never recorded and cannot be fully restored by any software plugin, effectively ruining the take.46
Preventing peaking requires rigorous hardware and DSP methodologies:
Headroom Management: Purposefully setting input levels significantly below 0 dBFS to provide a massive safety buffer for sudden volume spikes.6
Compressors: Dynamic range processors that act like automated volume knobs. They mathematically turn down the volume of the signal only when it crosses a specific user-defined threshold, smoothing out the dynamic difference between whispers and shouts. Compressors utilize Attack and Release parameters (measured in milliseconds) to dictate how quickly the volume is reduced and how slowly it recovers, ensuring the effect sounds natural rather than robotic.35
Limiters: Extreme compressors featuring an infinity-to-one ratio. While analog-style limiters (like the legendary Fairchild 670 or Manley Vari-Mu) are used for musical coloration, digital "brickwall" limiters act as a hard acoustic ceiling.52 If a brickwall limiter is set to -1 dBFS, absolutely no audio is permitted to cross that barrier, effectively catching stray transients and saving the final exported file from clipping the listener's playback device.35
However, if utilizing a 32-bit float field recorder, the threat of peaking at the converter level is neutralized. If a host suddenly screams and the waveform visually clips within the DAW (such as Adobe Audition, Pro Tools, or Reaper), the 32-bit float architecture allows the engineer to simply drag the clip gain downward, magically revealing the perfectly preserved, un-distorted waveform that extended "above" the visual ceiling.
Setting a Level for Recording Human Speech
Establishing the correct numerical targets for human speech requires a fundamental understanding of the distinction between input tracking levels (the raw recording) and output mastering levels (the final published file).30
For the raw recording phase, the overriding philosophy is safety via headroom.37
Input Targets: Digital recording systems function flawlessly when levels are conservative. The engineer should set the input gain such that the host’s average conversational dialogue modulates between -18 dBFS and -12 dBFS.37
Peak Targets: When the host expresses excitement or emphasizes a word, the loudest transient peaks should strike precisely between -6 dBFS and -4 dBFS.6 By treating -6 dBFS as the absolute ceiling during the live tracking phase, the engineer builds a massive buffer against unexpected distortion.6
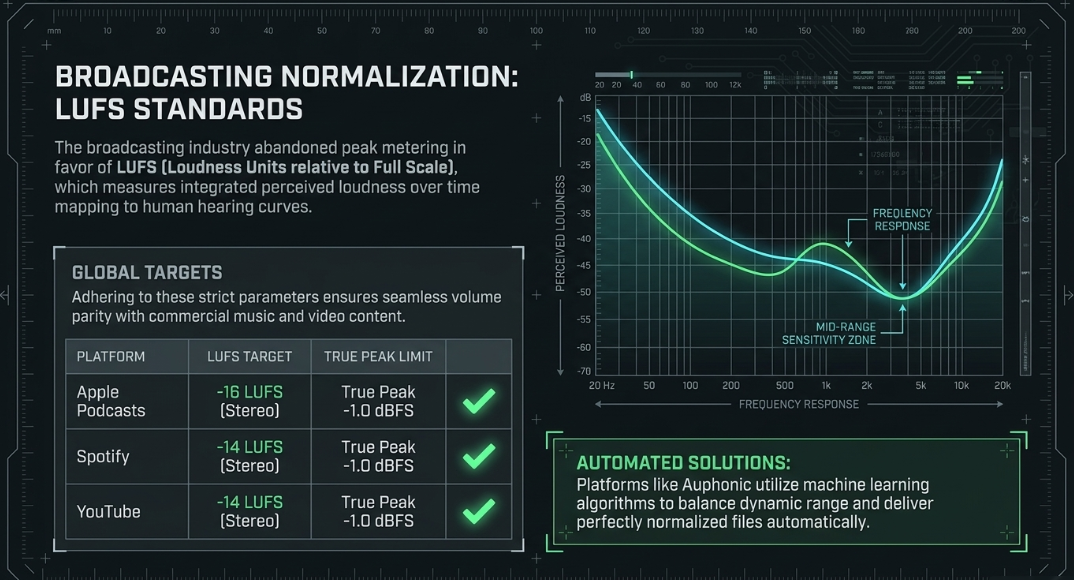
Once the raw audio is captured safely, it must be compressed, equalized, and brought up to a standardized commercial volume during the final mastering phase. Because human perception of loudness is frequency-dependent and non-linear (as defined by the Fletcher-Munson curves, where humans hear mid-range frequencies as inherently louder than sub-bass), the industry abandoned raw peak and RMS meters for final delivery.39 Instead, broadcasting adopted LUFS (Loudness Units relative to Full Scale).39 LUFS measures the integrated, psychoacoustic perceived loudness of an entire file over time.39
The global broadcasting standards for podcast mastering are highly strict, and must be monitored using specialized metering plugins such as YouLean Loudness Meter, Waves WLM, or iZotope Insight 30:
By adhering to these specific LUFS standards, the engineer ensures that their podcast will play back at the exact same volume as music on Spotify or video content on YouTube, maintaining consistency and sparing the listener from constantly adjusting their volume dial.27 For producers lacking deep mastering knowledge, automated cloud algorithms like Auphonic or desktop tools like The Levelator utilize machine learning to automatically analyze and balance the dynamic range of the file, delivering perfectly normalized -16 LUFS audio seamlessly
Making Allowances for Human Nature
Despite meticulous sound checks, rigid gain staging, and optimal microphone placement, human emotion remains highly unpredictable. A compelling podcast thrives on organic conversation, which inherently contains massive, instantaneous dynamic swings: a whispered secret, a sudden burst of explosive laughter, or an overlapping argument.60 If an audio interface is statically set, these natural human elements will shatter the mix, resulting in either inaudible whispers or heavily distorted shouts.61
The traditional, analog method of handling this is "riding the fader"—a technique where a dedicated engineer physically pushes hardware faders up and down in real-time on the mixing console, anticipating the breath and energy of the host.6 For solo podcasters operating without an engineer, practicing active mic technique (physically leaning away from the microphone during moments of loud laughter or excitement) is the analog solution to preventing peaks.6
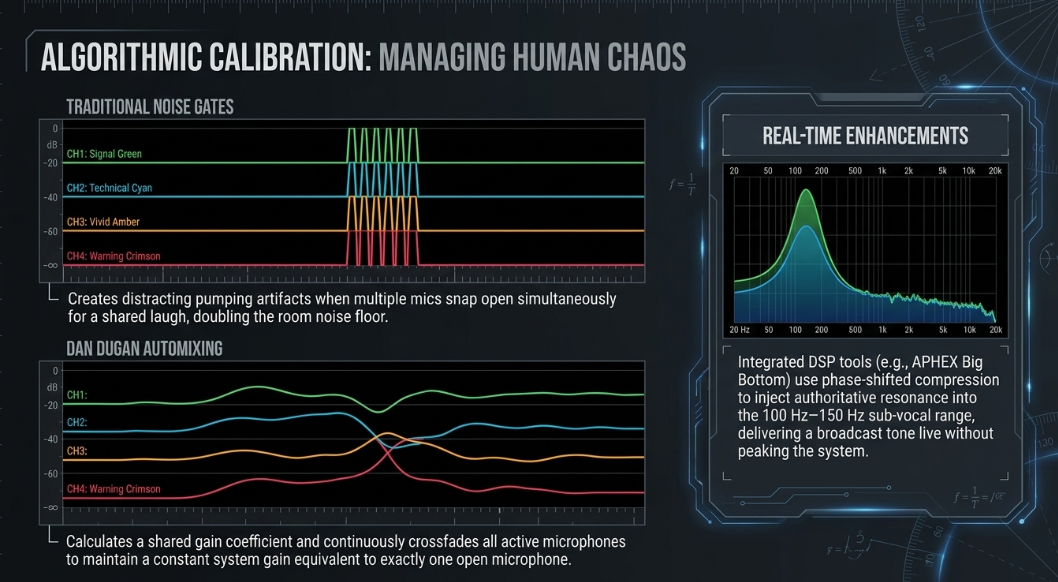
However, in multi-host environments with unpredictable overlapping chatter, automated digital solutions have become indispensable. Standard noise gates—which completely mute a channel when someone stops talking and snap open when they begin—are highly jarring; when multiple gates snap open simultaneously to capture a shared laugh, the background noise floor suddenly doubles or triples, creating a highly distracting "pumping" acoustic artifact.63
To solve this, professional workflows employ auto-mixers, predominantly built upon the Dan Dugan Speech System algorithm (available natively in Waves eMotion LV1 mixers and other high-end corporate consoles).63 A Dugan automixer operates on an elegant mathematical philosophy of constant system gain.64 Rather than gating, it continuously crossfades multiple microphones in real-time. If four people are speaking simultaneously, the algorithm calculates a shared gain coefficient and turns all four microphones down proportionally, maintaining the overall background noise floor at the exact equivalent of one single open microphone.64 This permits chaotic laughter and cross-talk to sound exceptionally smooth, natural, and entirely free of feedback or noise pumping.63
Furthermore, modern podcasters rely on specialized real-time DSP integrated directly into modern podcast mixers to elevate the natural voice into a "broadcast" tone. Devices like the RØDECaster Pro II, Zoom PodTrak P8, and Tascam Mixcast 4 offer built-in processing chains.23 The RØDECaster, for example, licenses legendary studio processors: the APHEX Aural Exciter adds harmonic distortion to the upper frequencies, creating a crisp, sparkling intelligibility, while the APHEX Big Bottom processor utilizes phase-shifted compression to inject massive, resonant body into the 100 Hz to 150 Hz sub-vocal range.10 This allows even thin, reedy voices to sound warm, commanding, and professional in real-time, without artificially peaking the system.
Setting a Level for Recording Things That Aren’t Human Speech
Podcasts are rarely monolithic blocks of isolated dialogue. A professional soundscape is layered with intro and outro music beds, transitional sound effects (SFX), and archival audio clips. Integrating these non-vocal elements requires a deep understanding of frequency masking and relative gain staging.
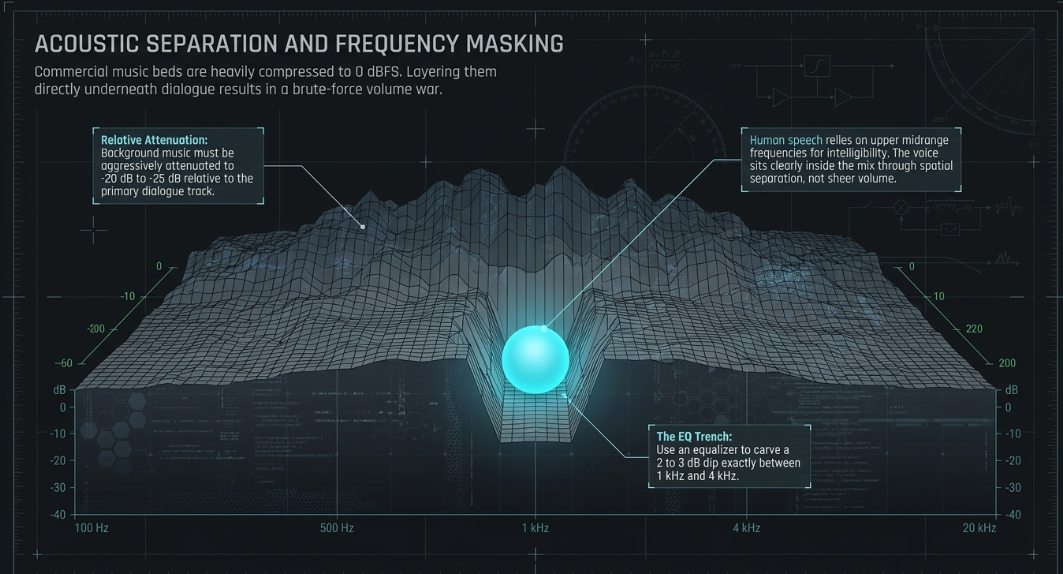
Music tracks and SFX files obtained from commercial royalty-free libraries are typically heavily mastered before they are ever downloaded. They are already dynamically compressed and maximized to hit 0 dBFS or a punishingly loud -14 LUFS.58 If these fully mastered files are dropped directly into a DAW timeline alongside a raw vocal track recorded conservatively at -18 dBFS, the music will instantly drown out the host, creating an amateurish mix.58
Audio engineers must ruthlessly attenuate non-speech elements to create necessary acoustic separation. As a general industry rule of thumb, background music beds playing underneath active dialogue should be reduced to between -20 dB and -25 dB relative to the primary vocal track.73 If the music features a sudden crescendo or dynamic shift, automated volume envelopes (or an advanced technique known as side-chain compression "ducking") must be employed to automatically pull the music down a few milliseconds before the host begins to speak.35
Furthermore, music often competes for the exact same critical frequencies that make human speech intelligible (specifically the upper midrange between 1 kHz and 4 kHz). Professional execution involves carving out an "EQ trench" in the music bed, utilizing an equalizer to dip those specific middle frequencies by 2 to 3 dB. This ensures the vocal sits comfortably "inside" the music, dominating the mix through frequency separation rather than fighting it in a brute-force volume war.
Getting a Good Take When Recording Outside
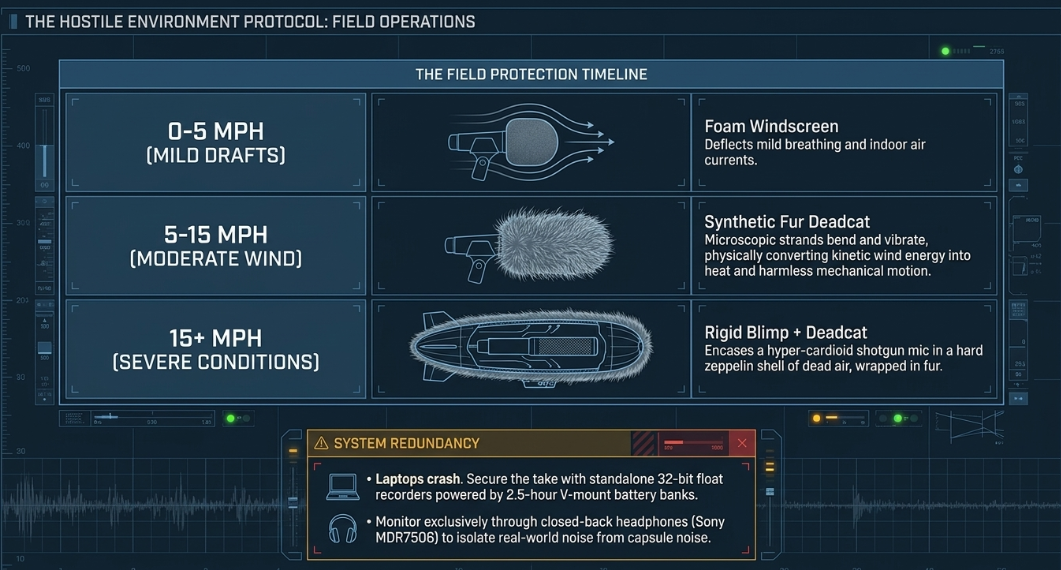
Field recording strips the audio engineer of their most vital asset: absolute environmental control. Moving outside of an acoustically treated studio introduces wind, unpredictable ambient transients, and severe weather constraints.28 Securing a good take outdoors demands highly specialized equipment and a defensive, paranoid recording strategy.
Environmental Selection and Profiling
Before placing a microphone, the location must be profiled for acoustic liabilities. Environments that seem subjectively quiet to the human ear often possess hidden low-frequency rumbles (distant highways) or intermittent high-frequency noise (cicadas, birds, aircraft). Once a suitable location is established, the engineer must record "room tone"—a mandatory, uninterrupted capture of at least 5 to 10 seconds of pure environmental silence with absolutely no one speaking.9 This silent file provides the exact noise footprint of the location. During post-production, advanced noise-reduction algorithms evaluate this profile to surgically extract the background hiss and rumble from the dialogue tracks without roboticizing or degrading the human voice.9
Hardware Fortification
Microphone selection must shift toward rugged, highly directional polar patterns. Omnidirectional lavaliers will capture every gust of wind and rustling leaf, while highly sensitive large-diaphragm studio condensers will distort under the immense acoustic pressure of an outdoor environment. Dynamic microphones, or highly directional shotgun microphones (hyper-cardioid) placed just out of frame, are mandatory for field deployment due to their superior off-axis rejection of ambient noise.13
Monitoring must be upgraded to strictly closed-back, over-ear headphones (such as the industry-standard Sony MDR7506).13 Earbuds or open-back headphones allow environmental noise to leak into the ear canal, making it completely impossible for the engineer to distinguish between the noise occurring in the real world and the noise actually hitting the recording capsule.
Wind Protection Mechanics
Standard foam windscreens are acoustically transparent and virtually useless against anything beyond a mild draft indoors.26 Outdoor execution requires robust physical diffusion to protect the capsule.
The deployment of a "Deadcat" (or a smaller "Dead Kitten" for lavalier microphones hidden under clothing) is highly critical.26 A deadcat is an acoustic slip-on cover made of specialized synthetic fur.78 When high-velocity wind strikes the microphone, the individual strands of synthetic fur act as microscopic shock absorbers. They bend and vibrate, physically converting the kinetic energy of the wind into heat and silent mechanical motion, safely scattering the air currents before they can penetrate the inner mesh and strike the microphone diaphragm.77
For maximum protection, the fur must remain dry and un-matted; clumped, wet fur creates solid walls that transmit, rather than diffuse, kinetic energy directly into the microphone.
System Redundancy and Power
Because the outdoor environment is highly volatile, digital fail-safes and robust power solutions are required. Power fluctuations, Bluetooth dropouts, and sudden screams from wildlife can ruin an unrepeatable field interview.11 Relying on laptops is dangerous; utilizing standalone field recorders or portable broadcast desks ensures that unstable software or dropped internet connections do not corrupt the file.13 To power these robust setups (such as a RØDECaster Pro paired with multiple cameras), engineers utilize high-capacity V-mount battery banks, which can easily supply 2.5 to 3 hours of uninterrupted continuous power, ensuring the rig doesn't die mid-interview.80 Finally, by integrating 32-bit float recorders into the mobile rig, the engineer mathematically guarantees that sudden, unpredictable loud noises will never result in digital clipping, allowing the production team to focus entirely on the subject matter rather than constantly riding the gain knobs.46
Conclusion
The execution of professional podcast audio is a highly rigorous technical discipline that demands the precise synchronization of acoustic environmental control, physiological awareness, hardware calibration, and advanced digital signal processing. Securing a flawless take is never an accident born of merely purchasing high-end equipment; it is the deliberate result of strategic capsule positioning, strict adherence to acoustic laws such as the 3:1 ratio, and mathematically rigorous gain staging utilizing targeted dBFS ceilings and LUFS broadcasting parameters. By proactively managing biological variables through host hydration and breath support, insulating digital data via 32-bit float architectures, and automating complex conversational dynamics with advanced algorithms like the Dugan Speech System, productions can entirely eliminate the destructive artifacts of digital clipping, phase cancellation, and mouth noise. Whether operating in a perfectly controlled, acoustically treated studio or battling the volatile elements in outdoor field conditions, applying these systematic acoustic principles ensures an elite, commercially competitive auditory experience that preserves absolute listener immersion.
Works cited
Podcast Like A Pro!, accessed May 14, 2026, https://www.soundonsound.com/techniques/podcast-like-a-pro
How to Get the Best Audio Quality Out of Your Podcast - RØDE, accessed May 14, 2026, https://rode.com/en-us/about/news-info/how-to-get-the-best-audio-quality-out-of-your-podcast
Audio Engineering for Podcasting: Tips and Techniques for Producing Engaging Podcasts, accessed May 14, 2026, https://www.mi.edu/in-the-know/audio-engineering-podcasting-tips-techniques-producing-engaging-podcasts/
The Complete Guide to Microphone Technique for Podcasters - Buzzsprout, accessed May 14, 2026, https://www.buzzsprout.com/blog/mic-technique-podcasting
A Basic Guide to Presentation Microphones - Shure USA, accessed May 14, 2026, https://www.shure.com/en-US/insights/a-basic-guide-to-mics-and-mic-techniques-for-presenters
Proper Audio Levels For Your Podcast - Audient, accessed May 14, 2026, https://audient.com/tutorial/proper-audio-levels-podcast/
Audio Levels for Podcasts and Video (Any Editing System!) Easy Fix! - YouTube, accessed May 14, 2026, https://www.youtube.com/watch?v=_vecHTGK7Yo
Strategies and a Suggested Standard Operating Procedure for Soundcheck | SoundGirls.org, accessed May 14, 2026, https://soundgirls.org/dialing-it-in-part-two-strategies-and-a-suggested-standard-operating-procedure-for-soundcheck/
How to block background fuzz or mouth sounds? : r/podcasting - Reddit, accessed May 14, 2026, https://www.reddit.com/r/podcasting/comments/ruakjt/how_to_block_background_fuzz_or_mouth_sounds/
RØDECaster Pro | Using Advanced Processing and Effects | RØDE (US), accessed May 14, 2026, https://rode.com/en-us/user-guides/rodecaster-pro/using-advanced-processing-and-effects
The ultimate podcast equipment guide for creators, accessed May 14, 2026, https://creators.spotify.com/resources/grow/podcast-equipment-guide
Microphone Tips and Tricks for Podcasting - PreSonus, accessed May 14, 2026, https://www.presonus.com/blogs/technical/microphone-tips-and-tricks-for-podcasting
Portable Podcast Setup: Essential Gear Guide for Field Recording, accessed May 14, 2026, https://thepodcastconsultant.com/blog/portable-podcast-setup
How To Make Your Podcast Sound Professional - YouTube, accessed May 14, 2026, https://www.youtube.com/watch?v=8aHy3QMI4XM
How to Position a Microphone for Great Audio on Your Podcast, accessed May 14, 2026, https://ringmaster.com/how-to-position-a-microphone-for-great-audio/
Microphone Techniques for Podcasting - YouTube, accessed May 14, 2026, https://www.youtube.com/watch?v=ZlOmbWL0ZDM
Podcast Microphone Positioning: Setup Guide & Accessories, accessed May 14, 2026, https://thepodcastconsultant.com/blog/podcast-microphones-position-accessories
In the Voiceover Studio: The Well-Positioned Microphone - Tuesday VO Tech Tip, accessed May 14, 2026, https://justaskjimvo.studio/well-positioned-microphone/
Improve Your Voice: Tips for a Better Podcast, accessed May 14, 2026, https://weeditpodcasts.com/improve-your-voice-tips-for-a-better-podcast/
Master Your Breath: Sound More Natural and Confident on the Mic - Nic Redman, accessed May 14, 2026, https://nicolaredman.com/master-your-breath/
Microphone Techniques - Shure, accessed May 14, 2026, https://www.shure.com/en-US/docs/education/Microphone-Techniques-for-Recording
Effectively Reduce Sibilance and Mouth Noises for Purer ..., accessed May 14, 2026, https://fifinemicrophone.com/blogs/news/effectively-reduce-sibilance-and-mouth-noises-for-purer-recordings
RØDECaster Pro II User Guide | How to Use the On-board Processing | RØDE (US), accessed May 14, 2026, https://rode.com/en-us/user-guides/rodecaster-pro-ii/how-to-use-the-on-board-processing
Podcast Problem: Terrible Mouth Noises - Wil Williams Writes, accessed May 14, 2026, https://wilwilliams.reviews/2017/06/26/podcast-problem-terrible-mouth-noises/
How mic placement affects the recorded sound of the voice - DPA Microphones, accessed May 14, 2026, https://www.dpamicrophones.com/mic-university/audio-production/how-mic-placement-affects-the-voice/
Tips for reducing wind and background noise from audio clips when filing outside? - Reddit, accessed May 14, 2026, https://www.reddit.com/r/videography/comments/lfaw8a/tips_for_reducing_wind_and_background_noise_from/
Standard Podcast Volume Levels and the Listening Experience - Glass Ivy, accessed May 14, 2026, https://glassivy.com/standard-podcast-volume-levels/
Tips for Recording Outdoors. Continue reading for tips to help you ..., accessed May 14, 2026, https://medium.com/podcast-clubhouse/tips-for-recording-outdoors-5aeff0f59840
Podcast Sound Design: Essential Elements, Effects & Music - daily.dev, accessed May 14, 2026, https://daily.dev/blog/podcast-sound-design-essential-elements-effects-and-music/
How Loud to Record Your Podcast, and How to Reach -16LUFS [TUTORIAL + DEMO], accessed May 14, 2026, https://www.youtube.com/watch?v=QhwZ-EkXY2g
Tascam Mixcast 4: You Don't Need The Rode Caster Pro - YouTube, accessed May 14, 2026, https://www.youtube.com/watch?v=PN239BCWF7Y
10 Tips for a Great Sounding Podcast - iZotope, accessed May 14, 2026, https://www.izotope.com/en/learn/10-tips-for-a-great-sounding-podcast
Miking 2 People: Microphone Placement to Avoid Bleed and Phase Issues - YouTube, accessed May 14, 2026, https://www.youtube.com/watch?v=6B-ekvkfYf4
What is the 3-1 Rule for Mic Placement? - Sage Audio, accessed May 14, 2026, https://www.sageaudio.com/articles/3-1-rule-mic-placement
How to stop particularly those red areas from clipping? : r/mixingmastering - Reddit, accessed May 14, 2026, https://www.reddit.com/r/mixingmastering/comments/vs4cgk/how_to_stop_particularly_those_red_areas_from/
3 1 Rule - DPA Microphones, accessed May 14, 2026, https://www.dpamicrophones.com/dict/3-1-rule/
accessed May 14, 2026, https://blog.fireside.fm/podcast-recording-best-practices-capturing-clear-professional-audio/#:~:text=Recording%20Tips,to%20prevent%20audio%20from%20distorting.
Sound Mixing 101: Compressors and Limiters | by Fourwind Films - Medium, accessed May 14, 2026, https://medium.com/fourwind-films/sound-mixing-101-compressors-and-limiters-81502299fe18
A Massively Oversimplified Guide to Loudness - The Simplecast Blog, accessed May 14, 2026, https://blog.simplecast.com/a-massively-oversimplified-guide-to-loudness
The Difference Between Bit Rate, Sample Rate & Bit Depth: Understanding Audio Basics, accessed May 14, 2026, https://www.waveroom.com/blog/bit-rate-vs-sample-rate-vs-bit-depth/
Understanding Sample Rate and Bit Depth in Digital Audio Production - LALAL.AI, accessed May 14, 2026, https://www.lalal.ai/blog/sample-rate-bit-depth-explained/
Bit Depth vs. Sample Rate: The Pro Audio Quality Master Guide - BOYA, accessed May 14, 2026, https://www.boyamic.com/blogs/microphone-bit-depth-explained
Audio requirements - Apple Podcasts for Creators, accessed May 14, 2026, https://podcasters.apple.com/support/893-audio-requirements
accessed May 14, 2026, https://www.boyamic.com/blogs/microphone-bit-depth-explained#:~:text=What's%20the%20best%20bit%20depth,%2F96kHz%2B%20(like%20BOYAMIC2).
What sample rate and bit rate do you record at? : r/podcasting - Reddit, accessed May 14, 2026, https://www.reddit.com/r/podcasting/comments/d5hhkf/what_sample_rate_and_bit_rate_do_you_record_at/
32-Bit Float: Eliminate Clipping & Gain Staging Headaches Instantly - BOYA, accessed May 14, 2026, https://www.boyamic.com/blogs/32-bit-float-recording
What is 32-bit Float Recording? | TASCAM - United States, accessed May 14, 2026, https://tascam.com/us/feature/32-bit_float
What are the actual benefits of recording in 32-bit float? - Sound Design Stack Exchange, accessed May 14, 2026, https://sound.stackexchange.com/questions/53160/what-are-the-actual-benefits-of-recording-in-32-bit-float
32-Bit Float: Everything You Need to Know - ZOOM, accessed May 14, 2026, https://zoomcorp.com/en/us/news/32-bit-float-everything-you-need-to-know/
Headroom and recording level - Windows - Audacity Forum, accessed May 14, 2026, https://forum.audacityteam.org/t/headroom-and-recording-level/54516
How To Use A Limiter And Prevent Clipping - Music Production Basics 06 - YouTube, accessed May 14, 2026, https://www.youtube.com/watch?v=AalShDtXKkU
An introduction to limiters (and how to use them) - iZotope, accessed May 14, 2026, https://www.izotope.com/en/learn/an-introduction-to-limiters-and-how-to-use-them
Why does 32-Bit Float get downplayed by professional sound engineers? - Reddit, accessed May 14, 2026, https://www.reddit.com/r/audioengineering/comments/1bew3gr/why_does_32bit_float_get_downplayed_by/
What audio level do you set your podcast at? - Reddit, accessed May 14, 2026, https://www.reddit.com/r/podcasting/comments/1esdh6l/what_audio_level_do_you_set_your_podcast_at/
Recording and Mixing Levels Demystified (updated) | by Mojo - Medium, accessed May 14, 2026, https://mojosarmy.medium.com/recording-and-mixing-levels-demystified-151ec65705fa
How loud (dB) should I aim when I'm recording stuff (vocals, synths, guitar etc) before starting to mix? - Reddit, accessed May 14, 2026, https://www.reddit.com/r/musicproduction/comments/tgk82r/how_loud_db_should_i_aim_when_im_recording_stuff/
Podcasting Levels: Tips and Standards for Publishing | B&H eXplora, accessed May 14, 2026, https://www.bhphotovideo.com/explora/pro-audio/tips-and-solutions/podcasting-levels-tips-and-standards-for-publishing
Help Understanding Gain Settings When Recording/Editing For Best Sound : r/podcasting, accessed May 14, 2026, https://www.reddit.com/r/podcasting/comments/1hgom00/help_understanding_gain_settings_when/
Standard Podcast Volume Levels: Everything You Need to Know - Media Pouch Studios, accessed May 14, 2026, https://pouch6studios.com/standard-podcast-volume-levels/
Fix Audio: Gain Staging & Mid-Range Noise Issues #shorts - YouTube, accessed May 14, 2026, https://www.youtube.com/shorts/caTp50lrKaA
How To prevent audio clipping WHILE recording podcast? - Reddit, accessed May 14, 2026, https://www.reddit.com/r/podcasting/comments/1hsmi8n/how_to_prevent_audio_clipping_while_recording/
Crackling sounds when laughing etc. - Podcasting - Audacity Forum, accessed May 14, 2026, https://forum.audacityteam.org/t/crackling-sounds-when-laughing-etc/50324
How to Use the Dugan Speech Automixer in Waves eMotion LV1 Classic - YouTube, accessed May 14, 2026, https://www.youtube.com/watch?v=TuwpTERJ4Ps
Don't understand Dan Dugan Automix Working principle : r/livesound - Reddit, accessed May 14, 2026, https://www.reddit.com/r/livesound/comments/1go4lm3/dont_understand_dan_dugan_automix_working/
Dugan Automixer Manual, accessed May 14, 2026, https://www.dandugan.com/Assets/manuals/Waves-Dugan-Automixer-Manual.pdf
Dugan Automixing Explained By Dan Dugan - Sound Speeds - YouTube, accessed May 14, 2026, https://www.youtube.com/watch?v=P_KSBx02jCI
Dugan Automixers Explained: Get Crystal Clear Dialog With This UNREAL Tool - YouTube, accessed May 14, 2026, https://www.youtube.com/watch?v=4eGSl0T2N1Q
Compare TASCAM Mixcast 4 vs RODE RODECaster Pro II vs RODE RODECaster Video S vs RODE RODECaster DUO - B&H Photo, accessed May 14, 2026, https://www.bhphotovideo.com/c/compare/TASCAM_Mixcast+4_vs_RODE_RODECaster+Pro+II_vs_RODE_RODECaster+Video+S_vs_RODE_RODECaster+DUO/BHitems/1623233-REG_1696424-REG_1927651-REG_1762232-REG
Tascam Mixcast 4 vs. Rodecaster Pro: Which Is Best For Podcasts & Streaming? - YouTube, accessed May 14, 2026, https://www.youtube.com/watch?v=Y0r3UnKyYGY
RØDECaster PRO II vs TASCAM Mixcast 4: they're... close enough?!? - YouTube, accessed May 14, 2026, https://www.youtube.com/watch?v=Y6lxOTZhn68
RØDECaster APHEX Big Bottom & Aural Exciter Settings #rodecasterpro #podcast #rodecasterproii - YouTube, accessed May 14, 2026, https://www.youtube.com/shorts/U0n5dlcRwDI
How to Use the Advanced Aphex Aural Exciter & Big Bottom on the RØDECaster Pro, accessed May 14, 2026, https://www.youtube.com/watch?v=o9rydDg0G4U
What is the rule of thumb on audio levels for Background Music vs Spoken Word? - Reddit, accessed May 14, 2026, https://www.reddit.com/r/VideoEditing/comments/10h6drk/what_is_the_rule_of_thumb_on_audio_levels_for/
**Question** Audio dB levels for voice and music? : r/NewTubers - Reddit, accessed May 14, 2026, https://www.reddit.com/r/NewTubers/comments/8c6w2s/question_audio_db_levels_for_voice_and_music/
Proper Audio Levels for Video Editors (Dialogue, Music & SFX Explained) [Works in Any ... - YouTube, accessed May 14, 2026, https://www.youtube.com/watch?v=sbCd91VG22w
Recording Equipment for Outdoors : r/podcasting - Reddit, accessed May 14, 2026, https://www.reddit.com/r/podcasting/comments/1e6uk2c/recording_equipment_for_outdoors/
Does A Deadcat Actually Reduce Microphone Wind Noise? - YouTube, accessed May 14, 2026, https://www.youtube.com/watch?v=j4SxaOW8CsA
How to Use a Deadcat? - Beverly Boy Productions, accessed May 14, 2026, https://beverlyboy.com/filmmaking/how-to-use-a-deadcat/
Dead Cat Microphones: Enhancing Audio Quality | Schulze Brakel, accessed May 14, 2026, https://www.schulze-brakel.com/blog/blog-10/dead-cat-microphones-enhancing-audio-quality-27
How to Podcast Outdoors | Tips for Filming YouTube Videos and Podcasts Outside, accessed May 14, 2026, https://www.youtube.com/watch?v=pWraOAfMDlc