File Formats and Settings
What Is Audio?
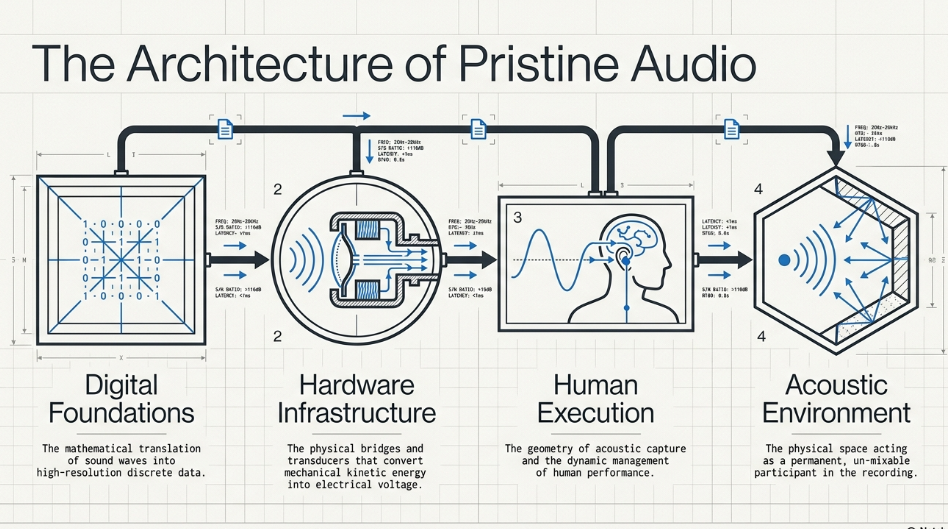
To master the execution of a podcast, one must first understand the fundamental physics of the medium. Audio, in its acoustic form, is the propagation of mechanical wave energy through a compressible medium, most commonly atmospheric air. These sound waves manifest as alternating cycles of high pressure (compression) and low pressure (rarefaction). When these oscillating pressure waves interact with a transducer—such as the tympanic membrane of the human ear or the diaphragm of a microphone—the mechanical kinetic energy is converted into a corresponding electrical signal. In the realm of analog recording, this electrical signal is continuous, fluctuating in voltage precisely in tandem with the acoustic pressure variations. However, the modern podcasting pipeline relies almost exclusively on digital infrastructure, necessitating the conversion of this continuous analog voltage into a discrete digital vocabulary.
Digital Audio, the Sample Rate, and the Bit Rate
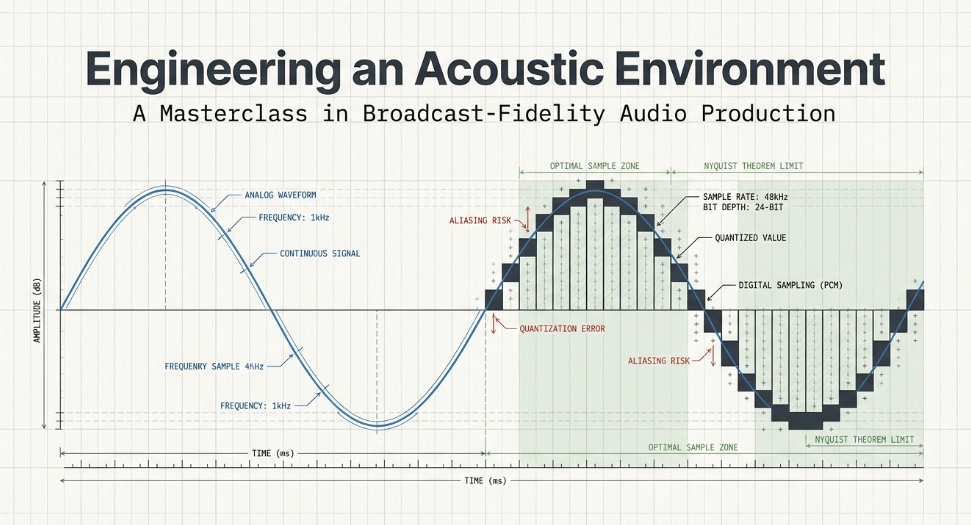
The translation from an analog waveform to a digital signal is achieved through an Analog-to-Digital Converter (ADC) using a process known as Pulse-Code Modulation (PCM).1 PCM captures the audio signal by mapping it across two specific axes: time and amplitude.
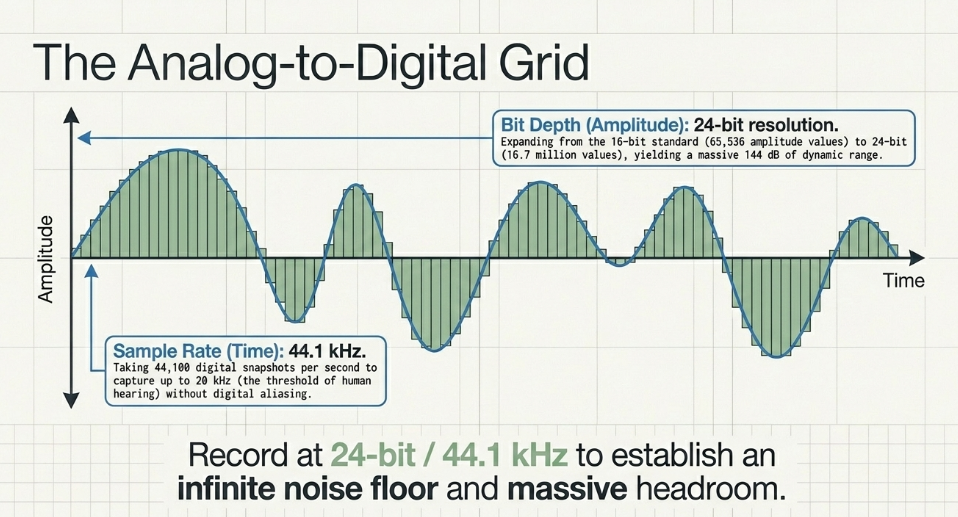
The temporal axis is governed by the sample rate, which dictates the frequency of digital snapshots taken of the continuous audio signal per second. Measured in kilohertz (kHz), the sample rate determines the highest frequency that can be accurately captured, a principle governed by the Nyquist-Shannon sampling theorem.2 Because the threshold of human hearing extends up to approximately 20 kHz, a sample rate must be at least double this frequency to prevent digital aliasing. Consequently, 44.1 kHz (44,100 samples per second) was established as the compact disc standard and remains the baseline for most spoken-word podcasting.2 Many modern audio interfaces and digital audio workstations (DAWs) support higher sample rates, such as 48 kHz, 88.2 kHz, 96 kHz, 176.4 kHz, and 192 kHz, which are often recommended for intensive audio processing or cinematic sound design.
The amplitude axis is governed by the bit rate, or more accurately, the bit depth. A bit is a single binary value (a zero or a one).2 The bit depth defines the resolution of each individual sample, directly correlating to the available dynamic range and the signal-to-noise ratio. A 16-bit depth, which is the distribution standard, allows for 65,536 possible amplitude values per sample, yielding a dynamic range of roughly 96 decibels (dB).1 In contrast, recording at a 24-bit depth expands the available amplitude values to over 16.7 million, providing a theoretical dynamic range of 144 dB. The prevailing industry standard dictates that all tracking and post-production processing should occur at a 24-bit depth to maintain extensive headroom and a negligible noise floor, before the final mix is dithered down to a 16-bit format for consumer distribution.
Compressed and Uncompressed File Formats: wav vs. mp3
Digital audio files are categorized into uncompressed formats, lossless compressed formats, and lossy compressed formats. Understanding the architectural differences between them is paramount for optimizing both archival quality and distribution efficiency.
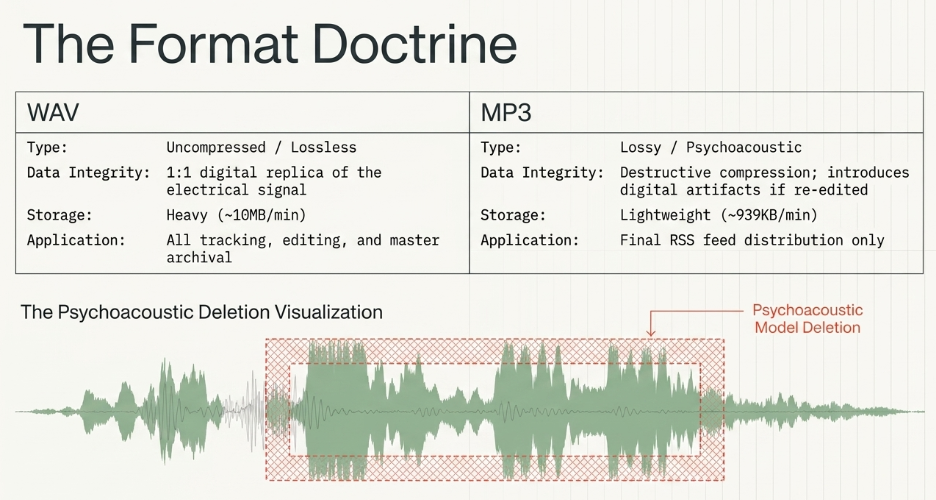
Uncompressed formats, predominantly WAV (Waveform Audio File Format) and AIFF, store the raw PCM data exactly as it was mathematically translated by the ADC.1 Because absolutely no acoustic data is discarded, WAV files represent a 1:1 digital replica of the electrical signal. They are lossless, making them the absolute gold standard for editing and producing.5 However, this extreme fidelity demands substantial storage infrastructure.
To overcome bandwidth limitations for mobile end-users, the podcasting industry relies on lossy compression codecs, with MP3 (MPEG-1 Audio Layer III) remaining the ubiquitous standard.2 The MP3 algorithm achieves drastic reductions in file size through psychoacoustic modeling. By analyzing the audio signal, the algorithm identifies and permanently discards data that the human auditory system is biologically incapable of perceiving—such as extremely high frequencies or quiet sounds occurring simultaneously with loud sounds (simultaneous masking).2 This process results in purposeful, irreversible degradation of the audio file.
Working with Files in the wav and mp3 Formats
The fundamental rule of podcast engineering is to decouple the production format from the distribution format. Because the MP3 format relies on destructive, lossy compression, it introduces digital artifacts.2 If a producer records an MP3, imports that MP3 into a DAW, applies equalization or compression, and then exports the project as a new MP3, the audio is subjected to cascading generations of psychoacoustic deletion. This recursive degradation quickly renders the human voice metallic, swishy, and fatiguing to the listener. Therefore, best practices dictate that all tracking, mixing, and editing must be conducted utilizing uncompressed WAV files, preserving the highest possible fidelity throughout the digital signal processing chain.5 The MP3 format must be reserved exclusively as the final container generated at the very end of the production pipeline, explicitly for RSS feed distribution.5
Stereo vs. Mono
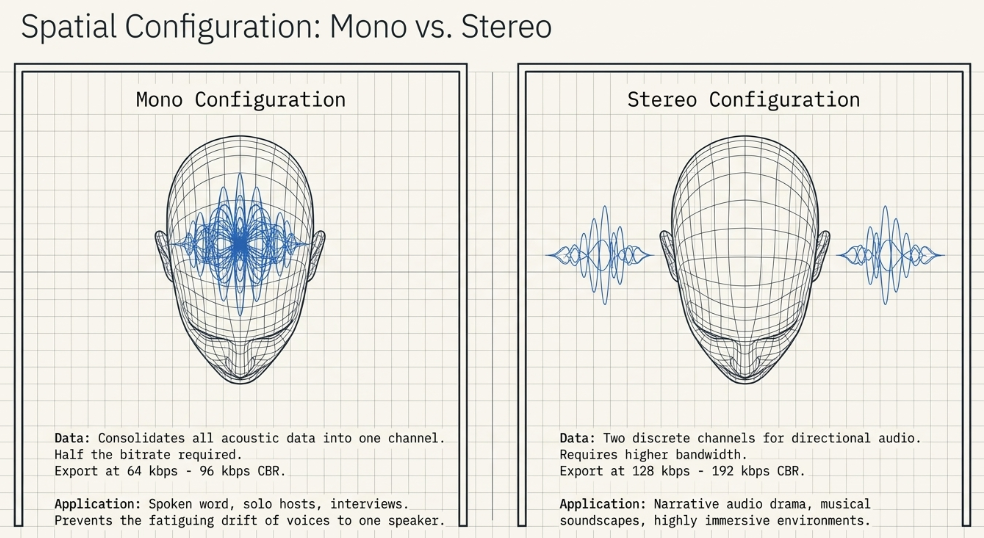
The spatial configuration of the podcast must align with its narrative intent. Mono (monaural) audio consolidates all acoustic data into a single channel. When played back through headphones, the listener hears the exact same signal in both the left and right ears.6 For the vast majority of podcasts—including solo spoken-word, interviews, and roundtable discussions—mono is highly recommended.5 It anchors the voices to the center of the listener's head, preventing the fatiguing phenomenon of one host drifting exclusively to the left speaker. Furthermore, because mono requires only one channel of data, it requires half the bitrate of stereo to achieve the same perceived quality, making it a highly efficient, lightweight file for mobile downloading.3
Stereo (stereophonic) utilizes two discrete channels, allowing the engineer to pan different acoustic elements across a horizontal left-right field.6 Stereo is essential for narrative storytelling, radio dramas, and podcasts where complex musical soundscapes and directional sound effects are vital to the emotional impact of the production.6 However, stereo files are inherently larger and require higher distribution bitrates (typically 128 kbps to 256 kbps) to maintain clarity.
Just Give Me the Executive Summary
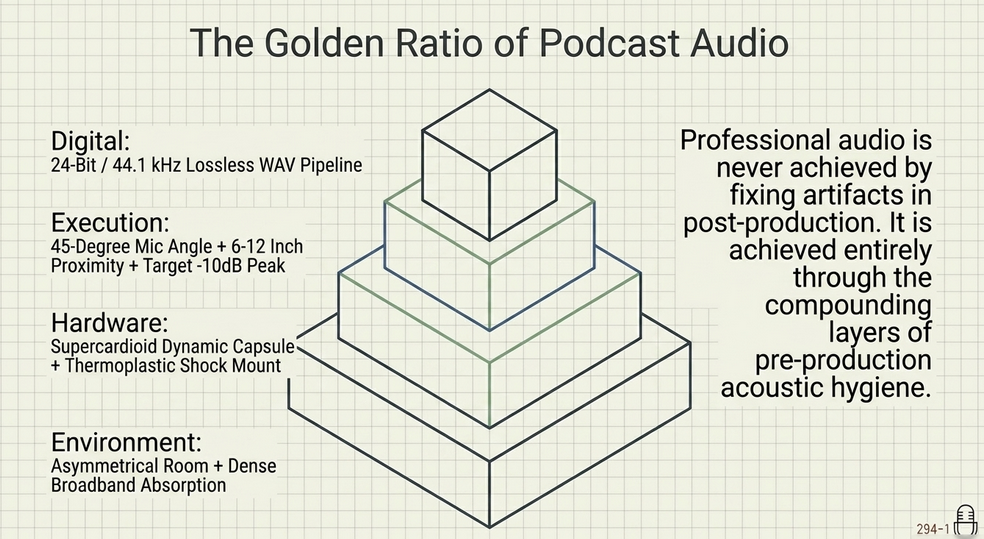
To synthesize Module 1: Podcasters should capture audio utilizing an uncompressed WAV format at a sample rate of 44.1 kHz or 48 kHz, paired with a bit depth of 24-bit to maximize dynamic range and headroom.1 All editing and processing should occur within this lossless WAV ecosystem to prevent artifact generation.5 Once the mix is finalized, spoken-word shows should be exported as a Mono MP3 at a Constant Bit Rate (CBR) of 64 kbps to 96 kbps, while music-heavy or immersive narrative shows should be exported as a Stereo MP3 at 128 kbps to 192 kbps.3 This workflow guarantees pristine master archives while delivering optimized, bandwidth-friendly files to the audience.
Choosing File Formats and Settings in Audacity
Audacity, an open-source Digital Audio Workstation, is a standard tool in the podcasting sector. Configuring Audacity properly before the recording button is engaged prevents catastrophic sample rate conversion errors later in the process.
Setting the Bit Rate and Sample Rate in Audacity
The foundational Project Rate, which determines the sample rate of the entire session and the eventual exported file, is governed by a selection box located at the bottom left of the Audacity interface.8 This must be explicitly set to 44100 Hz or 48000 Hz at the commencement of the project.3 Attempting to alter the sample rate of an individual track retroactively via the Track Drop-Down Menu is highly discouraged, as this alters the speed and pitch of the audio, destroying the recording.8 The bit depth of the uncompressed audio is determined during the export process. By selecting "WAV (Microsoft) signed 16-bit PCM" or 24-bit PCM in the Export File dialog, the producer sets the final amplitude resolution.8
Choosing Stereo or Mono in Audacity
When preparing a file for export, the producer must route the tracks appropriately. If a mono export is desired for an interview podcast, any stereo tracks must be split and mixed down to mono to prevent phase cancellation issues. During the export process, if MP3 is selected as the container, Audacity provides a configuration menu to select the bit rate mode (Constant vs. Variable) and the specific kbps threshold.3 A 96 kbps CBR mono setting will yield excellent voice quality, while 128 kbps CBR stereo will offer a robust soundscape for music-heavy podcasts.3
Bouncing Your Files in Audacity
The terms "exporting" and "bouncing" are often used interchangeably, representing the process of rendering a multitrack session, including all applied digital signal processing (DSP), into a single, flattened audio file.10 Bouncing is a critical workflow strategy. As a producer stacks multiple effects—such as compression, noise reduction, and equalization—the computer's CPU bears a heavy computational load. By bouncing a heavily processed track down to a new, raw WAV file, the CPU is relieved of calculating the real-time DSP, preventing playback stuttering and system crashes.
When bouncing files in Audacity, the visual sound meters must be monitored obsessively. Heavy DSP can inadvertently increase the overall amplitude of the track. If the bouncing green sound meters push all the way to the right and hit 0 dB, the resulting file will suffer from digital clipping.12 Prior to bouncing, it is often necessary to apply a Limiter or Normalize effect to ensure the highest peak remains safely below 0 dB.13 A nuance of digital processing is that exporting to MP3 slightly alters the waveform, which can occasionally cause the new file to exceed 0 dB even if the source WAV did not; thus, leaving a True Peak ceiling of -1.0 dB before bouncing is a widely adopted professional safeguard.13
Gear
Dealing with Background Noise When Recording at Home
The transition from file architecture to physical hardware begins with the acoustic reality of the recording environment. Home environments are plagued by structural and airborne noise. HVAC systems, refrigerator compressors, distant traffic, and computer cooling fans produce a constant bed of low-to-mid frequency acoustic energy.15 Microphones are objective transducers; they do not possess the human brain's psychoacoustic ability to "tune out" constant hums. Consequently, combating background noise at home dictates the selection of every subsequent piece of hardware in the signal chain, prioritizing equipment with high mechanical isolation and narrow pickup patterns.
When to Record on a Smartphone
While modern smartphones feature sophisticated computational photography, their audio capabilities are severely limited for professional podcasting.18 Smartphones utilize microscopic electret condenser capsules designed with omnidirectional pickup patterns, engineered primarily to capture speech in proximity while rejecting background noise via aggressive algorithmic noise gating.18 This automatic gain control destroys the natural dynamic range of the human voice. Furthermore, smartphones lack the physical XLR inputs required to interface with broadcast-grade dynamic microphones.18 Recording on a smartphone should be reserved exclusively for absolute emergencies or transient voice memos, never as a primary tracking device for a published episode.18
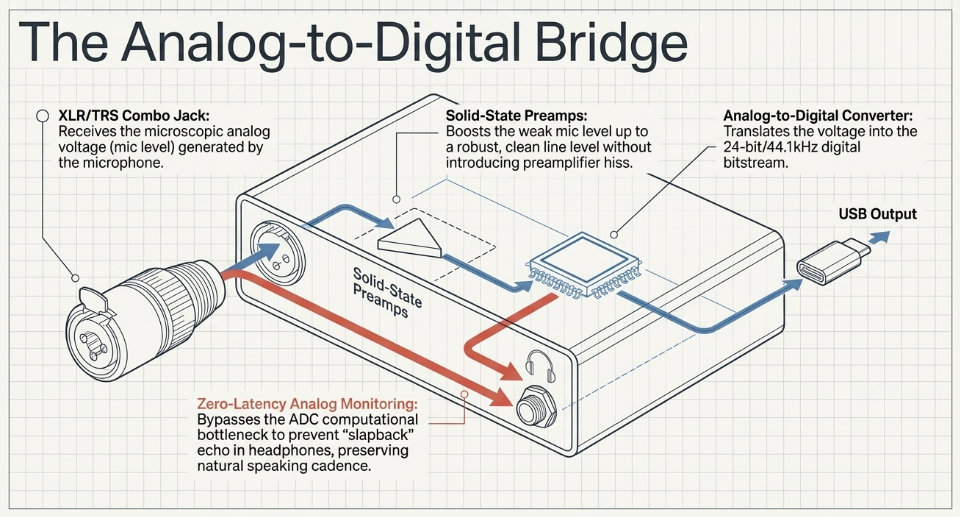
Audio Interface: The Analog to Digital Connection
To utilize professional microphones, a dedicated audio interface is a mandatory piece of infrastructure. The microphone generates a microscopic electrical voltage (mic level) that is far too weak to be digitized. The audio interface serves as the critical bridge, housing pre-amplifiers that boost the analog signal to line level, and ADC/DAC chips that convert the voltage into a digital bitstream that the computer can process.18
Inputs and Outputs
Modern audio interfaces feature a variety of connection topologies. The industry standard input is the XLR/TRS combination jack.4 The XLR connection accepts balanced microphone signals, while the center 1/4" TRS (Tip-Ring-Sleeve) connection accepts line-level instruments or external preamps.4 On the output stage, interfaces typically feature balanced 1/4" TRS main outputs to drive active studio monitor speakers, alongside a dedicated 1/4" headphone output for monitoring the session.4
The Audio Quality of the Presonus Studio 24c
The PreSonus Studio 24c serves as an exemplary case study of a prosumer podcasting interface. It is a compact, 2-in/2-out USB-C bus-powered device featuring solid-state XMAX-L microphone preamps.4 The unit's ADC architecture supports high-resolution 24-bit recording at sample rates up to 192 kHz, yielding a flat frequency response of 20 Hz to 20 kHz (±0.1 dBu).4 The preamps are noted for delivering transparent, clean gain, providing sufficient amplification for most standard condenser and dynamic microphones without introducing significant preamplifier hiss.21
Latency
A profound psychological and technical hurdle in digital recording is latency—the computational delay between the analog audio entering the interface, being processed by the DAW, and returning to the headphones.21 High latency produces a devastating "slapback" echo in the headphones that psychologically paralyzes a speaker, ruining their natural speaking cadence. The PreSonus Studio 24c circumvents this via a dedicated mixer knob that blends the zero-latency analog input signal directly with the computer's playback return, allowing the host to monitor their voice in real-time before it hits the ADC bottleneck.4 While the unit operates effectively at software buffer settings yielding 3ms of latency, relying on direct analog monitoring is the foolproof standard for podcast tracking.
Other Considerations
When evaluating bus-powered interfaces like the Studio 24c, it is critical to acknowledge power limitations. Because the unit draws its electrical current entirely from the computer's USB port, the internal headphone amplifier may lack the voltage necessary to drive high-impedance (e.g., 250-ohm or 600-ohm) audiophile headphones to a loud volume.21
Portable Recorders
When a podcasting production demands mobility—such as field interviews, capturing environmental soundscapes, or working in locations without access to AC power—a portable field recorder becomes an indispensable tool.18 Devices like the Zoom H5 or Roland R-07 function as standalone audio interfaces, housing their own preamps, ADCs, and digital storage via SD cards.18
Recording with the Inbuilt Microphones of a Portable Recorder
Most high-end portable recorders feature interchangeable capsule systems, commonly utilizing an X/Y stereo condenser microphone array.25 These inbuilt microphones are phenomenally adept at capturing "wild tracks"—ambient acoustic environments like a bustling coffee shop or a dense forest.25 Recording ambient sound in stereo provides narrative depth and a wide spatial image that cannot be achieved with a single mono microphone.25 However, because these inbuilt capsules are typically highly sensitive condensers, they are susceptible to handling noise; the recorder must be mounted to a stand or tripod to prevent the friction of the operator's hands from ruining the take.
Inputs and Outputs
Beyond the inbuilt capsules, portable recorders feature physical XLR/TRS combo inputs located at the base of the unit.27 This infrastructure provides immense flexibility, allowing the portable unit to act as the central hub for a multi-person interview. The device supplies +48V phantom power to these inputs, ensuring compatibility with the entire spectrum of professional microphones.
Using a Portable Recorder with an External Microphone
The true power of a portable recorder lies in bypassing its sensitive inbuilt capsules and plugging broadcast-quality dynamic microphones directly into its XLR inputs.18 This hybrid approach yields the pristine, isolated vocal quality of a studio environment while retaining the battery-powered freedom of a mobile rig. A podcaster can conduct a high-fidelity, dual-host interview in a remote location, writing uncompressed 24-bit WAV files directly to the device's internal storage.18
Other Considerations
While portable recorders are powerful, they introduce a workflow consideration in post-production: audio synchronization. If a podcaster is recording video simultaneously on a separate digital camera, the high-quality audio from the portable recorder must be manually synced with the camera's visual track in a non-linear editor (NLE) using a visual slate or clap.25
Headphones
The monitoring infrastructure is the final link in the hardware chain, and its selection is critical. The absolute standard for podcasting is closed-back, wired headphones.23 Closed-back designs feature sealed earcups that provide acoustic isolation, preventing the audio playing through the headphones (such as the voice of a remote co-host or a soundboard effect) from bleeding out and being captured by the live microphone—an error that causes destructive feedback loops and phase cancellation.23
Cables
Wired connectivity is a non-negotiable requirement in professional audio.23 Bluetooth and wireless headphones introduce inherent latency, data compression, and the risk of signal dropouts, making them entirely unsuitable for real-time critical monitoring where an engineer must hear exactly what the ADC is capturing.29 Furthermore, utilizing high-quality, balanced XLR cables for microphones is vital. Cheap cabling is highly susceptible to electromagnetic interference (EMI) and radio frequency interference (RFI), which manifests as a persistent hum or buzz in the audio signal.
Intermission
At this juncture, the signal chain is established. We have digitized the fundamental physics of sound, selected the appropriate lossless and lossy file containers, and established the analog-to-digital bridge via dedicated interfaces and portable recorders. The ensuing modules will dissect the primary acoustic interactors: microphones, physical isolation hardware, and the specific techniques required to extract optimal fidelity from human speech and complex acoustic environments.
Microphones
Sennheiser e945
Microphones are the most critical tools in a podcaster's arsenal, serving as the frontline transducers that interpret acoustic energy. The Sennheiser e945 represents an exceptional archetype of a broadcast-quality vocal microphone.16 Handcrafted in Germany, the e945 is heavily utilized in both live sound and spoken-word environments due to its specific physical and electro-acoustic characteristics.32
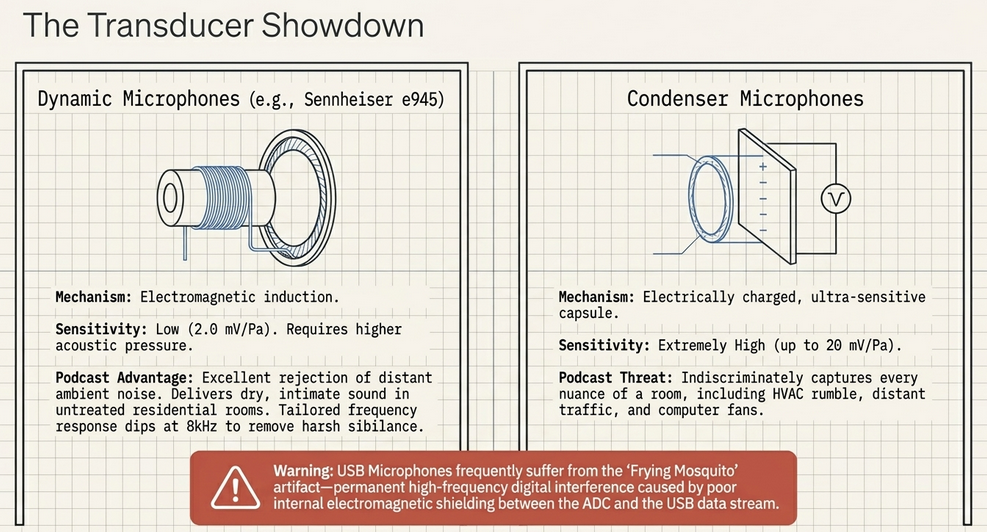
The Benefits of Dynamic Microphones for Podcasting
The e945 is a dynamic microphone. In contrast to condenser microphones—which utilize an electrically charged, ultra-sensitive diaphragm that indiscriminately captures every nuance of a room, including HVAC rumble and distant traffic—dynamic microphones operate via electromagnetic induction.15 They utilize a heavier diaphragm attached to a wire coil suspended within a magnetic field. Because this physical mechanism requires a higher threshold of acoustic pressure to induce an electrical current, dynamic microphones are inherently less sensitive. This apparent limitation is actually their greatest strength for podcasting; they excel at rejecting distant ambient noise and room reflections, isolating the speaker's voice and delivering a dry, intimate sound even in untreated residential rooms.16
Understanding Microphone Sensitivity
Microphone sensitivity dictates the efficiency with which the transducer converts acoustic pressure into electrical voltage. The Sennheiser e945 features a sensitivity rating of 2.0 mV/Pa (millivolts per Pascal) at 1kHz.34 While this is substantially lower than a typical condenser microphone (which might boast 20 mV/Pa), 2.0 mV/Pa is highly efficient for a dynamic capsule. This indicates that while it requires a robust preamplifier to reach optimal tracking levels, it is capable of capturing minute vocal transients and dynamic nuances without demanding excessive, noise-inducing artificial gain.32
Choosing a Microphone with an Appropriate Frequency Response
A microphone's frequency response is not merely a list of numbers; it is the sonic fingerprint of the device. The e945 exhibits a highly tailored frequency curve.36 It possesses a smooth, flat midrange extending from 2 kHz to 6 kHz, which anchors the fundamental frequencies of human speech.36 Crucially, it features a purposeful 2–3 dB dip around 8 kHz—the frequency zone responsible for harsh, piercing sibilance (the grating 's' and 't' sounds).36 This is followed by a slight boost at 11 kHz to provide "air" and upper-end transparency.36 Because of this specific topographical curve, the e945 is lauded for providing natural warmth to female and tenor voices without introducing the muddy, congested low-end proximity effect commonly associated with other industry-standard dynamics like the Shure SM58.
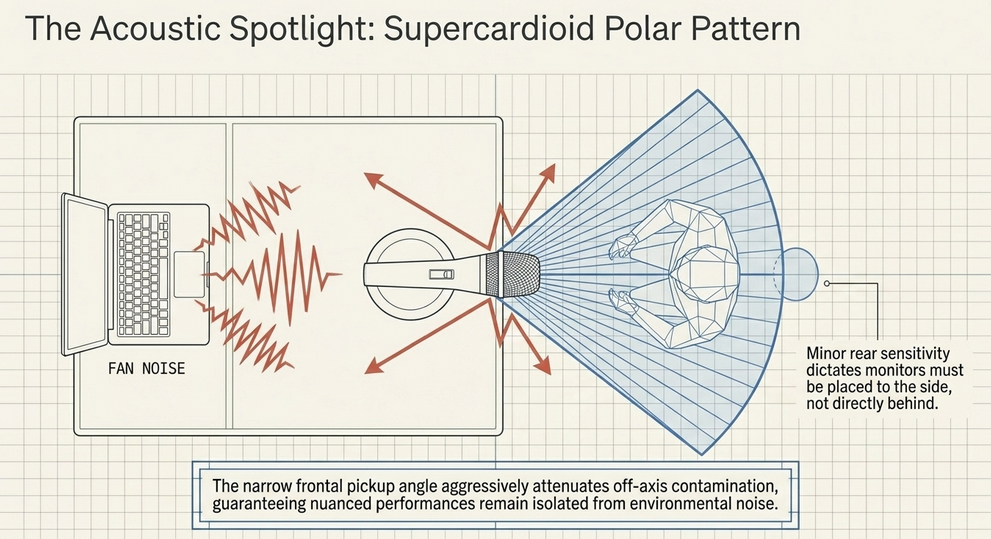
Polar Patterns and How They Help Reject Background Noise
A polar pattern maps a microphone's directional sensitivity. While standard cardioid microphones capture sound primarily from the front and reject audio from the rear (180 degrees), the e945 utilizes a supercardioid polar pattern.16
The supercardioid pattern acts as an acoustic spotlight. It provides an exceptionally narrow pickup angle, heavily rejecting unwanted off-axis noise bleeding in from the sides of the microphone.16 This guarantees that nuanced performances remain pristine and isolated from environmental contamination.16
USB Microphones
While XLR dynamic microphones represent the broadcast standard, USB microphones present an accessible, albeit compromised, alternative. A USB microphone circumvents the need for an external audio interface by housing the preamplifier, ADC, and DAC directly within the microphone chassis.15 While this provides simple plug-and-play operation for beginners, the miniaturized internal components frequently struggle with noise floor issues. A notorious phenomenon associated with lower-end USB microphones is the "frying mosquito" artifact—a high-frequency digital interference pattern burned into the signal path due to poor electromagnetic shielding between the USB data stream and the internal ADC.38 This specific type of digital interference is notoriously difficult to remove using standard noise reduction software without permanently damaging the vocal track.38
Microphone Stands
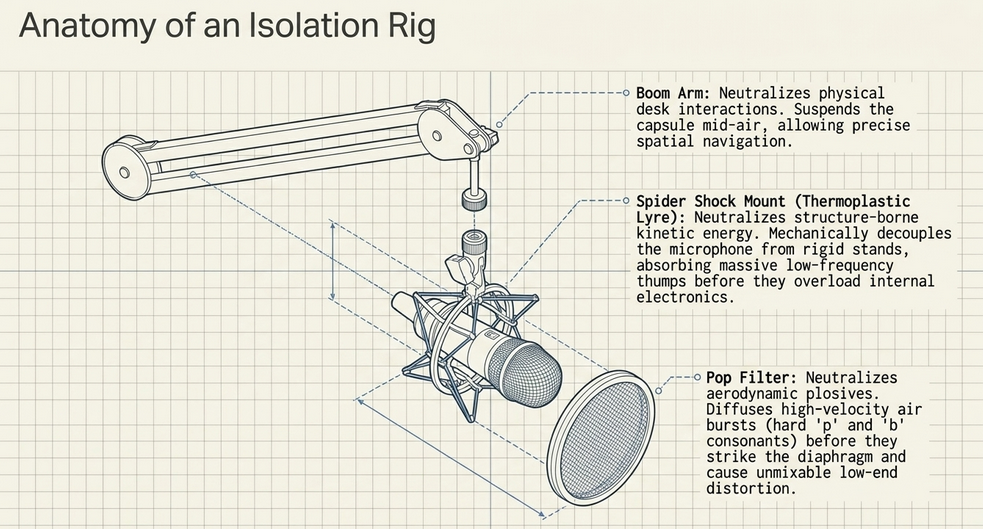
A microphone is utterly useless if it is not securely positioned. The utilization of a boom arm or a heavy-duty desk stand is required to navigate the capsule precisely into the speaker's acoustic sweet spot.39 Boom arms, which clamp to the edge of a desk, allow the host to suspend the microphone mid-air, freeing up desk space for notes and preventing physical interaction with the base of the stand.26
Spider Shock Mount
One of the most insidious forms of audio degradation is structure-borne noise. While microphones capture airborne sound waves, any physical vibration—from a host tapping the desk, typing on a keyboard, or low-frequency rumble from a passing subway—travels directly up the stand and resonates through the microphone chassis into the capsule.17 Even light finger brushes against a stand can register as massive, low-frequency thumps that drown out the speaker's voice.41
The solution is a spider shock mount. A shock mount mechanically decouples the microphone from the rigid stand utilizing an elastic suspension system.17 The microphone is cradled in a web of bands or specialized thermoplastics (such as the Rycote InVision Lyre system), which absorb kinetic energy and block the transfer of mechanical vibrations.40 While electronic low-cut filters can remove mild low-frequency rumble, severe kinetic impacts can overload the microphone's internal electronics and cause clipping; therefore, a shock mount provides critical mechanical insurance that an EQ plugin cannot replicate.
Mic Sock
Airborne kinetic energy presents another threat in the form of plosives. Plosives are concentrated bursts of air expelled from the human mouth during the articulation of hard consonants (such as 'p', 'b', and 'k'). When this aerodynamic burst slams into the sensitive diaphragm of a microphone, it causes a massive, unmixable low-end distortion.43 A mic sock (an acoustically transparent foam cover that slides over the grille) or a specialized nylon pop filter diffuses this air pressure, forcing it to scatter before it can strike the capsule.43 Crucially, a pop filter must be mounted a few inches away from the grille; if it physically touches the microphone, the kinetic energy of the air burst transfers directly through the mesh into the chassis, defeating the acoustic diffusion.43
Summary
Module 3 establishes that the selection of a supercardioid dynamic microphone, such as the Sennheiser e945, provides the highest degree of vocal isolation and off-axis noise rejection.16 However, the microphone must be paired with the appropriate mechanical isolation hardware—specifically a thermoplastic shock mount and a properly positioned pop filter—to protect the transducer from structure-borne vibrations and aerodynamic plosives.
Getting a Good Take
Sound Check... Check... 1... 2...
The acquisition of high-end equipment does not guarantee high-fidelity audio; proper operational technique is equally vital. The recording process must always commence with a rigorous sound check.44 A sound check is not merely uttering "testing"; it requires the host and guests to speak at the exact conversational volume, cadence, and intensity they will utilize during the actual recording, ensuring the ADC is calibrated to real-world conditions.
Positioning the Microphone for Recording Speech
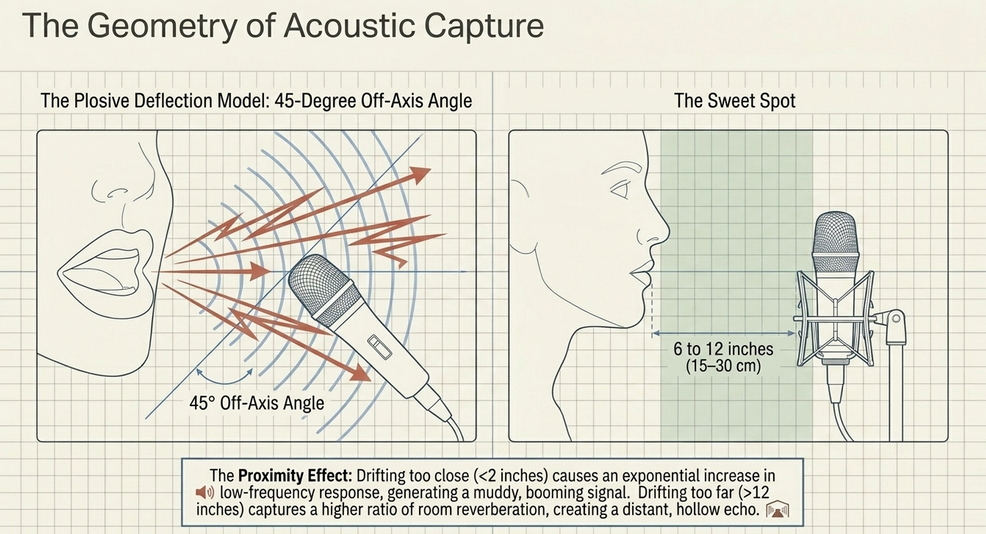
The acoustic interaction between the human mouth and the microphone capsule dictates the fundamental tonality of the recording. Generally, the microphone should be positioned at a distance of 6 to 12 inches (15 to 30 cm) from the speaker's mouth.45 This spatial zone is universally recognized as the "sweet spot."
Setting the Best Angle for the Microphone
Microphone placement must also address the directional nature of human speech. If a highly directional microphone is placed perfectly parallel and dead-center to the mouth, it is placed directly in the firing line of high-velocity plosives and harsh sibilance. To mitigate this without sacrificing vocal clarity, the microphone should be positioned at a 45-degree angle, pointing slightly off-axis toward the mouth.43 This technique allows the powerful, directed bursts of air to pass smoothly across the front of the capsule, while the primary vocal frequencies are still seamlessly captured by the supercardioid polar pattern.43
Setting the Distance Between the Microphone and the Speaker
The distance between the speaker and the capsule fundamentally alters the frequency response due to the proximity effect. The proximity effect is an acoustic phenomenon inherent to all directional microphones, characterized by a massive, exponential increase in low-frequency response as the sound source moves closer to the diaphragm.45 If a host is 2 inches away, the proximity effect generates a booming, muddy, and overly bass-heavy signal that decimates speech intelligibility.32 Conversely, if a host drifts 24 inches away, the direct vocal signal weakens, and the microphone captures a higher ratio of room reverberation, resulting in a distant, hollow echo.45 Maintaining the strict 6-12 inch discipline balances intimacy with clarity.43
Avoiding the Recording of Mouth Noises
The off-axis, 45-degree positioning technique is also highly effective at preventing the capture of transient mouth noises, such as lip smacking, saliva clicks, and heavy nasal breathing. These high-frequency artifacts are highly directional; by angling the microphone slightly away from the direct oral trajectory, the physical geometry of the acoustic capture inherently filters out these undesirable human noises.43
Positioning the Microphone for Different Types of Recordings
In specialized scenarios, such as video podcasting or theatrical voice-acting where a microphone must remain hidden from the camera, alternate positioning is required. Extensive acoustic testing dictates that mounting a lavalier or boom microphone on the forehead or slightly above the head, pointing down at the mouth, yields an exceptionally natural sound.46 In stark contrast, placing a microphone below the chin or on the chest creates the worst possible acoustic shadow; the physical mass of the jaw blocks higher frequencies, resulting in the complete destruction of the 2-4 kHz frequency range, requiring massive artificial equalization to restore basic speech intelligibility.
Setting Levels
Gain staging is the architectural process of managing audio amplitude through the analog and digital signal path to maximize the signal-to-noise ratio while strictly preventing clipping.33 The preamplifier's gain knob dictates the magnitude of the analog signal being pushed into the ADC.47
Recording Sufficient Audio Data
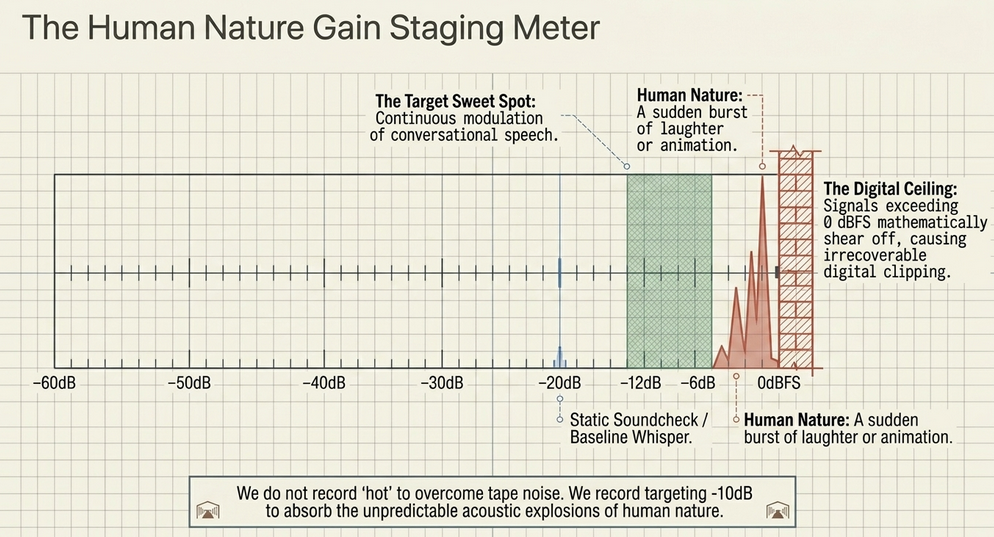
A pervasive and dangerous fallacy—inherited from the era of analog magnetic tape—is the belief that one must record "hot" (pushing the meters as close to 0 dB as possible) to overcome the inherent noise floor of the recording medium.47 Modern 24-bit digital interfaces possess astronomical dynamic range and an exceptionally low noise floor.33 Therefore, the contemporary standard is to record with generous headroom, allowing for the capture of pristine, unclipped data that can be safely amplified during the post-production mixing phase.47
Peaking
The digital ceiling is absolute. If an audio signal exceeds 0 dB Full Scale (dBFS), the ADC runs out of binary values to represent the amplitude. The top of the waveform is mathematically sheared off, resulting in harsh, irrecoverable digital distortion known as clipping.47 To prevent peaking, visual metering must be strictly observed.
Setting a Level for Recording Human Speech
To set a healthy recording level, the host should speak at performance volume while the engineer adjusts the preamp gain. The visual meters in the DAW should peak reliably within the "green" or "yellow" zones, generally targeting transient peaks hitting around -10 dB to -6 dB.47 The core philosophy is to continuously modulate the signal into the mid-range without ever allowing the transient spikes to threaten the 0 dB threshold.48
Making Allowances for Human Nature
An experienced audio engineer, such as Corey Marie Green, understands that setting levels requires "Making Allowances for Human Nature".49 A host is not a synthesized test tone. Over a two-hour recording session, human nature dictates that speakers will become animated, burst into sudden laughter, lean back in their chairs due to spinal fatigue, or pivot their heads to address a co-host.50 If gain levels are set perfectly to a static, whispered sound check, the first burst of laughter will instantly clip the ADC.47 The -10 dB target provides a vital dynamic safety net to absorb these sudden acoustic explosions.47 Furthermore, human nature dictates how the final product is consumed. Listeners frequently use low-quality earbuds in noisy environments like subways.50 This necessitates aggressive post-production processing—specifically, utilizing software like Auphonic or a DAW compressor—to level the disparate volumes of different hosts, outputting a final mix normalized to -16 LUFS (stereo) or -19 LUFS (mono) with a True Peak limit of -1.0 dB to guarantee maximum intelligibility in compromised environments.
Setting a Level for Recording Things That Aren’t Human Speech
Capturing non-vocal audio—such as Foley effects, acoustic instruments, or environmental ambiences—demands a recalibration of technique. Human speech is relatively contained, with vowels sitting between 350 Hz and 2 kHz, and consonants living between 1.5 kHz and 4 kHz.37 Environmental soundscapes possess a vastly broader frequency spectrum and violently unpredictable dynamic range (e.g., a quiet forest suddenly interrupted by a thunderclap or a passing siren). Consequently, when recording wild tracks, preamplifier gain levels must be set even more conservatively to prevent catastrophic clipping from unpredictable transient spikes.37
Getting a Good Take When Recording Outside
Recording in the field introduces massive acoustic variables, predominantly wind. Even a slight breeze striking a microphone diaphragm will cause severe, low-frequency rumble that destroys the recording. When tracking outside with a portable recorder or shotgun microphone, the deployment of heavy acoustic diffusion—such as a synthetic fur "deadcat" or a rigid blimp system—is mandatory to break up the wind currents before they interact with the capsule. Crucially, producers must capture 10 to 20 seconds of pure, isolated "room tone" or environmental silence prior to speaking.53 This isolated noise profile is essential; it is fed into advanced post-production de-noising algorithms (like iZotope RX or Audacity's Noise Reduction), allowing the software to mathematically subtract the constant background hiss of nature from the vocal track without inducing underwater-sounding artifacts.52
Summary
Module 4 solidifies the operational execution of the recording phase. Optimal fidelity relies on maintaining strict 6-12 inch microphone discipline, angling the capsule at 45 degrees to avoid plosives, and setting conservative gain levels (-10 dB peaks) to absorb the unpredictable dynamic swings of human nature.43 By capturing sufficient headroom and utilizing room-tone profiles, the producer ensures the raw data is pristine and primed for post-production processing.
Recording Inside
Recording in a Studio
The physical dimensions, geometric shape, and material surfaces of the room in which a podcast is recorded exert a profound and permanent influence on the audio quality. A poor acoustic environment imprints itself onto the recording via reverberation (echo), comb filtering, and low-frequency resonance—artifacts that no equalizer can completely eliminate.55
A professional recording studio represents the pinnacle of acoustic control. These spaces are meticulously engineered to achieve absolute isolation from the outside world.
What’s in a Studio?
Professional studios utilize "room-within-a-room" construction, featuring floating floors resting on neoprene pucks and decoupled, multi-layered drywall to sever any mechanical transmission of structure-borne noise from the surrounding building.57 Inside the room, the acoustic response is neutralized utilizing extensive broadband absorption, tuned bass traps, and quadratic residue diffusers to eliminate standing waves and flutter echo, ensuring the microphone captures only the pure, direct signal of the human voice.57
Public Libraries and Community Spaces
Accessing a multi-million-dollar facility is rarely feasible for independent podcasters. Fortunately, public libraries and community spaces have emerged as invaluable alternatives.49 Many modern library systems, recognizing the cultural shift toward independent media creation, have constructed dedicated podcasting studios or media labs available to the public.60 These spaces provide acoustically treated environments and often supply broadcast-quality hardware, dramatically lowering the barrier to entry.60
Radio Stations
Local and community radio stations also provide access to heavily treated acoustic environments.49 Station managers are occasionally willing to barter studio time in exchange for airing the independent podcast on their broadcasting schedule, creating a symbiotic relationship that yields pristine audio quality.56
Recording at Home
The overwhelming majority of podcasts are recorded in residential spaces, which present significant acoustic challenges. Standard residential architecture—characterized by parallel plasterboard walls, hard wooden floors, and glass windows—is highly reflective, causing sound waves to bounce erratically, creating a hollow, reverberant sound.15
Reducing Background Noise
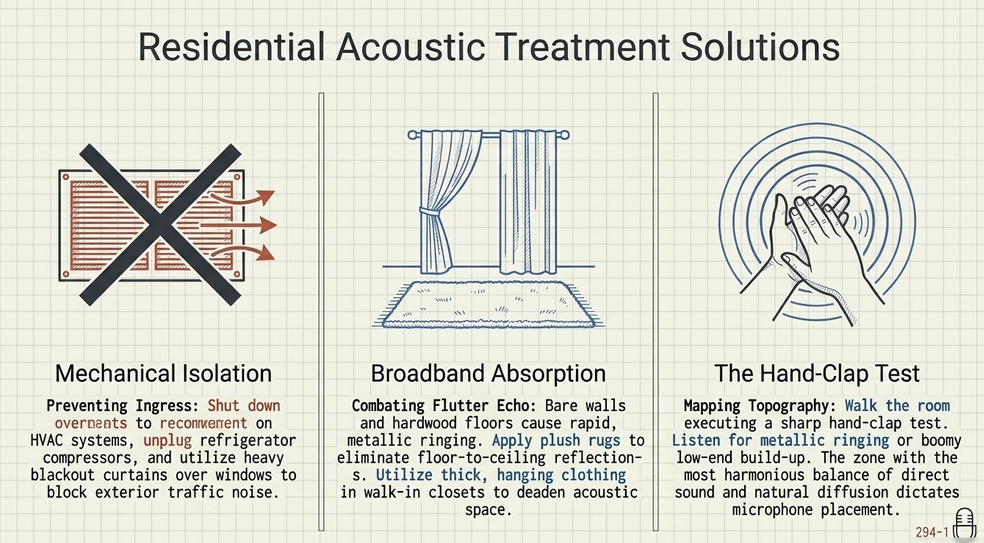
Before addressing room reflections, the producer must mitigate noise ingress. This requires practical, mechanical interventions: shutting down the HVAC system, closing all windows, unplugging noisy refrigerators during the tracking session, and utilizing heavy, dense blackout curtains over windows to dampen high-frequency airborne noise from exterior traffic.56
Consider the Size of Your Room
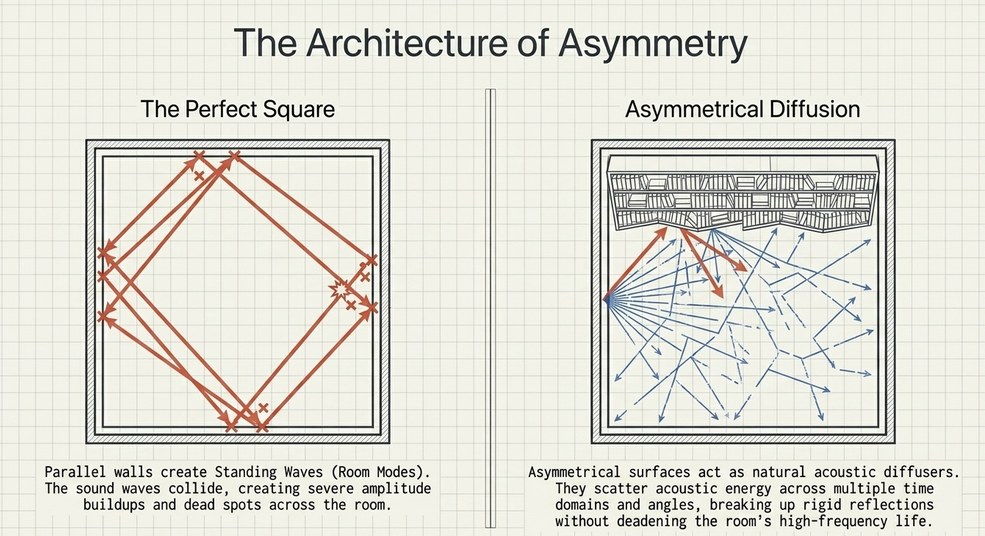
The geometric dimensions of a residential room dictate its acoustic resonance. Parallel walls are notoriously problematic because they create "standing waves" or room modes.62 When the physical distance between two walls perfectly matches the wavelength of a specific low-frequency sound, the acoustic waves collide, creating severe amplitude buildups (antinodes) and complete dead spots (nodes) at mathematically predictable intervals across the room.62
Acoustic theory dictates that the ideal dimensions for a recording space follow the Greek Golden Mean proportions—a ratio of 1:1.6:2.6 (Height x Width x Length).63 For a room with a standard 8-foot ceiling, optimal dimensions would be 8 feet tall, 13 feet wide, and 21 feet long.63 Larger rooms are generally superior to small, boxy rooms because they allow sound waves to travel further and lose kinetic energy before striking a boundary, preventing the rapid, aggressive short-delay reflections that muddy the human voice.62 A perfectly square room is the worst possible geometry, as it creates identical resonant frequencies across all three axes, compounding the standing wave phase issues.62
Look for Asymmetrical Surfaces to Randomize Reflections
While acoustic symmetry is critical in a mixing or control room (to ensure an accurate, centered stereo image from the playback monitors), a room dedicated strictly to capturing audio via a microphone actually benefits from physical irregularity.49 If a podcaster must work in an oddly shaped room, an L-shaped space, or a room with slanted ceilings, these anomalies should be embraced.64
Asymmetrical surfaces act as natural acoustic scatterers.49 By randomizing the angles at which sound waves impact boundaries, asymmetry prevents the formation of rigid, sustained standing waves between parallel walls.65 Producers can intentionally introduce asymmetry and randomize reflections by utilizing common household furniture. A large, densely packed bookshelf, for example, acts as a phenomenal acoustic diffuser.65 Because the books are of varying depths and heights, they scatter acoustic energy across multiple time domains and angles, breaking up the intensity of the reflection without completely deadening the room's natural high-frequency liveliness.65
Consider the Surfaces of the Walls, Floor, and Ceiling
To combat flutter echo—the rapid, metallic ringing caused by sound bouncing between bare, parallel walls—the introduction of acoustic absorption is mandatory.57 While professional 2-inch pyramid acoustic foam or high-density fiberglass panels placed at the primary reflection points are ideal, household items can substitute effectively.15 Laying down thick, plush rugs on hardwood floors eliminates floor-to-ceiling reflections, while suspending heavy blankets or utilizing thick curtains across glass surfaces acts as broadband high-frequency absorption.15
Finding a Place to Record at Home
When selecting the optimal room within a house, podcasters must prioritize mass and diffusion. A large walk-in closet is frequently utilized by voice actors; the irregular, soft surfaces of hanging clothing provide immense, dense absorption that completely deadens the acoustic space, yielding an incredibly dry, intimate vocal recording.55 Alternatively, a densely furnished living room with plush couches, rugs, and bookshelves will almost always sound superior to a sparsely decorated, perfectly square spare bedroom.62
Listening to the Space
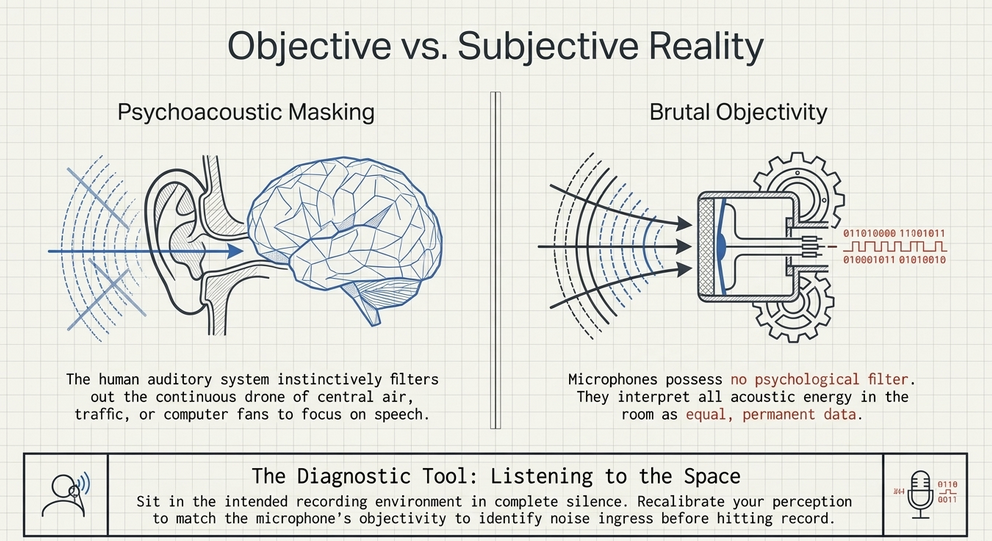
The ultimate diagnostic tool for acoustic evaluation is the practice of "listening to the space." This concept bridges audio engineering with acoustic anthropology, requiring the producer to sit in the intended recording environment in complete silence and actively monitor the ambient noise profile.49
The human auditory system is governed by psychoacoustic masking; the brain instinctively filters out the continuous hum of central air conditioning, the distant drone of traffic, or the high-pitched whine of a computer fan.50 Microphones, however, possess no psychological filter; they capture all acoustic energy with brutal objectivity.50 By engaging in deep, active listening, the podcaster recalibrates their perception to match the microphone's objectivity, allowing them to identify and eliminate noise sources prior to hitting record.50
Furthermore, listening to the space allows the producer to map the room's acoustic topography. By walking through the room and executing a sharp hand-clap test, the producer can listen for the metallic ring of flutter echo or the boomy build-up of low frequencies.69 This process identifies the room's acoustic "sweet spot"—the precise physical location where the balance of direct sound and natural room diffusion is most harmonious, dictating exactly where the microphone stand should be deployed.45
Summary
Module 5 concludes that the physical environment is an active participant in the recording process. While professional studios provide absolute isolation, podcasters can achieve broadcast fidelity in residential spaces by understanding the physics of their room.57 By avoiding small, square rooms, leveraging asymmetrical surfaces like bookshelves to diffuse reflections, and applying dense absorption to tame parallel walls, the acoustic energy of the human voice can be controlled.49 Finally, the rigorous practice of "listening to the space" guarantees that the objective reality of the microphone is accounted for, yielding pristine, isolated audio ready for global distribution.50
Works cited
Audio requirements - Apple Podcasts for Creators, accessed April 30, 2026, https://podcasters.apple.com/support/893-audio-requirements
Digital Audio Basics - UW-IT, accessed April 30, 2026, https://uwconnect.uw.edu/it?id=kb_article_view&sysparm_article=KB0034708
MP3 Export Options - Audacity Manual, accessed April 30, 2026, https://manual.audacityteam.org/man/mp3_export_options.html
Studio 24c - PreSonus, accessed April 30, 2026, https://www.presonus.com/products/studio-24c
Wav or MP3 file ? : r/podcasting - Reddit, accessed April 30, 2026, https://www.reddit.com/r/podcasting/comments/1hm3bhd/wav_or_mp3_file/
Audio Encoding Tips & Best Practices - Simplecast, accessed April 30, 2026, https://help.simplecast.com/hc/en-us/articles/21953657868445-Audio-Encoding-Tips-Best-Practices
Clarifications Re: MP3 File Size and Stereo vs Mono - Podcast Engineering School, accessed April 30, 2026, https://podcastengineeringschool.com/clarifications-re-mp3-file-size-and-stereo-vs-mono/
Setting sample rate and bit depth of export - Windows - Audacity Forum, accessed April 30, 2026, https://forum.audacityteam.org/t/setting-sample-rate-and-bit-depth-of-export/33693
Export Audio - Audacity Manual, accessed April 30, 2026, https://manual.audacityteam.org/man/file_export_dialog.html
Should you export your track and then master the exported file, or can you master your track in the original project file? What are the pros and cons of either? : r/edmproduction - Reddit, accessed April 30, 2026, https://www.reddit.com/r/edmproduction/comments/8eufo1/should_you_export_your_track_and_then_master_the/
Exporting & Bouncing Loops or Stems - Logic Pro Tutorial #36 - YouTube, accessed April 30, 2026, https://www.youtube.com/watch?v=FJ3QcC5OWHo
Sound Quality Reduced on Player - Windows - Audacity Forum, accessed April 30, 2026, https://forum.audacityteam.org/t/sound-quality-reduced-on-player/37623
Exporting as WAV causes clipping - macOS - Audacity Forum, accessed April 30, 2026, https://forum.audacityteam.org/t/exporting-as-wav-causes-clipping/61958
Podcasting Levels: Tips and Standards for Publishing | B&H eXplora, accessed April 30, 2026, https://www.bhphotovideo.com/explora/pro-audio/tips-and-solutions/podcasting-levels-tips-and-standards-for-publishing
Podcast Recording Best Practices: Capturing Clear, Professional Audio - Fireside Blog, accessed April 30, 2026, https://blog.fireside.fm/podcast-recording-best-practices-capturing-clear-professional-audio/
The Sennheiser e945 Vs. e935, accessed April 30, 2026, https://www.sennheiser.com/en-us/stories/the-pulse/the-pulse-stories/the-sennheiser-e945-vs-e935
Do I Really Need a Shock Mount? - Neumann, accessed April 30, 2026, https://www.neumann.com/en-us/knowledge-base/neumann-im-homestudio/homestudio-academy/do-i-really-need-a-shock-mount
When to use an external microphone or recorder to make your podcasts | AppleInsider, accessed April 30, 2026, https://appleinsider.com/articles/19/04/20/when-to-use-an-external-microphone-or-recorder-to-make-your-podcasts
Professional Voice Recorder vs. Smartphone: Which One for High-Quality Audio Recording?, accessed April 30, 2026, https://tctecinnovation.com/blogs/daily-blog/professional-voice-recorder-vs-smartphone-which-one-for-high-quality-audio-recording
PreSonus Studio 24c review - MusicRadar, accessed April 30, 2026, https://www.musicradar.com/reviews/presonus-studio-24c-review
PreSonus Studio 24c Review: Compact 2×2 Interface with Studio One Integration?, accessed April 30, 2026, https://soundandsignal.co.uk/presonus-studio-24c-review/
PreSonus Studio 24c Audio Interface Review (audio quality test) - YouTube, accessed April 30, 2026, https://www.youtube.com/watch?v=s3a-MnP2GFA
The ultimate podcast equipment guide for creators, accessed April 30, 2026, https://creators.spotify.com/resources/grow/podcast-equipment-guide
The Presonus Studio 24c works better at 3ms latency setting than 6ms for reason, accessed April 30, 2026, https://jamosapien.com/t/the-presonus-studio-24c-works-better-at-3ms-latency-setting-than-6ms-for-reason/3783
Pocket Recorder vs. a Dedicated Mic To Smartphone? : r/LocationSound - Reddit, accessed April 30, 2026, https://www.reddit.com/r/LocationSound/comments/1mv5jmh/pocket_recorder_vs_a_dedicated_mic_to_smartphone/
The Podcast Engineering Show - Deezer, accessed April 30, 2026, https://www.deezer.com/en/show/428142
The Podcaster's Audio Handbook – a review | 4PR – Voice of the People, accessed April 30, 2026, https://4pr-voice-of-the-people.com/2022/02/07/the-podcasters-audio-handbook-a-review/
Abstractive Summary Generation of Meeting Audio Files | Request PDF - ResearchGate, accessed April 30, 2026, https://www.researchgate.net/publication/390452366_Abstractive_Summary_Generation_of_Meeting_Audio_Files
Podcast Equipment Guide: From Beginner to Pro - The How This Works show, accessed April 30, 2026, https://www.howthisworks.show/podcast-equipment-guide
Podcast Equipment Guide: What I Recommend After 500 Episodes - Buzzsprout, accessed April 30, 2026, https://www.buzzsprout.com/blog/podcast-equipment-guide
Sennheiser e945 Dynamic Mic Review / Test - Podcastage, accessed April 30, 2026, https://podcastage.com/rev/e945
Sennheiser e945 Supercardioid Dynamic Microphone Review, accessed April 30, 2026, https://microphonegeeks.com/sennheiser-e945-supercardioid-dynamic-microphone-review/
Gain Staging 101 - ION Audio, accessed April 30, 2026, https://support.ionaudio.com/en/support/solutions/articles/69000802582-gain-staging-101
Dynamic Vocal Microphone e 945 - Sennheiser, accessed April 30, 2026, https://www.sennheiser.com/en-us/catalog/products/microphones/e-945/e-945-009422
e 945 - Sennheiser, accessed April 30, 2026, https://docs.cloud.sennheiser.com/en-us/evolution-wired/evolution-wired/specifications-e945.html
E935 vs. E945: Sennheiser's Good-Value Dynamic Mics on an Impartial Comparison | by Meraj Mohammadi O. | Medium, accessed April 30, 2026, https://medium.com/@meraj.m/e935-vs-e945-sennheisers-good-value-dynamic-mics-on-an-impartial-comparison-d996ee8fb7da
A Guide to Audio Processing and FX For Podcasting (GB) - RØDE, accessed April 30, 2026, https://rode.com/en-gb/about/news-info/a-guide-to-audio-processing-and-fx-for-podcasting
re: recording in higher quality than when exporting... - Audacity Forum, accessed April 30, 2026, https://forum.audacityteam.org/t/re-recording-in-higher-quality-than-when-exporting/37664
Everything You Need to Start a Podcast - Shure, accessed April 30, 2026, https://www.shure.com/en-US/insights/everything-you-need-to-start-a-podcast
Do You Need a Microphone Shock Mount? A Complete Guide | NearStream Official, accessed April 30, 2026, https://www.nearstream.us/blog/ultimate-guide-to-mic-shock-mount-setup
Why would you need a shock mount when you have a microphone stand? - Reddit, accessed April 30, 2026, https://www.reddit.com/r/ACX/comments/vpkcc6/why_would_you_need_a_shock_mount_when_you_have_a/
Everything You Need to Know About Shock Mounts: Types, Uses & Top Picks, accessed April 30, 2026, https://www.maono.com/blogs/news/everything-you-need-to-know-about-shock-mounts-types-uses-top-picks
How do you know where is the perfect mic placement for your voice? - Reddit, accessed April 30, 2026, https://www.reddit.com/r/VoiceActing/comments/ok3s8j/how_do_you_know_where_is_the_perfect_mic/
How do I make all the people speaking in a podcast recording equally loud? - Reddit, accessed April 30, 2026, https://www.reddit.com/r/podcasting/comments/ijdi3t/how_do_i_make_all_the_people_speaking_in_a/
Microphone Techniques - Shure, accessed April 30, 2026, https://www.shure.com/en-US/docs/education/Microphone-Techniques-for-Recording
How mic placement affects the recorded sound of the voice - DPA Microphones, accessed April 30, 2026, https://www.dpamicrophones.com/mic-university/audio-production/how-mic-placement-affects-the-voice/
The Complete Guide to Microphone Technique for Podcasters - Buzzsprout, accessed April 30, 2026, https://www.buzzsprout.com/blog/mic-technique-podcasting
Proper Audio Levels For Your Podcast - Audient, accessed April 30, 2026, https://audient.com/tutorial/proper-audio-levels-podcast/
Podcasters Audio Handbook: A Technical Guide for Creative People, accessed April 30, 2026, https://www.kriso.ee/podcasters-audio-handbook-technical-guide-creative-db-9781484273609.html
The Podcaster's Audio Handbook - Workers Bush Telegraph, accessed April 30, 2026, https://workersbushtelegraph.com.au/wp-content/uploads/2021/11/2021_Bookmatter_ThePodcasterSAudioHandbook.pdf
Audio Levels for Podcasts and Video (Any Editing System!) Easy Fix! - YouTube, accessed April 30, 2026, https://www.youtube.com/watch?v=_vecHTGK7Yo
The Podcast Engineering Show - Spotify for Creators, accessed April 30, 2026, https://anchor.fm/s/10d2220b4/podcast/rss
What do you guys use to record and edit episodes? : r/podcasting - Reddit, accessed April 30, 2026, https://www.reddit.com/r/podcasting/comments/1cbo2dy/what_do_you_guys_use_to_record_and_edit_episodes/
Podcast Like A Pro! - Sound On Sound, accessed April 30, 2026, https://www.soundonsound.com/techniques/podcast-like-a-pro
5 STEPS to Improve Your VOICEOVER in Audacity - YouTube, accessed April 30, 2026, https://www.youtube.com/watch?v=Rj7sbBng-T8
Recording Environment: 11 Tips for Capturing Quality Audio When You Don't Have a Studio - Sarah Mikutel, accessed April 30, 2026, https://sarahmikutel.com/how-to-podcast/podcast-recording-environment-studio
A Beginner's Guide To Acoustic Treatment, accessed April 30, 2026, https://www.soundonsound.com/sound-advice/beginners-guide-acoustic-treatment
Acoustic panels to the rescue: fixing asymmetrical speaker setups - Dynaudio, accessed April 30, 2026, https://dynaudio.com/magazine/2025/may/acoustic-treatment-ask-the-expert
How to Start a Library Podcast in 8 Simple Steps, accessed April 30, 2026, https://www.urbanlibraries.org/blog/how-to-start-a-library-podcast-in-8-simple-steps
Podcasting in Public Libraries - YouTube, accessed April 30, 2026, https://www.youtube.com/watch?v=r5dkQkr__xo
Acoustic Treatment for Podcasters: How to Prepare Your Home Studio Without Spending a Lot of Money - Buzzsprout, accessed April 30, 2026, https://www.buzzsprout.com/blog/sound-treatment-for-podcasters
What are the best dimensions for a home studio ? : r/mixingmastering - Reddit, accessed April 30, 2026, https://www.reddit.com/r/mixingmastering/comments/webykm/what_are_the_best_dimensions_for_a_home_studio/
The Best Room Shape for a Recording Studio - SoundAssured, accessed April 30, 2026, https://www.soundassured.com/blogs/blog/the-best-room-shape-for-a-recording-studio-learn-about-room-shapes-and-sizes
If my room is asymmetrical, how does that affect treatment? - Acoustics Insider, accessed April 30, 2026, https://www.acousticsinsider.com/blog/if-my-room-is-asymmetrical-how-does-that-affect-treatment
From The Audiophile's Guide: Dealing with Odd-Shaped Rooms - PS Audio, accessed April 30, 2026, https://www.psaudio.com/blogs/copper/from-em-the-audiophile-s-guide-em-dealing-with-odd-shaped-rooms
Acoustic Treatment for Weird-Shaped Room : r/audioengineering - Reddit, accessed April 30, 2026, https://www.reddit.com/r/audioengineering/comments/v9l9r5/acoustic_treatment_for_weirdshaped_room/
(PDF) Immersive technologies in the formation of musical audio space - ResearchGate, accessed April 30, 2026, https://www.researchgate.net/publication/383897321_Immersive_technologies_in_the_formation_of_musical_audio_space
The Klang Magazine Handy Dandy One Stop Listening Manual, accessed April 30, 2026, https://klangmag.co/one-stop-listening-manual/
The Bloomsbury Handbook of Sonic Methodologies 9781501338755, 9781501338786, 9781501338779 - DOKUMEN.PUB, accessed April 30, 2026, https://dokumen.pub/the-bloomsbury-handbook-of-sonic-methodologies-9781501338755-9781501338786-9781501338779.html
Home Studio Acoustics: “My room is asymmetrical. Should I fix it?” - YouTube, accessed April 30, 2026, https://www.youtube.com/watch?v=yG-Kid-7bNc