Module 1: File Formats and Settings
The foundation of professional podcast production is predicated on a rigorous, scientific understanding of audio physics, digital signal processing, and the architectural specifications of file formats. The journey of an acoustic event—from a physical sound wave propagating through the air to a standardized, universally distributable digital file—requires a cascade of highly complex mathematical and electronic transformations. These transformations dictate the absolute fidelity, spatial characteristics, frequency response, and dynamic range of the final audio product. Mastery over file formats, bit rates, sample rates, and the specific functional mechanics of digital audio workstations (DAWs) ensures that the audio retains its structural integrity across an array of diverse playback environments, ranging from high-fidelity studio monitors to heavily compressed mobile streaming platforms. In a landscape where algorithmic distribution and listener retention are heavily influenced by acoustic quality, technical precision is paramount. This report provides an exhaustive, peer-level analysis of the physical, digital, and software-specific parameters required for professional podcast audio execution.
What Is Audio?
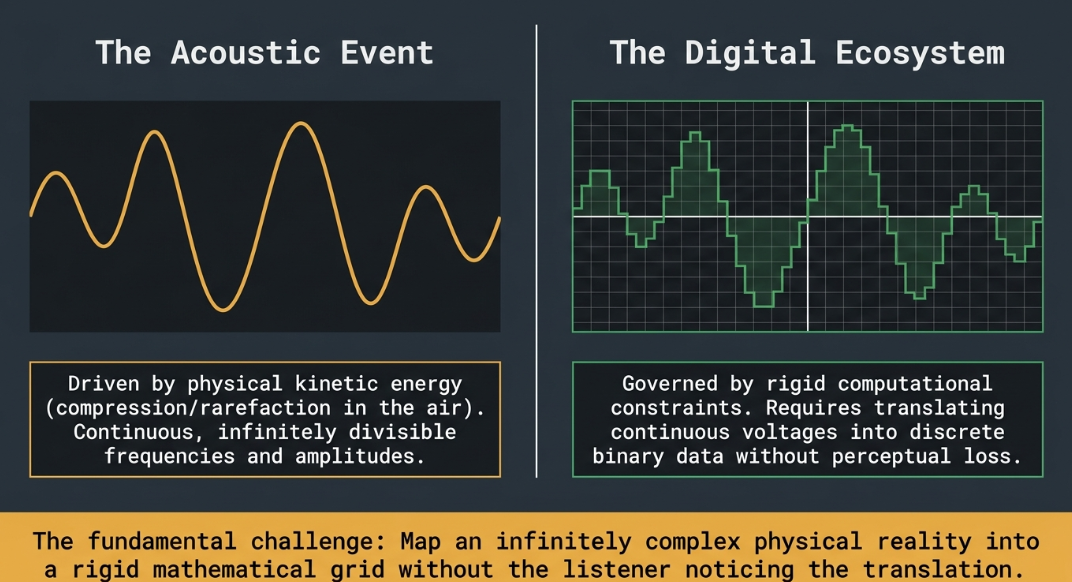
To execute professional audio production with absolute precision, one must first possess a comprehensive understanding of the fundamental physics of sound and its subsequent journey into the digital domain. Audio, in its native, physical state, is a continuous analog phenomenon. It consists of physical vibrations—specifically, longitudinal mechanical waves of compression and rarefaction—that propagate through an elastic medium such as air.1 These physical sound waves possess a continuous, infinitely divisible range of frequencies and amplitudes, which the human auditory system perceives biologically as pitch and volume, respectively.
The initial mechanical step in capturing audio for a podcast involves a specialized transducer, typically a microphone.1 A microphone's internal diaphragm physically responds to the minute air pressure variations of the propagating sound wave. Through advanced electromagnetic or electrostatic principles, the transducer converts this mechanical kinetic energy into an analog electrical signal.1 This resultant electrical signal is a direct analog of the original sound wave: it remains continuous in both the time domain and the voltage amplitude domain.
However, modern recording, editing, archival, and global distribution rely entirely on the digital ecosystem. Computing systems process discrete binary data—specific values of zeros and ones—rather than continuous, fluctuating electrical voltages.3 The concept of converting continuous physical phenomena into discrete digital information arose in the twentieth century alongside the advancement of early computing and telecommunications, marking the transition from degrading mechanical analog storage (such as vinyl records and magnetic cassette tapes) to the lossless persistence of the Information Age.1 The translation of this continuous analog voltage into a discrete digital format is governed entirely by a hardware component known as the Analog-to-Digital Converter (ADC).3 The overarching algorithmic process utilized by standard audio systems to encode these continuous values into discrete numbers is known as Pulse Code Modulation (PCM).3
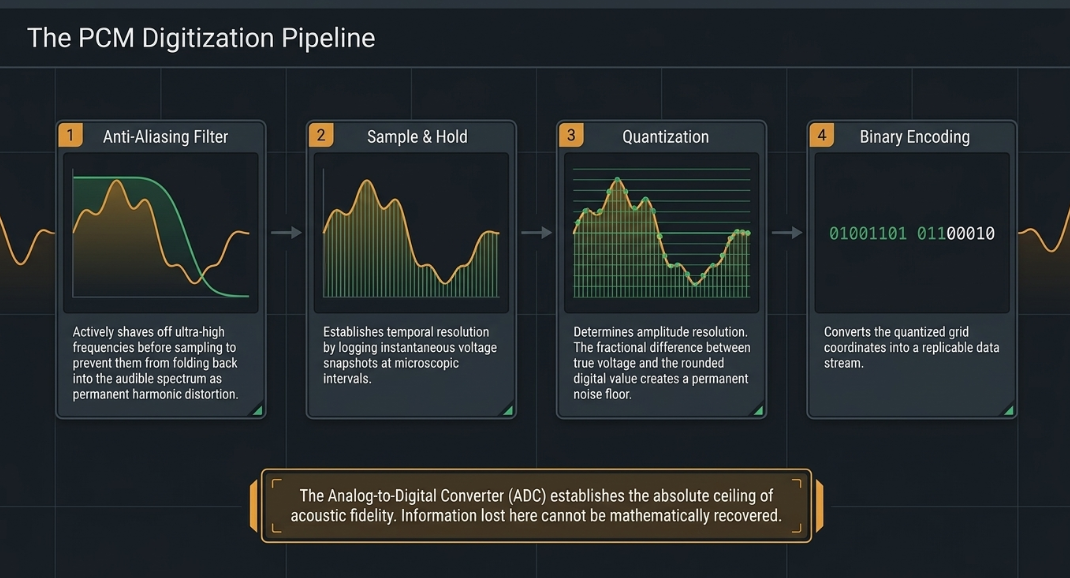
The analog-to-digital conversion process via PCM is comprised of several distinct, mathematically sequential stages that permanently define the audio's quality.2
First, the analog signal must undergo Anti-Aliasing Filtering. Before any digital sampling occurs, the analog signal is passed through a steep low-pass filter.2 This filter actively removes high-frequency energy that exceeds half of the system's intended sampling rate. If these extremely high frequencies are not filtered out before the signal is digitized, a phenomenon known as aliasing occurs, where frequencies beyond the digital system's processing limit fold back into the audible frequency spectrum, presenting themselves as harsh, unmusical, and permanent harmonic distortion.
Once filtered, the signal enters the Sample and Hold (S/H) phase. The continuous analog signal is periodically measured at precisely timed, microscopic intervals. This sampling phase establishes the temporal resolution of the digital audio, defining how accurately the system can track the frequency of the waveform over time.2
Immediately following the sampling phase is Quantization. Once a snapshot of the electrical voltage is taken, the exact amplitude of that specific sample must be assigned a rigid numerical value. Because the digital system operates within a fixed number of binary bits, the continuous voltage measurement is rounded to the nearest available discrete value on a predefined digital scale.2 This process determines the amplitude resolution (dynamic range) of the audio. The minute difference between the actual continuous voltage and the rounded digital value is known as quantization error, which the listener perceives as a low-level static or "noise floor" in the background of the digital recording.6
The final phase is Binary Encoding. The quantized values are encoded into long strings of binary data. In this binary counting system, only two states exist: zero and one.2 Binary is uniquely suited to modern technology because these two discrete states can be flawlessly represented as the on or off status of a transistor switch, the magnetic polarity on a hard drive platter, or microscopic bumps and flat planes etched into a compact disc.3 A square wave is utilized in PCM encoding, where a specific voltage threshold dictates that signals below the threshold are classed as zeroes, and signals above are classed as ones.3
The fundamental advantage of this digital paradigm is that a digital signal can be perfectly replicated, transmitted, and stored indefinitely without suffering the generational degradation, hiss, and mechanical flutter that inherently plague analog media.1 As long as the binary code can be successfully differentiated by the receiving hardware, the audio waveform can be mathematically reconstructed to its exact original state.3 However, this means that the ADC dictates the absolute ceiling of the recording's quality. If acoustic information is lost, filtered poorly, or distorted during this initial conversion stage, no amount of downstream digital processing or advanced digital-to-analog (D/A) playback hardware can authentically recover the missing data.
Digital Audio, the Sample Rate, and the Bit Rate
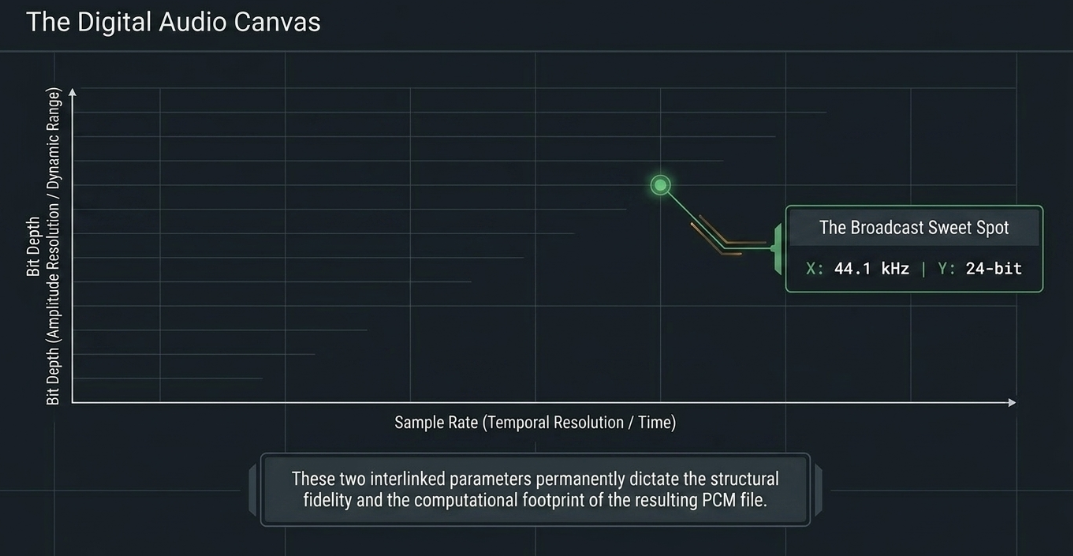
The structural fidelity and computational footprint of a PCM digital audio file are fundamentally governed by two primary interlinked parameters: the sample rate (which dictates the time domain and frequency response) and the bit depth (which dictates the amplitude domain and dynamic range). Understanding the underlying mathematics of these parameters is essential for configuring audio hardware and software.
The Sample Rate and the Nyquist-Shannon Theorem
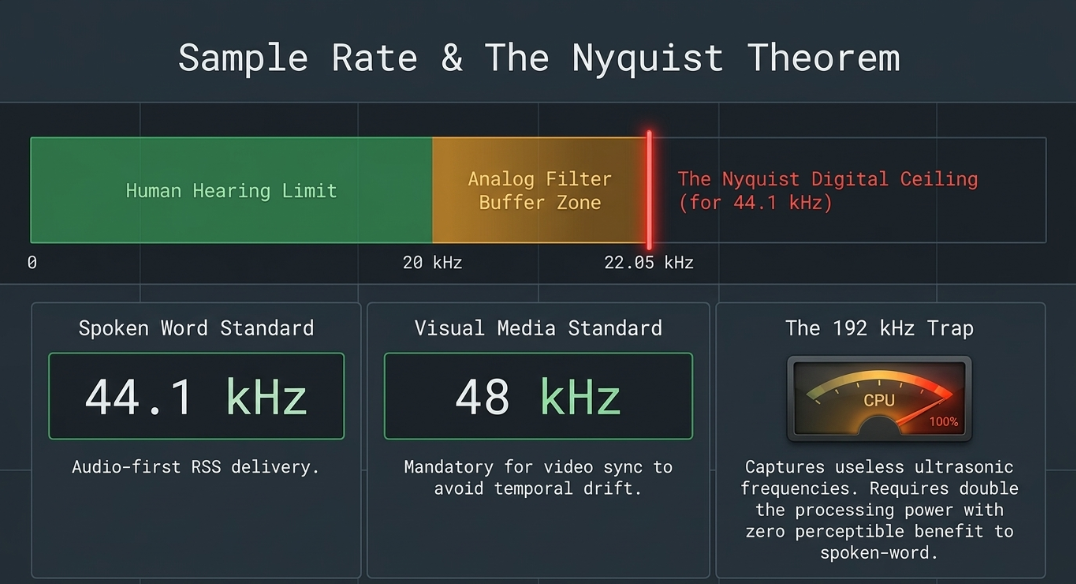
The sample rate represents the literal frequency at which the Analog-to-Digital Converter captures instantaneous snapshots of the analog signal. It is universally measured and expressed in Hertz (Hz) or kilohertz (kHz).7 For instance, a standard sample rate of 44,100 Hz (44.1 kHz) indicates that the audio voltage is actively measured and logged 44,100 times every single second.7
The scientific rationale dictating these specific, seemingly arbitrary numerical rates is derived directly from the Nyquist-Shannon sampling theorem. The theorem is a foundational principle of digital signal processing, positing that to accurately and cleanly reconstruct a continuous analog signal, the digital sampling rate must be strictly at least twice the highest frequency present in the analog signal being recorded. This absolute maximum frequency limit is mathematically defined as the Nyquist frequency. The generally accepted upper physiological limit of human acoustic hearing is 20,000 Hz (20 kHz).7 Therefore, to capture the entire spectrum of human hearing without frequency loss or aliasing distortion, the minimum sample rate must be mathematically greater than 40,000 Hz.7
The global industry standard of 44.1 kHz was cemented during the late twentieth-century development of the Compact Disc format.7 A sample rate of 44.1 kHz yields a Nyquist frequency of 22,050 Hz. This yields a critical mathematical buffer zone between the 20 kHz human hearing limit and the 22.05 kHz digital ceiling. This buffer allows audio engineers to implement analog anti-aliasing low-pass filters that feature a gradual, musical "roll-off" curve, rather than requiring an impossibly steep "brick-wall" filter that would introduce severe phase distortion into the audible spectrum.7
While 44.1 kHz remains the undisputed, ubiquitous playback standard for consumer music applications, audio-exclusive podcasts, and general spoken-word projects, an alternative standard of 48 kHz dominates the visual media sector.9 The 48 kHz sample rate is the established industry standard for film, television, and video production.9 If a podcast features a video component, such as a multi-camera YouTube show, or is expected to have its audio integrated into a broader video package, recording at 48 kHz is heavily mandated. Utilizing 48 kHz in these scenarios actively prevents the need for complex, computationally intensive resampling in post-production, which can introduce artifacting and synchronization drift over long recordings.9
Modern audio interfaces and recording software offer exponentially higher sample rates, such as 88.2 kHz, 96 kHz, 176.4 kHz, and even 192 kHz.9 While these ultra-high rates push the Nyquist frequency far beyond the realm of biological perception (a 192 kHz sample rate can theoretically reproduce ultrasonic frequencies up to 96 kHz), they offer deeply diminishing returns for spoken-word podcasts and standard audio production.7 The pursuit of maximum sample rates introduces severe logistical penalties. Recording at 96 kHz requires precisely double the CPU processing power and hard drive storage space compared to 48 kHz.9 This intensive processing requirement drains hardware resources rapidly, slowing down digital plugins, introducing latency, and risking system crashes during long podcast tracking sessions.9
Furthermore, many professional audio engineering plugins and processing tools are optimized for standard rates and may exhibit unstable behavior or unexpected artifacting when forced to process ultra-high sample rates.9 The consensus among professional mix engineers is that a "professional sound" is not at all tied to utilizing exorbitant sample rates.4 So many seminal, high-fidelity albums were recorded flawlessly at the 16-bit, 44.1 kHz CD standard.4 In practical mixing scenarios, engineers routinely utilize high-pass and low-pass filters to actively strip out extreme, inaudible high frequencies—often placing a sharp cut on vocal tracks around 14 kHz to 18 kHz—to remove "brittle nastiness," sibilance, and electromagnetic interface noise that provides no musical value to the mix.4 Therefore, recording ultrasonic frequencies at 192 kHz only to immediately filter them out to preserve mix clarity is an inefficient allocation of digital resources.
Bit Depth and Bit Rate
While the sample rate dictates the frequency response in the temporal domain, the Bit Depth—frequently referred to as word length, word size, or sample format—dictates the dynamic range and the signal-to-noise ratio in the amplitude domain.6 The bit depth specifically defines the number of computer bits utilized to record and represent the absolute amplitude of each individual sample snapshot taken by the ADC.2
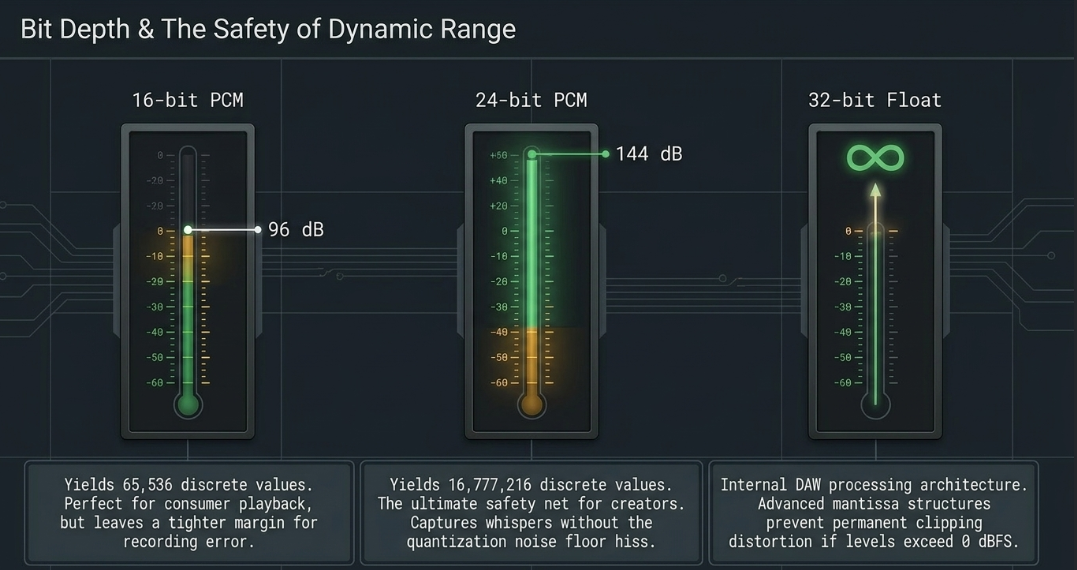
The mathematical relationship between bit depth and dynamic range is absolute. Each additional bit of depth provides approximately 6 decibels (dB) of dynamic range.
16-bit PCM Audio: This format utilizes 16 bits of data per sample, yielding

24-bit PCM Audio: This format utilizes 24 bits of data per sample, yielding

32-bit floating-point: This is an advanced processing format utilized almost exclusively internally by DAWs. It effectively provides infinite dynamic range within the digital processing environment. Signals processed internally in 32-bit float that exceed the 0 dB Full Scale (0 dBFS) clipping point will not suffer permanent harmonic distortion or flattened waveforms.6 Their amplitude can simply be reduced later in the software chain to restore the completely unclipped waveform.6 However, 32-bit float requires 50% more storage space than 24-bit audio and double the space of 16-bit audio.9 It is strictly reserved for raw capture on specialized field recorders, internal DAW mathematics, and archival backups, rather than consumer distribution, as standard media players cannot natively decode the floating-point architecture.6
Bit Rate is a distinct, highly critical metric often erroneously conflated with bit depth. The bit rate measures the sheer volume of data processed per second and is typically expressed in kilobits per second (kbps).14 In uncompressed audio formats, the bit rate is a fixed mathematical calculation derived by multiplying the sample rate by the bit depth and the number of channels, divided by one thousand.14 For example, a standard stereo uncompressed CD file (44,100 Hz 

Compressed and Uncompressed File Formats: wav vs. mp3
The selection of a specific digital file format involves a continuous, strategic negotiation between maximum audio fidelity and practical data footprint constraints. Digital audio formats are categorized broadly by their internal data compression architecture: uncompressed, lossless compression, and lossy compression.
Uncompressed Formats: WAV and AIFF
WAV (Waveform Audio File Format) and AIFF (Audio Interchange File Format) are robust, uncompressed, raw audio container formats that universally utilize Linear PCM encoding.8 The WAV format, developed by Microsoft and IBM, stores audio data in the Little-Endian byte order and preserves every single microscopic sample captured by the analog-to-digital converter.14 It acts as a flawless, mathematically perfect digital mirror of the original acoustic event.16
Because WAV files retain the entire frequency spectrum from 20 Hz to 20 kHz without any algorithmic alteration or data pruning, they provide unmatched depth, acoustic clarity, and transient detail.8 This lossless nature firmly establishes WAV as the strict, non-negotiable industry standard for the tracking, editing, and mixing phases of professional podcast production.8 When podcasters utilize multi-track recording, WAV files ensure that subtle vocal layers, breath nuances, and high-frequency sibilance are captured perfectly for subsequent equalization.8 Furthermore, modern, advanced post-production processors—particularly AI-driven neural network noise reduction tools like Adobe Speech Enhance—strictly require uncompressed WAV data to function optimally.15 AI voice models rely on an uninterrupted frequency spectrum to map human speech; when presented with compressed audio, the AI becomes confused because the compression algorithms physically leave microscopic "holes" across the audio spectrum, leading to bizarre, robotic artifacts.15
The primary, glaring drawback of the WAV format is its prohibitive file size.16 Because no data is discarded, a standard stereo 16-bit WAV file consumes approximately 10 MB of disk space for every single minute of audio.8 This makes routine internet transfer, cloud server storage, and direct mobile streaming wildly inefficient and expensive.8 Furthermore, the legacy WAV file architecture contains a hardcoded, structural 4-Gigabyte internal file size limit.14 Due to how various player applications interpret the file size header, this practical limit often manifests at 2 GB.14 Consequently, a continuous stereo 16-bit recording will reach a maximum theoretical duration of approximately 6 hours and 45 minutes before the file structure permanently fails and ceases recording.
Lossless Compression: FLAC and ALAC
Formats such as FLAC (Free Lossless Audio Codec) and ALAC (Apple Lossless Audio Codec) were engineered to bridge the profound gap between massive file sizes and raw, uncompromised fidelity.12 These highly efficient codecs operate on principles broadly similar to a standard ZIP file used for computer documents. They utilize advanced linear prediction algorithms to identify redundancies in the audio data, compressing the digital footprint down by roughly 40% to 60% compared to a raw WAV file.16 However, unlike MP3s, this compression is entirely lossless. Upon playback or decompression by a compatible software application, the FLAC file is mathematically decoded to recreate the exact, bit-for-bit, pristine PCM audio stream initially recorded.16
FLAC is highly preferred among audiophiles and archiving professionals, as it provides perfect audio reproduction while saving valuable terabytes of server space.12 However, its file size remains far too large for standard RSS podcast distribution, and native support across older mobile devices and the broader Apple ecosystem remains fragmented (with Apple historically preferring its proprietary ALAC format, though Apple Podcasts Connect does accept FLAC for premium master ingest).12
Lossy Compression: MP3, AAC, and Opus
To successfully distribute podcast audio to hundreds of millions of simultaneous global listeners efficiently, the broadcasting industry relies entirely on lossy codecs such as MP3, AAC (Advanced Audio Coding), Ogg Vorbis, and Opus.15 Lossy compression achieves its remarkably small file sizes through aggressive algorithms that permanently discard actual audio data.8
These codecs rely on highly complex "psychoacoustic models." The encoder analyzes the audio signal in real-time and actively removes frequencies and sonic data that the human ear is biologically unlikely to perceive.8 This is largely based on auditory masking—the biological phenomenon where a loud sound masks the perception of a simultaneous, quieter sound at a nearby frequency. The encoder drops the masked data entirely.8 Furthermore, to save massive amounts of data, MP3 compression frequently employs a steep low-pass filter, completely cutting off all high-frequency data above 16 kHz or 18 kHz, as those extreme frequencies consume significant data but contribute little to speech intelligibility.8
The severity of this data destruction is dictated entirely by the target Bit Rate selected by the engineer prior to export.
32 kbps to 64 kbps: Acceptable strictly for mono, low-fidelity voice recordings, heavily masking high frequencies.
128 kbps to 160 kbps: Considered the absolute optimal standard for spoken-word MP3 delivery, balancing reasonable file sizes with excellent voice clarity.12
320 kbps: The maximum operational quality for an MP3 file. At 320 kbps, the psychoacoustic destruction is minimal, and the file is virtually indistinguishable from a lossless WAV file for the vast majority of non-audiophile listeners. However, this produces much larger file sizes (roughly 8 to 10 MB for a standard 3-minute song).16
While MP3 remains the universal, legacy fallback format—boasting unrivaled compatibility and supported by virtually every hardware media player and web browser in existence since the late 1990s—it is technically an antiquated codec.15 Newer codecs offer vastly superior mathematical efficiency.15 AAC, the backbone of the entire Apple media ecosystem, provides markedly better transient response, high-frequency retention, and overall fidelity than an MP3 file rendered at the exact same bit rate.
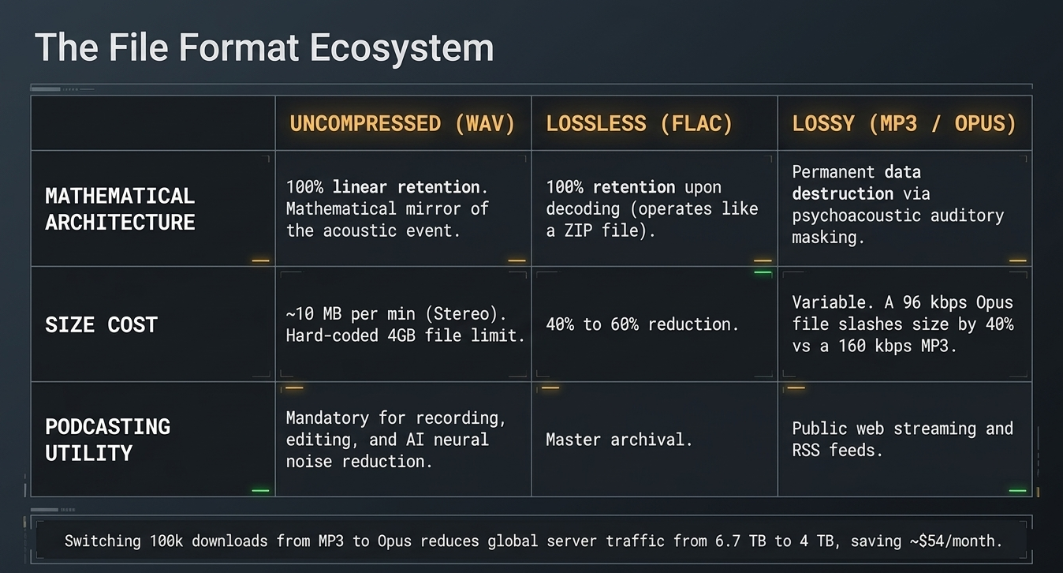
The Opus codec represents the cutting-edge frontier of lossy compression. Highly optimized for speech and dynamic scaling, a 96 kbps Opus file can slash file sizes by approximately 40% when compared to a standard 160 kbps MP3, while simultaneously sounding completely transparent and devoid of artifacting on human speech.15 The financial and logistical incentives to utilize highly efficient lossy codecs for podcast distribution are profound. Consider a highly successful podcast generating 100,000 global downloads per episode. Distributing a weekly hour-long episode as a 160 kbps MP3 results in a 70 MB file, generating an enormous 6.7 Terabytes of server traffic.15 By switching the distribution codec to a 96 kbps Opus file, the individual file size drops to 42 MB, plunging global network usage down to 4 Terabytes. Utilizing standard cloud transfer rates (such as Cloudflare R2's pricing at two cents per gigabyte), this minor architectural switch translates directly to tangible operational savings of roughly fifty-four dollars every single month, while maintaining pristine audio quality.15
Stereo vs. Mono
The spatial configuration of the digital audio file—specifically whether it is rendered in Mono (Monaural) or Stereo (Stereophonic)—drastically impacts both the listener's psychoacoustic experience and the technical data footprint of the exported file.
Mono Audio: The Dialogue Standard
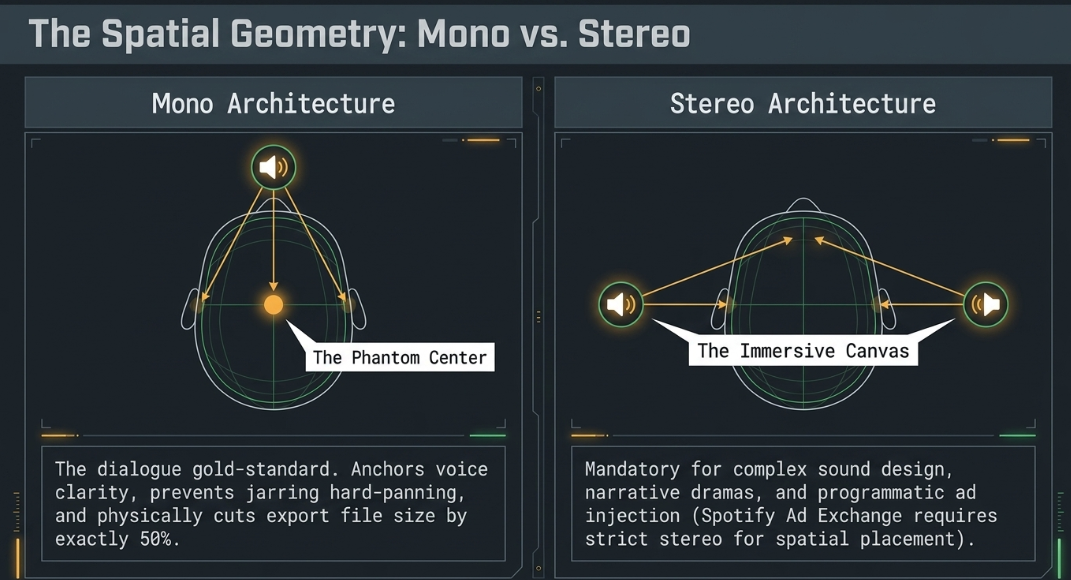
Mono recording and playback utilize a singular, unified audio channel.22 During mono recording, a single microphone captures the sound, transmitting it to a single digital track. Upon playback, the resulting mono file routes that exact, identical signal equally to both the left and right speakers (or headphone drivers) of the listener's playback device.22 Psychoacoustically, this creates a tightly focused, cohesive "phantom center" image directly in the middle of the listener's head or directly between a pair of stereo monitors.
For voice-centric podcasts, interviews, and monologue formats, mono is unequivocally the gold standard.23 Human dialogue must remain centrally anchored to ensure phase coherence and immediate clarity.22 Recording and mixing dialogue in mono completely prevents a jarring, amateurish "hard-panning" effect, where a host might inexplicably sound as if they are standing solely in the listener's left ear, while the guest is localized entirely to the right ear.24 From a technical mixing standpoint, forcing a mix into mono allows audio engineers to accurately perceive true volume balances and identify frequency masking issues without the deceptive distraction of a wide spatial field. An audio mix that sounds balanced, punchy, and clear in mono is mathematically guaranteed to translate perfectly across diverse playback systems, from high-end multi-speaker arrays to a single, localized smartphone speaker.23
Crucially, exporting a podcast entirely in mono literally cuts the required file size exactly in half when compared to a stereo file, as the compression codec is only mathematically required to encode and store one channel of data instead of two independent channels.25 This 50% data reduction is a massive logistical advantage for meeting the strict file-size limits imposed by podcast hosting companies, many of which restrict monthly upload data.
Stereo Audio: The Immersive Canvas
Stereo recording utilizes two distinct, mathematically discrete channels (Left and Right).22 Stereo captures the spatial separation and acoustic reflections of an event, mapping different frequency elements across a wide horizontal soundstage.22
While stereo is entirely unnecessary for a standard two-person conversation or solo voiceover, it becomes absolutely mandatory for narrative audio dramas, immersive horror podcasts, or productions relying heavily on complex ambient sound design, stereo acoustic guitars, drum overheads, and high-fidelity music tracking.23 Stereo mixing opens up the acoustic soundscape. It allows dense sound effects and lush music stems to sit wide in the left and right extremes of the mix, leaving the critical mono-center channel completely unoccluded and reserved strictly for the lead vocal dialogue.
Furthermore, structural industry requirements often dictate stereo delivery regardless of content. Premium advertisers and programmatic audio ad exchanges heavily favor, and often mandate, stereo file delivery. For instance, Spotify's massive podcast ad exchange requires strict stereo MP3 file delivery for insertion via Direct IO.27 Bouncing an advertisement containing spatially mixed music and sound effects down to mono collapses the entire mix, instantly flattening dynamic spatial panning and causing the sound frequencies to collide and become "crowded".27 Delivering advertisements in stereo allows brands to place music, sound effects, and voiceovers strategically in different parts of the listener's sound field, yielding a significantly more engaging and high-retention audio experience.27
Just Give Me the Executive Summary
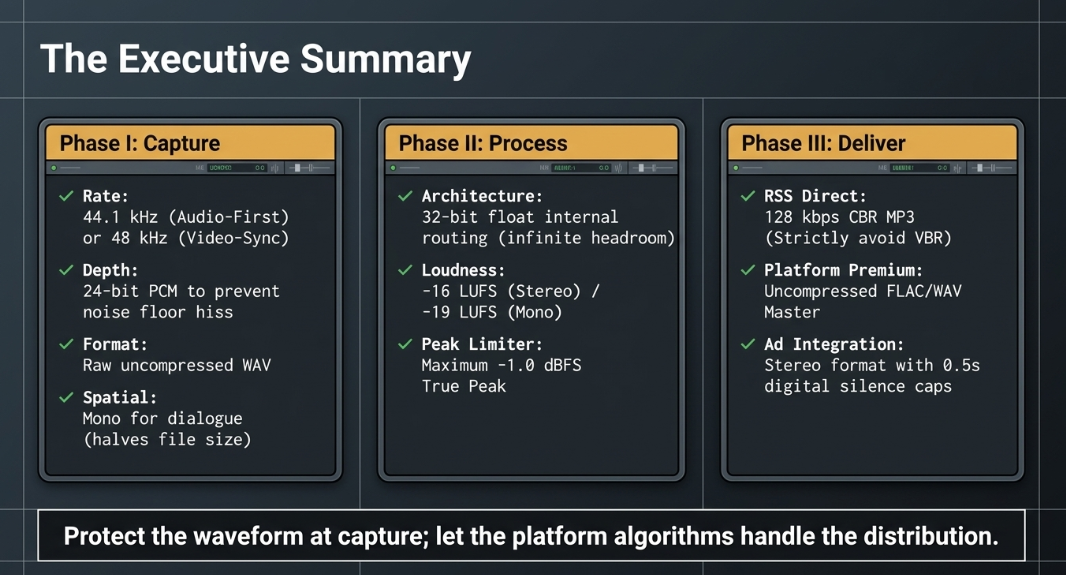
The modern professional podcast ecosystem requires a delicate, highly technical balance of pristine high-fidelity capture and heavily optimized, algorithm-friendly distribution. A podcast file must seamlessly navigate strict RSS feed parameters, proprietary platform normalization algorithms, and highly diverse consumer playback hardware without suffering audio degradation. Below is the executive summary of best practices and strict platform requirements for audio execution in the 2025/2026 podcast landscape.
Capture and Editing Standards
Sample Rate: Record all sessions at 44.1 kHz for audio-exclusive podcast productions.7 If the audio will be synced with a video component, YouTube package, or television broadcast, you must record at 48 kHz to ensure seamless synchronization with standard video frame rates.9
Bit Depth: Track and process all raw audio in 24-bit or DAW-internal 32-bit float to preserve maximum dynamic range, capture quiet details, and permanently avoid digital clipping artifacts during the mixing phase.6
Working Format: Exclusively record, edit, and archive the master session using uncompressed, lossless WAV formats. Never perform destructive editing on MP3 files.8
Final Mix Loudness and Preconditioning
Regardless of the final format chosen, podcast masters must adhere to strict integrated loudness parameters. This standardization prevents the listener from having to constantly adjust their device volume between different podcast episodes or injected advertisements.27
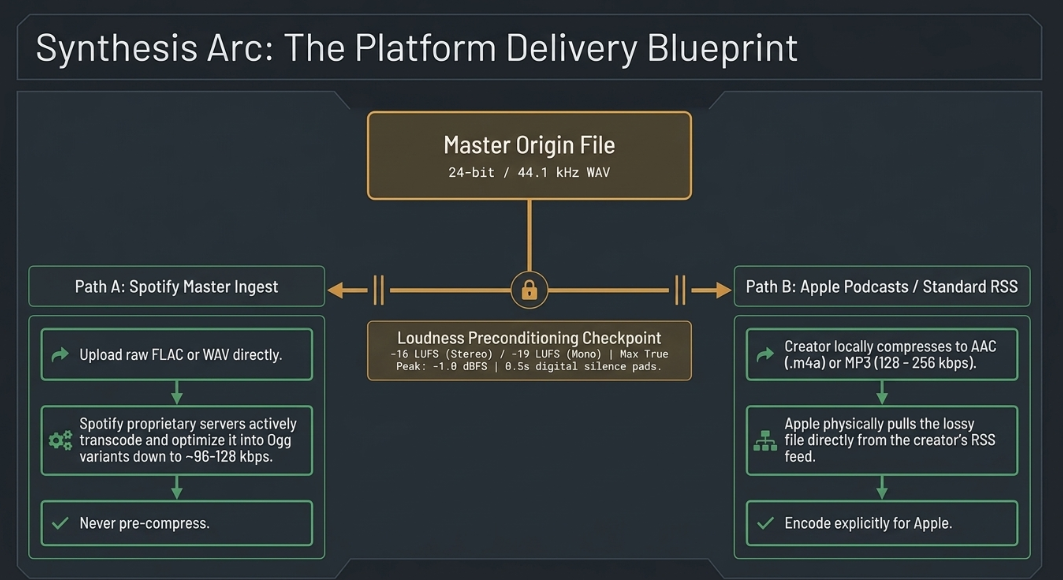
Integrated Loudness: Target an overall average of -16 LUFS (Loudness Units relative to Full Scale) for stereo files. Mono files should be mastered to -19 LUFS. These measurements follow the precise ITU-R BS.1770-5 standard recommendation, operating within a tight tolerance of +/- 1.5 LUFS.12
True Peak: Ensure the absolute loudest transient peaks do not exceed -1.0 dBFS to -2.0 dBTP (True Peak). Leaving this critical headroom prevents peak distortion when the pristine file is subsequently subjected to aggressive lossy compression algorithms by downstream streaming providers.12
Ad Formatting: When bouncing audio advertisements for dynamic insertion, ensure exactly 0.5 seconds of digital silence is baked into both the top and tail of the file. This padding allows for natural, unjarring transitions between the host content and the programmatic ad.28
RSS Feed and Platform Delivery
Major tech platforms like Apple Podcasts and Spotify feature highly divergent ingest guidelines and architectures. While Apple typically pulls lossy audio directly from the creator's RSS feed, Spotify offers a unique, proprietary pipeline for high-fidelity master ingest, handling the optimization on their own servers.12
Note on Platform Algorithms: Spotify internally processes all uncompressed WAV and FLAC ingests into their own lossy FLAC/Ogg variants, eventually streaming podcasts to mobile end-users at approximately 96 kbps (Standard) and up to 128 kbps on the Web Player.30 To ensure maximum quality, creators must not attempt to pre-downsample or reduce the bit depth of master files before sending to Spotify; deliver the highest-quality native stereo master and allow their internal optimization algorithms to function unhindered.30 Apple Podcasts, conversely, completely ignores Opus files and strictly enforces AAC/MP4 or MP3 architecture for its standard feeds, leveraging ID3 tags for dynamic sound check parameters.
Choosing File Formats and Settings in Audacity
Audacity remains a ubiquitous, powerful open-source Digital Audio Workstation (DAW) utilized globally by podcast professionals ranging from independent journalists to large-scale production houses. However, its expansive, highly modular toolset requires precise structural configuration to ensure broadcast-quality output. The software architecture explicitly separates the immediate project processing environment from the final export algorithms.
By default, the Audacity processing engine utilizes a 32-bit float sample format for all internal mathematics.6 This represents an optimal, professional-grade configuration. Operating within a 32-bit floating-point environment affords the audio engineer infinite dynamic headroom during the mixing phase. If multiple dense tracks sum together and inadvertently push the master output above the rigid 0 dBFS clipping threshold, the 32-bit float architecture utilizes advanced mantissa and exponent data structures to retain the geometric integrity of the waveform perfectly.6 The audio will not permanently clip or distort; the user can simply engage the master volume fader or apply a normalization effect to bring the amplitude back down into legal, unclipped limits without suffering any permanent harmonic distortion.6
It is strongly advised to maintain this 32-bit float default setting perpetually. However, to confirm or intentionally adjust the default bit depth for all newly recorded and imported files, a user must navigate deep into the DAW's structural preferences:
Open Edit > Preferences (on Windows systems) or Audacity > Preferences (on macOS systems).
Navigate to the Audio Settings panel located on the left sidebar. (Note: In legacy versions of Audacity prior to the 3.x updates, these settings were categorized under a tab labeled "Quality").29
Locate the Default Sample Format parameters and ensure 32-bit float is actively selected from the dropdown menu.6
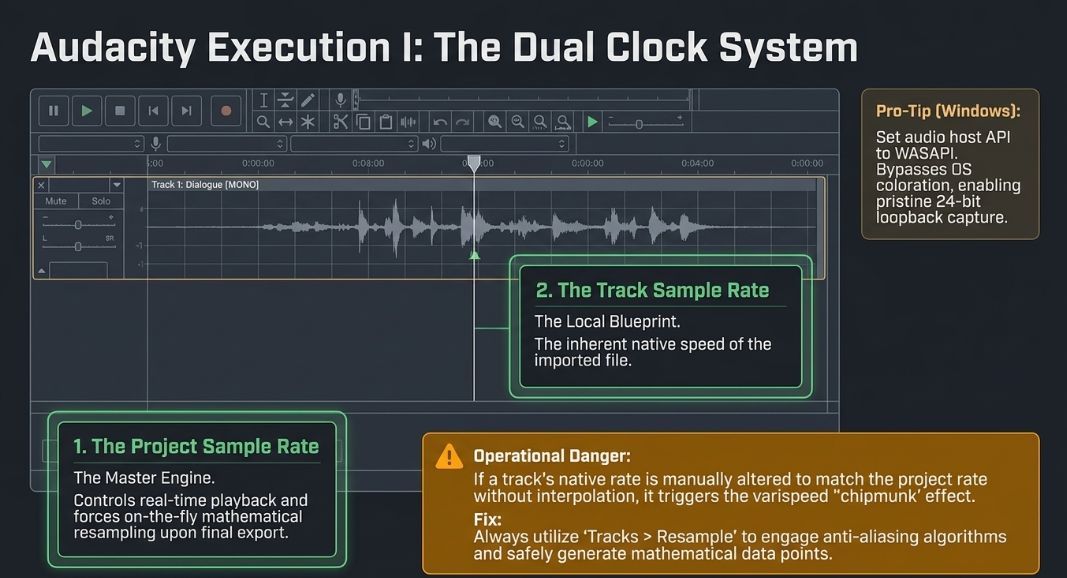
For Windows users specifically, the selection of the audio host API within these settings heavily influences format availability and capture quality. Choosing the Windows WASAPI host over standard legacy drivers is highly beneficial for professional capture. WASAPI allows for pure 24-bit digital capture and direct loopback recording. This loopback captures audio entirely within the digital domain, bypassing inferior analog-to-digital conversions inherent to standard Windows OS "stereo mix" inputs, yielding a pristine recording path.29
It is important to note that certain audio formats like Ogg Vorbis, due to the inflexible nature of their specific codec designs, will natively import into Audacity strictly at 16-bit resolution, entirely overriding your preference settings.29 However, users can force Audacity to import OGG files at a higher 32-bit resolution by manually installing the optional FFmpeg library extension. This crucial extension unlocks advanced architectural handling and broader format support within Audacity, permitting the import and export of complex proprietary containers including AC3, M4A, WMA, and MP4 files.
Setting the Bit Rate and Sample Rate in Audacity
Managing sample rates within the Audacity ecosystem requires a nuanced, technical understanding of the vital distinction between the global Project Sample Rate and the localized Track Sample Rate. Mismanagement of these dual parameters is a frequent source of catastrophic user error, leading to permanent pitch-shifting, severe time-stretching anomalies, and devastating degradation of audio fidelity.29
Managing the Sample Rate
Audacity robustly supports highly complex multitrack sessions where disparate audio files possessing entirely different native sample rates (for example, a low-fidelity 8,000 Hz telephone call recording, a 44,100 Hz dialogue track, and a pristine 48,000 Hz cinematic sound effect stem) can seamlessly coexist on the exact same timeline.29 The software unifies and processes these mathematically disparate files via a master clock known as the Project Sample Rate.
The Project Sample Rate acts as the absolute master clock for all real-time playback, audio rendering, and final mixdown procedures.29
If the Project Rate is deliberately set to 44,100 Hz, any new, blank tracks created via the "Add Track" menu, or generated spontaneously by hitting the record button, will automatically be clocked at 44,100 Hz.29
Furthermore, upon initiating a final export, all disparate tracks operating at different rates are aggressively and mathematically resampled on-the-fly to conform identically to the master Project Sample Rate.29
To modify the Project Sample Rate globally across the entire session:
Locate the Audio Setup toolbar (or, depending on the interface layout, navigate to Audio Setup > Audio Settings in newer software builds such as 3.3.x and above).35
Change the Project Rate dropdown menu to the desired industry standard (e.g., 44,100 Hz or 48,000 Hz).29
An Important Note on Resampling Physics: In legacy iterations of Audacity (versions 3.2.5 and older), altering the Project Rate displayed at the bottom left of the interface did not affect the temporal speed of existing audio.35 However, changing individual track sample rates manually via the track dropdown menu without employing proper resampling algorithms can inadvertently trigger a varispeed control effect. This forces the audio to play back significantly faster and higher in pitch—the notorious "chipmunk" effect—because the software attempts to play 44,100 samples per second at a new, faster rate of 48,000 samples per second without interpolating new data points.35
To correctly and safely alter the sample rate of a specific isolated track without destructively altering its pitch or temporal speed, the engineer must select the track, navigate to the top Tracks menu, click Resample, and carefully input the new desired rate.34 This deliberate action engages Audacity's high-quality dithering and anti-aliasing interpolation algorithms, safely generating or removing samples to execute the mathematical conversion flawlessly.14 If batch processing multiple files to a new sample rate, users can add them to a blank project and utilize File > Export > Export Multiple to process the sample rate changes simultaneously.
Setting the Export Bit Rate for MP3s
When producing a final MP3 file intended for global RSS distribution, setting the target Bit Rate is a critical step that permanently dictates the file's final storage size and acoustic quality.26 This parameter is configured exclusively within the final Export Audio dialog window.
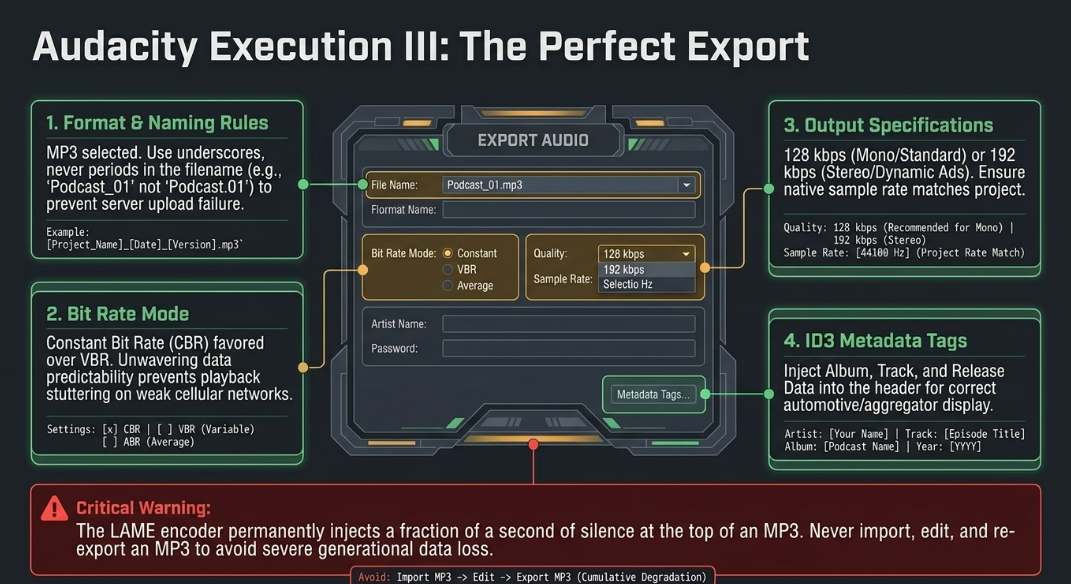
Under the hood, Audacity utilizes the highly regarded, open-source LAME encoder library to mathematically process MP3 compression.26 The primary architectural decision within the LAME parameters is choosing between Variable Bit Rate (VBR) and Constant Bit Rate (CBR) operational modes.26
Variable Bit Rate (VBR): In this dynamic mode, the encoder continuously analyzes the audio complexity millisecond by millisecond. During highly complex acoustic passages (e.g., heavily layered intro music), the encoder allocates a higher bit rate to preserve transient detail and quality. Conversely, during simple passages (e.g., digital silence, room tone, or a single unaccompanied voice), it aggressively throttles the bit rate down to save massive amounts of digital space.26 While VBR theoretically provides the highest mathematical ratio of audio quality to file size, its inherently unpredictable data fluctuations are notoriously hostile to podcast streaming algorithms and legacy hardware players.26
Constant Bit Rate (CBR): This rigid mode mathematically locks the encoder to a singular, unwavering bit rate stream (e.g., 128 kbps) for the absolute entirety of the file, completely regardless of the audio's acoustic complexity.26 While it theoretically provides slightly less overall precision for its file size when directly compared to VBR, CBR is unequivocally the recommended mode for professional podcasting. Its absolute data predictability ensures highly stable transmission across weak cellular networks, entirely eliminating data spikes that cause playback stuttering and buffering during internet streaming.26
To set this optimal configuration:
Navigate to File > Export Audio.
Select MP3 from the primary Format list.
Set the Bit Rate Mode dropdown to Constant.
Select the target transmission quality (e.g., 128 kbps for standard mono/stereo, or 192 kbps for high-fidelity ad delivery).26
Ensure the sample rate matches the project's native operational rate (e.g., 44,100 Hz).26
Because lossy encoding permanently and destructively purges high-frequency data, audio engineers must obey a cardinal rule: never import a finalized MP3, edit it, and export it as an MP3 again. This cycle creates "generational loss," heavily compounding the compression damage and introducing severe, unlistenable digital artifacts. All structural edits must be performed strictly on raw WAV files, utilizing the MP3 format exclusively as the final, immutable step for export.26
Furthermore, users must be aware of encoder delay. When bouncing to MP3, the LAME encoder will inherently and unavoidably inject a microscopic fraction of a second of digital silence at the exact beginning of the file due to the mathematical delay of the encoding process.26 While Audacity smartly utilizes LAME Mp3 info tags to track this anomaly and seamlessly strip it out upon re-importation, many other third-party applications do not read these tags. This latency is an inescapable architectural reality of the MP3 format itself, further reinforcing why WAV remains the only viable format for sample-accurate track synchronization.
Choosing Stereo or Mono in Audacity
Properly routing and configuring spatial channels within the Audacity interface is paramount. Failure to address channel architecture can result in bizarre phase cancellation artifacts, bloated file sizes, and dialogue that refuses to sit correctly in the acoustic phantom center.
Configuring Mono Recording
A common and deeply frustrating issue arises from hardware/software mismatches. By default, modern operating systems (particularly the Windows architecture) frequently recognize advanced external USB audio interfaces as generic "microphones," sometimes forcing a default stereo software layout even when only a single physical microphone is plugged into input channel 1 of the hardware interface.33 When the podcaster hits record, this results in an unusable track where the host's voice exists exclusively in the left speaker, while the right speaker captures nothing but empty digital silence and room noise.
To force the Audacity engine to capture a true, center-panned mono signal from a single transducer:
Locate the Device Toolbar on the main interface.
Access the recording channels dropdown menu and explicitly select "1 (Mono) Recording Channel".33 Alternatively, this behavior can be permanently codified within the DAW via Preferences > Audio Settings > Recording > Channels, changing the default parameter to Mono.33 As noted previously, recording in mono drastically reduces the processing load on the CPU and consumes roughly half the physical disk space compared to stereo (averaging 600 MB per hour versus the 1.2 GB required for stereo).33
Correcting Stereo Imbalances (Mixing Down)
If a podcaster receives raw, unedited tape from a remote guest or field recorder where the audio was inadvertently recorded to only one side of a stereo track, Audacity offers several highly specific architectural solutions to repair the geometry.
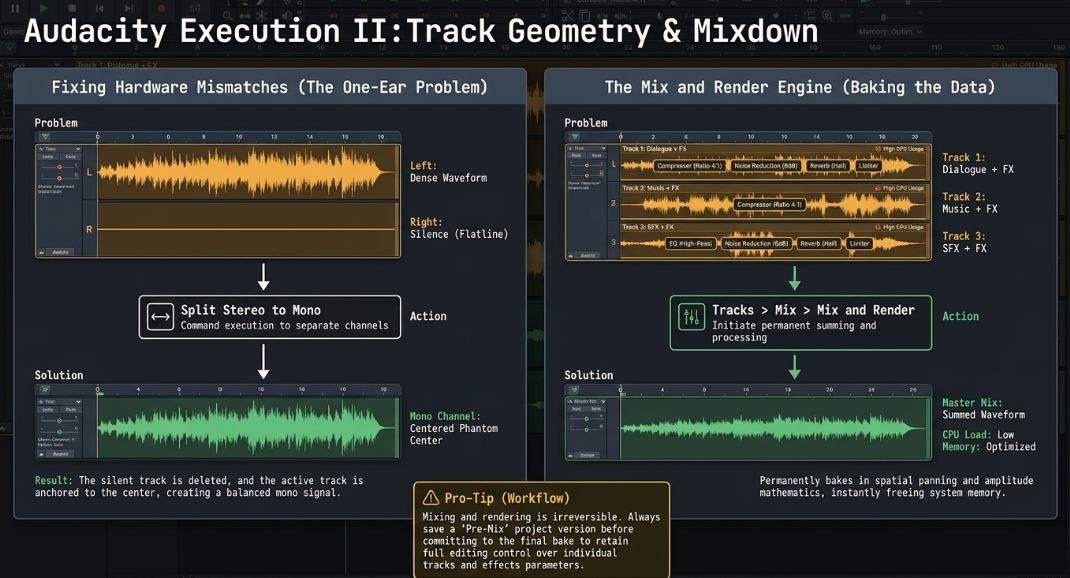
Method 1: Splitting the Stereo Track
If the engineer wishes to isolate and retain only the functional audio channel while completely discarding the empty, noisy channel to save processing power:
Click the specific track name located at the top of the Track Control Panel to open the contextual Track Dropdown Menu.37
Select the command Split Stereo to Mono. This action instantly severs the interleaved stereo track into two totally independent, center-panned mono tracks.37
Identify the empty or noisy track visually via the waveform, and delete it permanently by clicking the "X" button situated at the top left of its specific Track Control Panel.37 The remaining track is now a perfect, center-panned mono file.
Method 2: Mix Stereo Down to Mono
In scenarios where both the left and right channels contain distinct but vital acoustic information (for example, a field recording featuring an interviewer hard-panned on the left channel and a guest hard-panned on the right channel) that must be unified into a single broadcast-friendly track:
Highlight the entire stereo track using the selection tool.
Navigate to the top menu bar, select Tracks > Mix, and click Mix Stereo Down to Mono.37
The Audacity mix engine will mathematically average the amplitude of both the left and right channels, summing their data into a single, cohesive mono waveform that plays uniformly out of both speakers simultaneously.37 This process perfectly preserves any volume, gain, or pan settings previously applied to the original track.37
It is important to note that this specific mixdown command will be disabled (grayed out) by the software if the stereo track has already been split, or if the left and right channels possess mathematically different start or end positions on the temporal timeline.37 If the track is split, the user must first utilize the Track Dropdown Menu to join the channels back into a single stereo track before the conversion to mono can be successfully executed.
Bouncing Your Files in Audacity
In the established lexicon of professional audio engineering, the colloquial term "bouncing" originates directly from the mid-century analog tape era. When engineers ran out of physical tracks on a 4-track or 8-track tape machine, they would mathematically sum multiple tracks together and re-record (or "bounce") them onto a single open track on a separate tape machine to free up spatial real estate. Within modern digital DAWs, bouncing is functionally synonymous with "Exporting" or creating a final "Mixdown".18 Audacity utilizes the rigid terminology "Export Audio" or "Mix and Render" to accomplish these highly specific tasks.18
The Mix and Render Engine
Before exporting the final finished file to the hard drive, engineers frequently utilize bouncing techniques on complex, heavily layered audio stems within the project timeline itself. This commits CPU-intensive, real-time computational effects (like heavy EQ or noise reduction) directly into a new static waveform, freeing up massive amounts of system memory.
Selecting Tracks > Mix > Mix and Render mathematically sums all highlighted tracks together. This powerful process permanently renders all real-time transformations directly to the digital waveform, baking in any track gain adjustments, spatial panning, amplitude envelopes, and Project Sample Rate alterations.37 The resulting rendered "Mix" track instantly replaces the original selected tracks on the timeline.37
If the engineer wishes to perform a bounce while strictly preserving the original raw tracks for potential future non-destructive editing, they can utilize the alternative command Mix and Render to New Track (accessible via the shortcut Ctrl + Shift + M). This performs the exact same mathematical summing process, but safely deposits the newly rendered mix track directly below the original source tracks on the timeline.37
It is critical to actively monitor VU meter levels prior to engaging the render engine. The mathematical summing of multiple loud tracks can easily push the combined amplitude past 0 dBFS, resulting in severe digital clipping (audible as harsh pops or static noise). Master track gain controls must be deliberately reduced to provide adequate mathematical headroom prior to initiating the mixdown.37
The Final Export (Bouncing to Disk)
To completely bounce the finished, mastered podcast out of the enclosed Audacity processing environment for global distribution, the engineer must execute the Export sequence:
Initiate the Dialog: Navigate to File > Export Audio (or efficiently utilize the keyboard shortcut Ctrl + Shift + E).18
Track Selection Rules: Audacity's export engine operates on a strict WYSIWYG (What You Hear Is What You Get) paradigm. The software will unconditionally bounce all audio currently active and audible on the timeline. Tracks that have been manually silenced via the Mute button, or tracks that are grayed-out due to another track engaging the exclusive Solo button, will be completely and entirely excluded from the final exported file.14 Furthermore, any hidden audio tucked underneath overlapping clips will not be rendered.14
Naming Conventions: The engineer must enter the desired file name. A strict, non-negotiable industry best practice is to entirely avoid utilizing periods (dots) within the filename itself (e.g., utilize Podcast_Episode_01 rather than Podcast.Episode.01). Various operating systems and server architectures may fatally misinterpret internal periods as the initiation of a file extension, corrupting the file's operability and causing upload failures.18 To ensure total cross-platform and internet stability, only standard alphanumeric characters (A-Z, 0-9), underscores, and dashes should ever be utilized.18
Format and Encoding Parameters: The engineer must meticulously select the required format based on the delivery destination. For a high-resolution, lossless archival bounce, select WAV and set the encoding dropdown to Signed 16-bit PCM or 24-bit PCM.14 For immediate public RSS distribution, select MP3, adhering to the CBR parameters discussed previously.26
Channel Mapping: Configure the file to output as Stereo or Mono based strictly on the content constraints and ad-network requirements outlined in previous sections.14 Advanced, specialized users can select the "Custom mapping" toggle. Clicking the Configure button opens the Advanced Mixing Options dialog, allowing engineers to route specific internal Audacity tracks to discrete surround sound channels, though this application is exceedingly rare in standard podcasting.14
Range Definition: The user can precisely dictate the temporal scope of the bounce. Options include bouncing the Entire Project timeline, bouncing only a highlighted Current Selection (useful for exporting a quick teaser), or utilizing the powerful Multiple Files parameter.18 Exporting Multiple Files allows the DAW to rapidly bounce dozens of separate tracks or defined label regions into completely independent files simultaneously, which is an invaluable timesaver for batch-processing isolated vocal stems or sound effects.18
Metadata Insertion: Prior to finalizing the export sequence, the engineer should engage the Edit Metadata interface. Within this dialog matrix, essential ID3 tags—such as the overarching Podcast Title (Album category), specific Episode Title (Track Name), Release Year, and Genre—can be hardcoded directly into the file's header.18 This crucial step ensures that downstream hardware players, automobile stereos, and digital aggregator applications display the correct programmatic text information on-screen while the file is streaming.18
Once all parameters are meticulously verified, the engineer clicks the Export button. A progress dialog appears, tracking the algorithmic processing time.18 If an error is detected mid-bounce, clicking 'Stop' halts the math and leaves a partially usable file on the drive, whereas clicking 'Cancel' aborts the process entirely and deletes the fragmented data.18 Upon successful completion, the resulting file stands as the final, immutable digital realization of the audio production, comprehensively optimized and ready for immediate server ingestion and global acoustic distribution.
Works cited
Analog-to-digital conversion (ADC): What it is and how it works - Blog | Splice, accessed May 14, 2026, https://splice.com/blog/analog-to-digital-conversion/
Getting from a to d - and back-on digital conversion - DPA Microphones, accessed May 14, 2026, https://www.dpamicrophones.com/mic-university/background-knowledge/getting-from-a-to-d-and-back-on-digital-conversion/
All About Digital Audio: Part 1, accessed May 14, 2026, https://www.soundonsound.com/sound-advice/all-about-digital-audio-part-1
Are professionals in the industry producing music at sample rates above 48 kHz for the entirety of the session? : r/audioengineering - Reddit, accessed May 14, 2026, https://www.reddit.com/r/audioengineering/comments/1beljoe/are_professionals_in_the_industry_producing_music/
People who claim to hear the difference between 44.1khz, 48khz, and 96khz: Please explain why and how? - Reddit, accessed May 14, 2026, https://www.reddit.com/r/mixingmastering/comments/1pawrea/people_who_claim_to_hear_the_difference_between/
Sample Format - Bit Depth - Audacity Manual, accessed May 14, 2026, https://manual.audacityteam.org/man/sample_format_bit_depth.html
Sample Rates - Audacity Manual, accessed May 14, 2026, https://manual.audacityteam.org/man/sample_rates.html
WAV vs MP3: What's the Difference & Which Is Better for Podcasters - Riverside, accessed May 14, 2026, https://riverside.com/blog/wav-vs-mp3
What Sample Rate and Bit Depth Should I Use? - Resoundsound | Analog Mastering, accessed May 14, 2026, https://resoundsound.com/sample-rate-bit-depth/
Audio Sampling Rate Tips for Home Studios and Vinyl Pressing Projects - Disc Makers Blog, accessed May 14, 2026, https://blog.discmakers.com/2025/11/audio-sampling-rate-tips/
Pro Tools #protools #samplerate - 44.1 vs 48khz - YouTube, accessed May 14, 2026, https://www.youtube.com/shorts/ji9QZ7rwKCw
Audio requirements - Apple Podcasts for Creators, accessed May 14, 2026, https://podcasters.apple.com/support/893-audio-requirements
44.1khz vs 48khz: What is the Main Difference and Which Should I Use? - Boris FX, accessed May 14, 2026, https://borisfx.com/blog/44-1khz-vs-48khz-what-is-the-main-difference/
WAV Export Options - Audacity Manual, accessed May 14, 2026, https://manual.audacityteam.org/man/wav_export_options.html
WAV vs MP3: Choose the Best File for Your Podcast - Zencastr, accessed May 14, 2026, https://zencastr.com/blog/wav-vs-mp3-podcast-file-type
Best Audio Formats for Recording, Mastering & Distribution - MasteringBOX, accessed May 14, 2026, https://www.masteringbox.com/learn/audio-formats
WAV vs MP3: Which Audio Format is Best for Podcasting? - ZenCast, accessed May 14, 2026, https://www.zencast.fm/blog/wav-vs-mp3/
Export Audio - Audacity Manual, accessed May 14, 2026, https://manual.audacityteam.org/man/file_export_dialog.html
Wav or MP3 file ? : r/podcasting - Reddit, accessed May 14, 2026, https://www.reddit.com/r/podcasting/comments/1hm3bhd/wav_or_mp3_file/
Audio Quality Guidelines for podcast episodes - Support : RSS.com Knowledge Base, accessed May 14, 2026, https://help.rss.com/en/support/solutions/articles/44002371360-audio-quality-guidelines-for-podcast-episodes
Spotify Uploading Podcast: Complete Guide for 2026, accessed May 14, 2026, https://podcastmonkey.co/blogs/news/spotify-uploading-podcast
Should I Record Voice Overs in Mono or Stereo? - VOPlanet.com, accessed May 14, 2026, https://www.voplanet.com/article/should-i-record-voice-overs-mono-or-stereo
Mono vs. Stereo: Mixing Tips for Pro Results - Mastering.com, accessed May 14, 2026, https://mastering.com/mono-vs-stereo/
Stereo or Mono sound recording? Which do you use, and why? : r/podcasting - Reddit, accessed May 14, 2026, https://www.reddit.com/r/podcasting/comments/8wxewo/stereo_or_mono_sound_recording_which_do_you_use/
Mono Vs Stereo Podcast Audio Quality - Which is Better? - The Podcasting University, accessed May 14, 2026, https://thepodcastinguniversity.com/mono-vs-stereo-podcast-audio/
MP3 Export Options - Audacity Manual, accessed May 14, 2026, https://manual.audacityteam.org/man/mp3_export_options.html
Podcast Ad Specs & Requirements | Spotify Ads, accessed May 14, 2026, https://ads.spotify.com/en-US/ad-specs/podcast-ad-specs/
Chapter 7: Minimum requirements for podcast ads - Spotify Advertising, accessed May 14, 2026, https://ads.spotify.com/en-CA/guide-to-creating-audio-ads/podcast-ads-minimum-requirements/
Audio Settings Preferences - Audacity Manual, accessed May 14, 2026, https://manual.audacityteam.org/man/audio_settings_preferences.html
Audio file formats for Spotify, accessed May 14, 2026, https://support.spotify.com/us/artists/article/audio-file-formats/
Audio quality - Spotify Support, accessed May 14, 2026, https://support.spotify.com/us/article/audio-quality/
Changing track sampling rate and bit depth in an Audacity project, accessed May 14, 2026, https://forum.audacityteam.org/t/changing-track-sampling-rate-and-bit-depth-in-an-audacity-project/83583
FAQ:Recording - How To's - Audacity Manual, accessed May 14, 2026, https://manual.audacityteam.org/man/faq_recording_how_to_s.html
How to Change Sampling Rate in Audacity - Swell AI, accessed May 14, 2026, https://www.swellai.com/blog/how-to-change-sampling-rate-in-audacity
New Project Rate Settings - Windows - Audacity Forum, accessed May 14, 2026, https://forum.audacityteam.org/t/new-project-rate-settings/77519
Just updated... to 3.3.2 - Audacity 3 Help Forum, accessed May 14, 2026, https://forum.audacityteam.org/t/just-updated-to-3-3-2/75165
Tracks Menu: Mix - Audacity Manual, accessed May 14, 2026, https://manual.audacityteam.org/man/tracks_menu_mix.html
How to Convert Stereo to Mono in Audacity? Quick Tutorial - YouTube, accessed May 14, 2026, https://www.youtube.com/watch?v=0vu9nGZHobQ
Audacity How to Make Track Mono - Swell AI, accessed May 14, 2026, https://www.swellai.com/blog/audacity-how-to-make-track-mono
How to Convert Stereo to Mono in Audacity - YouTube, accessed May 14, 2026, https://www.youtube.com/watch?v=QKIxeOErNh0