Synchronous Calibration and Temporal Drift Mitigation
The primary technical challenge in multi-camera video podcast post-production is establishing a unified temporal reference across independent recording devices1. When video and audio are captured on multiple cameras and dedicated sound recorders, aligning these assets is critical to prevent lipsync errors and phase anomalies2. Under the Society of Motion Picture and Television Engineers (SMPTE) ST 12-1 standard, frame-accurate synchronization is maintained by stamping every media frame with a unique temporal address formatted as hours:minutes:seconds:frames ()1.
In a multi-camera studio, timecode is distributed using either Longitudinal Timecode (LTC) or MIDI Timecode (MTC)1. LTC operates as an analog audio signal that modulates timecode data into a bi-phase mark format, which is recorded onto an unused audio channel of non-timecode-enabled cameras or audio recorders1. MTC functions within the digital domain to lock Digital Audio Workstations (DAWs) to video playback engines, though it remains highly vulnerable to buffer-induced latency and dropped packets if digital networks are unstable1.
[GPS-Locked Master Clock Reference]
|
+-----------------------+-----------------------+
| (LTC Genlock Sync) | (NTP Protocol)
v v
[Leader LT4670 Generator] [vMix Capture Engine]
|
+-----------------------+
| (Analog Audio Path) | (Word Clock BNC)
v v
[Camera LTC Audio Track] [Digital Mixer Converters]
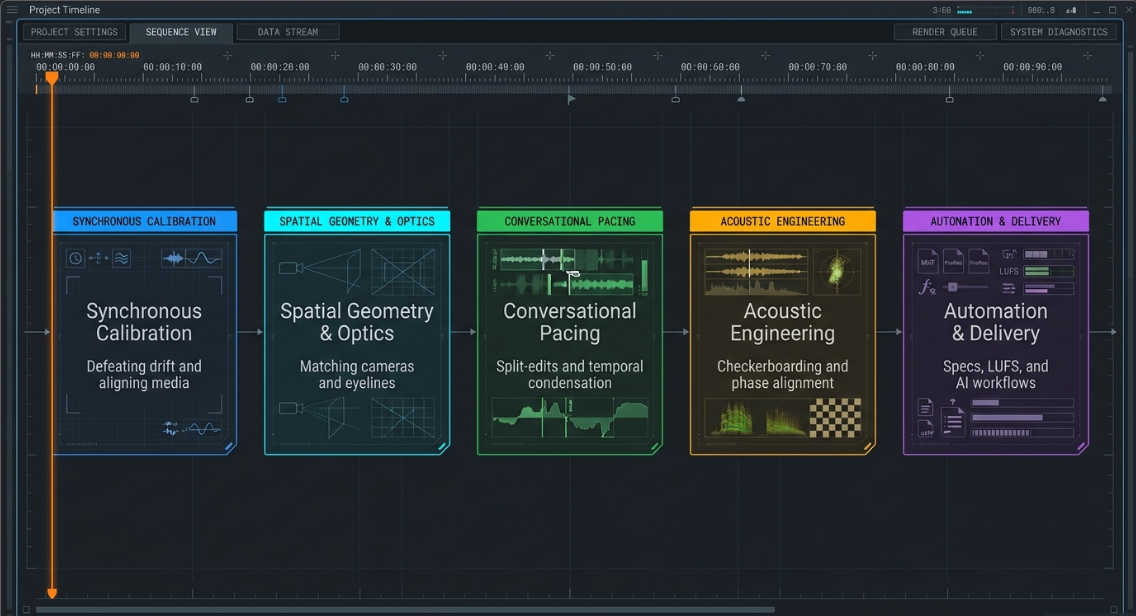
To maintain frame-accurate sync, professional workflows use external timecode generators equipped with Temperature-Compensated Crystal Oscillators (TCXOs)2. Standard internal camera clocks drift due to thermal fluctuations in the chassis and environment2. TCXO devices mitigate this drift by dynamically adjusting their resonance frequency relative to temperature, remaining frame-accurate for up to 48 hours2. During production, these generators are "jam-synced" to a master clock and attached to each camera and audio recorder2. Disconnecting generators after jam-syncing introduces drift as devices revert to their internal clocks2. Keeping them physically connected ensures a continuous, drift-free sync2.
For consumer cameras or mobile devices that lack dedicated timecode inputs, the LTC audio signal can be recorded directly onto a scratch audio track2. This "audio-timecode" is subsequently parsed and converted into file metadata within non-linear editing (NLE) applications like DaVinci Resolve or Adobe Premiere Pro using automated tools like Tentacle Sync Studio or Deity’s sync applications2.
Additionally, digital audio conversion must be synchronized using a master word clock signal1. Word clock ensures that all analog-to-digital converters (ADCs) operate at the exact same sample rate (typically )1. Without word clock synchronization, sample-rate drift causes digital clicks, pops, and comb filtering when summing multiple audio sources in post-production1. This synchronization is even more critical when managing Variable Frame Rate (VFR) footage3.
VFR, common in smartphones and remote capture tools like Zoom, adjusts frame rates dynamically to compress file sizes3. When placed on a constant-frame-rate (CFR) editing timeline, VFR video gradually drifts from real-time audio3. Post-production engineers use media analysis applications, such as MediaInfo, to identify VFR files and transcode them to constant frame rates (e.g., for PAL or for NTSC) using HandBrake or native timeline render engines before cutting3.
Furthermore, HDMI connections do not natively support genlock or frame-accurate synchronization protocols5. To resolve this latency in multi-camera configurations, engineers convert HDMI signals to SDI using hardware like Blackmagic Up-Down-Cross Converters5. These converters reference a shared analog sync source (such as an old analog camera or genlock generator), acting as a frame buffer to align incoming feeds before they reach the capture card5.
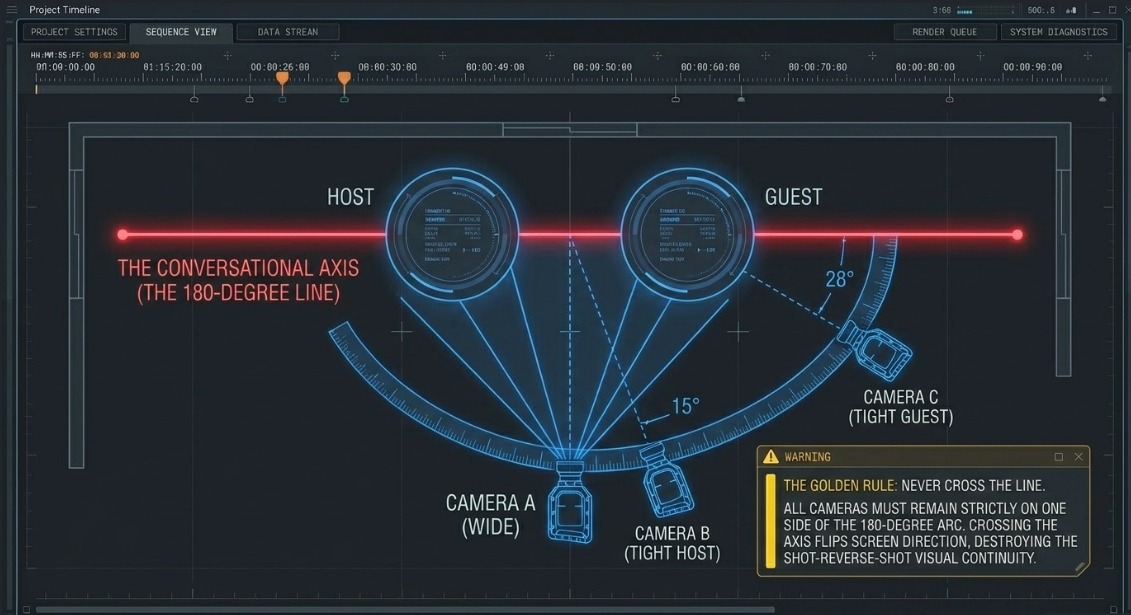
Spatial Geometry, Eyeline Matching, and Multi-Camera Setup Configuration
Establishing a coherent visual geography is critical for maintaining viewer engagement and spatial awareness during cuts8. The production space must be laid out according to strict physical guidelines to ensure seamless transitions in post-production8.
/===================\
| Wide Safety Shot |
| (Camera A) |
\=========+=========/
|
|
v
[Host Position] <================ Conversational Axis ================> [Guest Position]
| |
|-- [Camera B (Tight Host)] |-- [Camera C (Tight Guest)]
| (15-degree offset) | (25 to 30-degree offset)
| |
\=========================[ 180-Degree Line ]============================/
The 180-Degree Rule and Conversational Axes
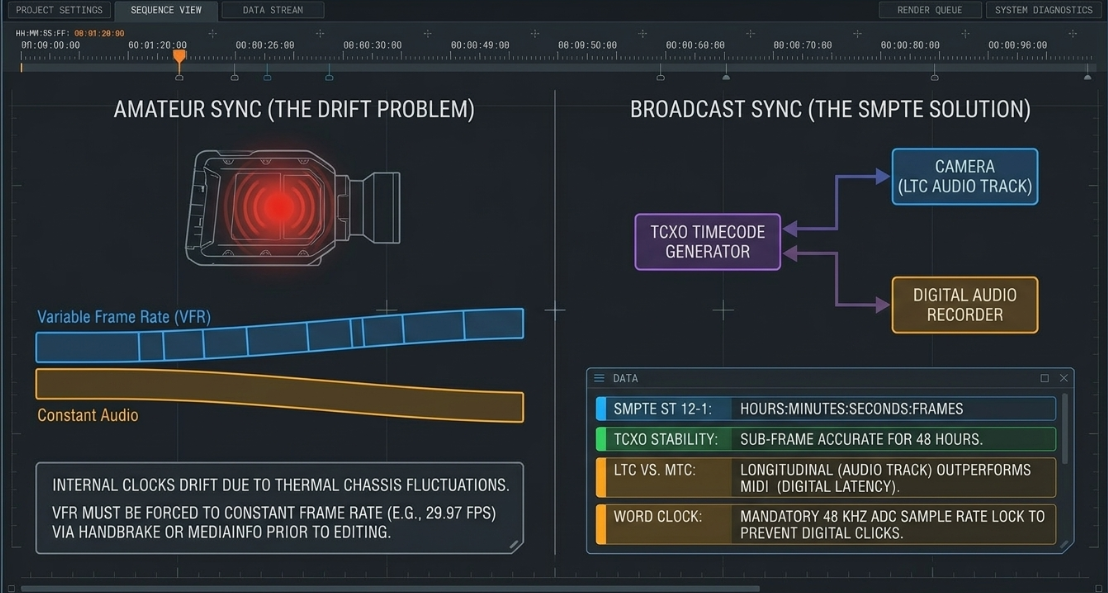
The spatial layout of any multi-camera setup is governed by the 180-degree rule8. Post-production engineers define an imaginary "conversational axis" that runs directly through the eyes of the host and guest8. All camera placements must remain strictly on one side of this semi-circle8. Crossing this line with any camera angle flips the screen direction of the participants8.
When cut sequentially, the host and guest will appear to be looking in the same direction rather than at one another, breaking visual continuity8. For standard interview formats, a three-camera system represents the ideal balance of coverage and editing flexibility11.
In this layout, Camera A is positioned directly on the perpendicular axis as a wide safety shot capturing both participants in a single "two-shot"10. This angle provides spatial context and serves as a transition cut when both speakers talk simultaneously11. Camera B is positioned tight on the host, offset approximately from the conversational axis9. Camera C is placed tight on the guest, offset between and on the same side of the line10.
These specific offsets capture natural, three-quarter profiles where the host looks screen-right and the guest looks screen-left, creating a balanced "shot-reverse-shot" configuration8. For panel-style talk shows, dedicating one close-up camera per primary speaker alongside a wide safety shot ensures full coverage of all reactions and interactions10.
Color Science, Exposure matching, and Optical Uniformity
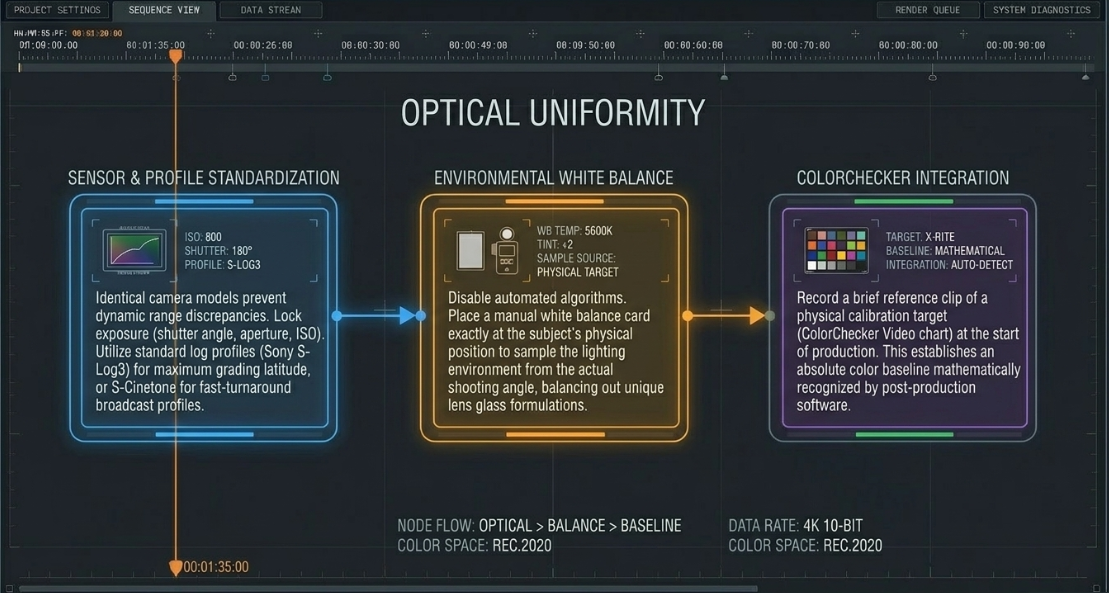
To make cuts between cameras seamless, the visual characteristics of all camera angles must match as closely as possible11. This is achieved through systematic camera matching:
Camera Sensor Standardization: Using identical camera models and brands ensures uniform sensor behavior, contrast, and color reproduction11. Even within the same manufacturer, different sensor generations interpret color selectively, creating dynamic range discrepancies that require extensive grading in post-production12.
White Balance Calibration: Do not rely on automated or estimated camera settings12. Instead, a standardized white balance card must be placed at the subject's exact position, allowing each camera to manually sample the lighting environment from its actual shooting angle12. This balances out the unique spectral properties of each lens's coatings and glass formulations12.
Exposure and Profile Controls: Exposure settings (shutter angle, aperture, and ISO) must be matched and locked across all cameras10. Using standard log profiles, such as Sony S-Log3, maximizes dynamic range for post-production grading, while profiles like S-Cinetone provide a polished, broadcast-ready image straight out of the camera for fast-turnaround workflows13.
Colorchecker Integration: Recording a brief reference clip of a color-calibration target (e.g., a ColorChecker Video chart) at the start of production establishes a reliable color baseline for grading inside tools like DaVinci Resolve12.
Post-Production Cut Classifications and Conversational Pacing Dynamics
The choice of edit points determines the rhythm and feel of a conversation14. In professional podcast post-production, cuts are categorized based on their structural role and impact on pacing16.
Cut Classifications
The core edit categories used to assemble and refine podcast timelines include:
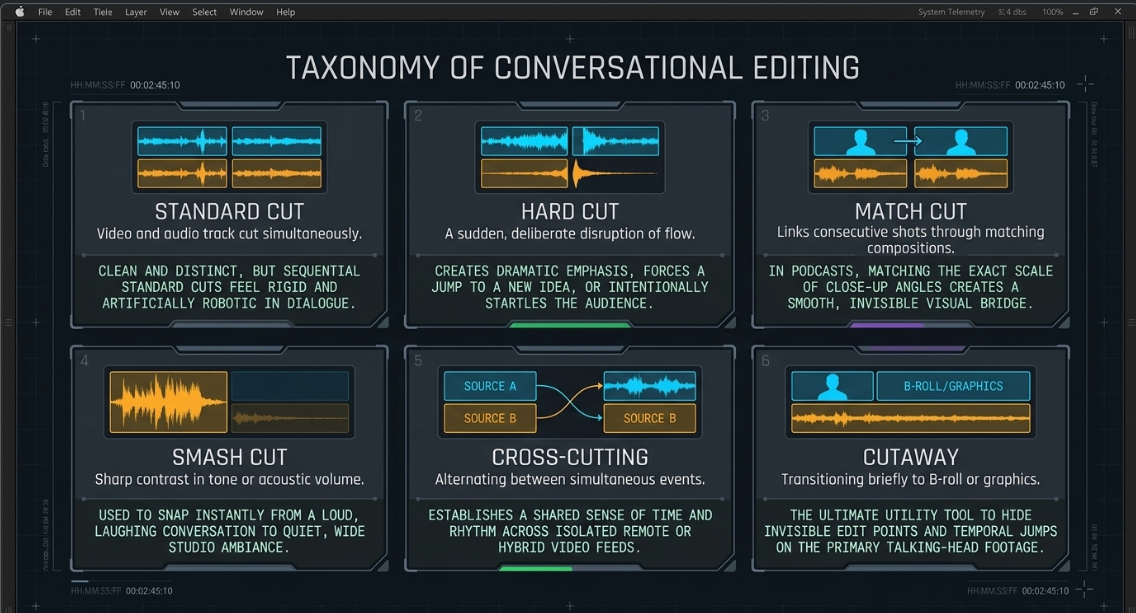
Standard Cut (Straight Cut): This is the most basic transition, where the video and audio tracks cut simultaneously on the exact same frame16. While useful for clean, distinct transitions, sequential straight cuts during a dialogue sequence can feel rigid and artificial18.
Hard Cut: A sudden, deliberate cut designed to disrupt the natural flow of a scene19. Hard cuts are typically used to create dramatic emphasis, jump to new ideas, or startle the audience19.
Match Cut: A transition that links two consecutive shots through matching visual elements, motion, or compositions16. In a podcast, matching the scale and framing of close-up angles creates a smooth visual bridge during speaker transitions8.
Smash Cut: A transition featuring a sharp contrast in tone, action, or audio volume16. For example, cutting from a loud, laughing conversation to a quiet wide shot of the studio16.
Cross-Cutting (Parallel Editing): This technique alternates between two or more events occurring simultaneously in different spaces16. In remote or hybrid podcasts, cross-cutting between separate remote feeds establishes a shared sense of time and conversational flow16.
Cutaway: A transition where the editor cuts away from the main speaker to show B-roll, screen recordings, or graphics, hiding edit points on the talking-head footage19.
Split-Edit Mechanics: J-Cuts and L-Cuts
To make dialogue sequences sound natural, editors rely heavily on split-edit techniques, specifically J-cuts and L-cuts20. These edits decouple the audio and video cut points, allowing transitions to blend seamlessly18.
Standard Cut Timeline:
Video: [ Host Close-up ][ Guest Close-up ]
Audio: [ Host Speaking ][ Guest Speaking ]
^ (Simultaneous Cut Point)
J-Cut (Audio Lead) Timeline:
Video: [ Host Close-up ][ Guest Close-up ]
Audio: [ Host Speaking ][ Guest Speaking ]
^ (Audio Cut Point Starts Early)
L-Cut (Audio Trail) Timeline:
Video: [ Host Close-up ][ Guest Close-up ]
Audio: [ Host Speaking ][ Guest Speaking ]
^ (Audio Cut Point Ends Late)
In a J-cut, the audio of the upcoming shot (Clip B) begins playing before the video transitions from the current shot (Clip A)18. The audio clip extends to the left beneath the preceding video, forming a "J" shape on the timeline24.
This edit mirrors how humans naturally experience conversations; when someone begins speaking, our ears register the sound a split second before we turn our heads to look at them26. Introducing the guest's voice while holding on the host's face makes the visual cut feel anticipated and natural18.
In an L-cut, the audio from the preceding shot (Clip A) continues playing after the video cuts to the next shot (Clip B)18. This creates an "L" shape on the timeline as the outgoing audio track extends to the right24.
L-cuts are ideal for capturing visual reactions8. For example, as the host finishes asking a question, the editor cuts to the guest's face to capture their physical response (e.g., a nod or a smile) while the host's final words trail off18. This technique maintains conversational flow and keeps the viewer connected to the emotional undertone of the interaction18.

Dialogue Pacing Metrics and Cognitive Processing
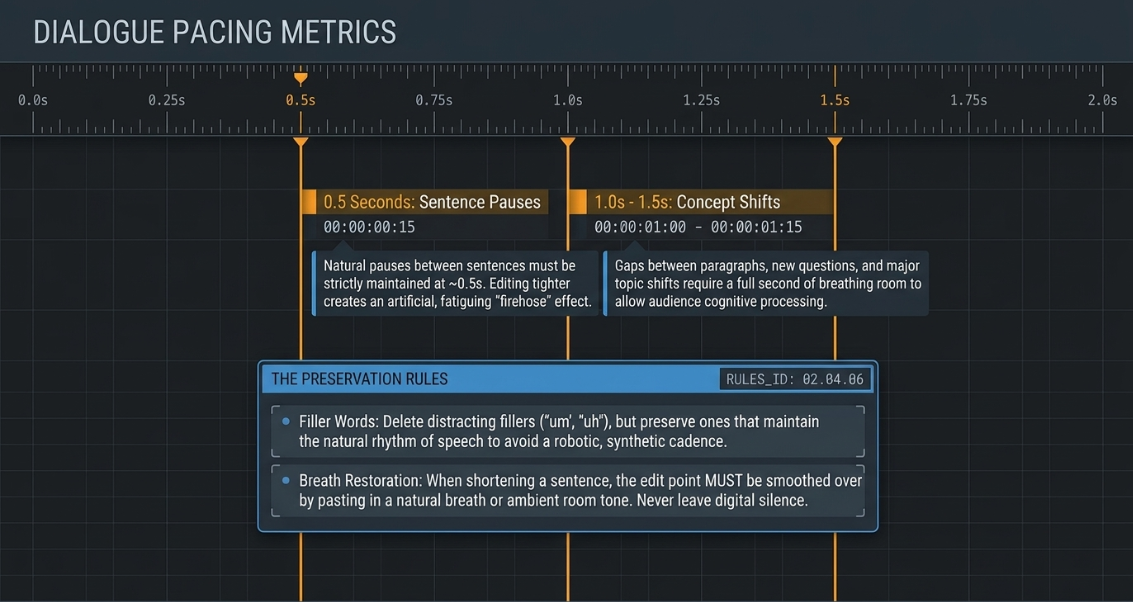
The pacing of edits significantly influences how an audience digests the conversation15. Over-editing to remove every pause or breath can create a relentless "firehose" effect17. This removes natural breathing patterns, making the dialogue sound artificial and fatiguing the listener15.
Conversely, leaving long silences can cause the pacing to drag14. Dialogue editors adjust conversational spacing based on the following standards:
Sentence Pauses: Natural pauses between sentences should be kept around 17. Gaps shorter than sound rushed and unnatural17.
Concept Shifts: Gaps between paragraphs, questions, and new topics require more breathing room, typically ranging from 17. This allows the audience to process key points before moving on15.
Filler Word Management: Deleting every filler word ("um," "uh," "like") can make speakers sound robotic15. It is best to remove distracting filler words but preserve those that occur naturally within the rhythm of speech15.
Breath Restoration: When a sentence is shortened, the edit should be smoothed over by using a natural breath or adding room tone15. This preserves the organic flow of the dialogue and ensures the cut points remain invisible15.
Edit Categories for Temporal Condensation: Jump Cuts, Morph Cuts, and Scaling
When editing single-camera interviews or removing sections of dialogue from a locked-off angle, editors must condense time without the benefit of switching to a different camera perspective22. This requires specific edit categories to hide jump cuts and maintain visual continuity16.
Raw Jump Cut Timeline:
[ Locked-off Medium Shot: "The issue is..." ] -> Cut Point -> [ Locked-off Medium Shot: "...highly critical." ]
(Visible spatial "jump" of subject)
Punched-In (Reframed) Timeline:
[ Scale: 100% | Medium Shot: "The issue is..." ] -> Cut Point -> [ Scale: 130% | Close-up: "...highly critical." ]
(Simulates a dynamic 2-camera setup)
Jump Cuts
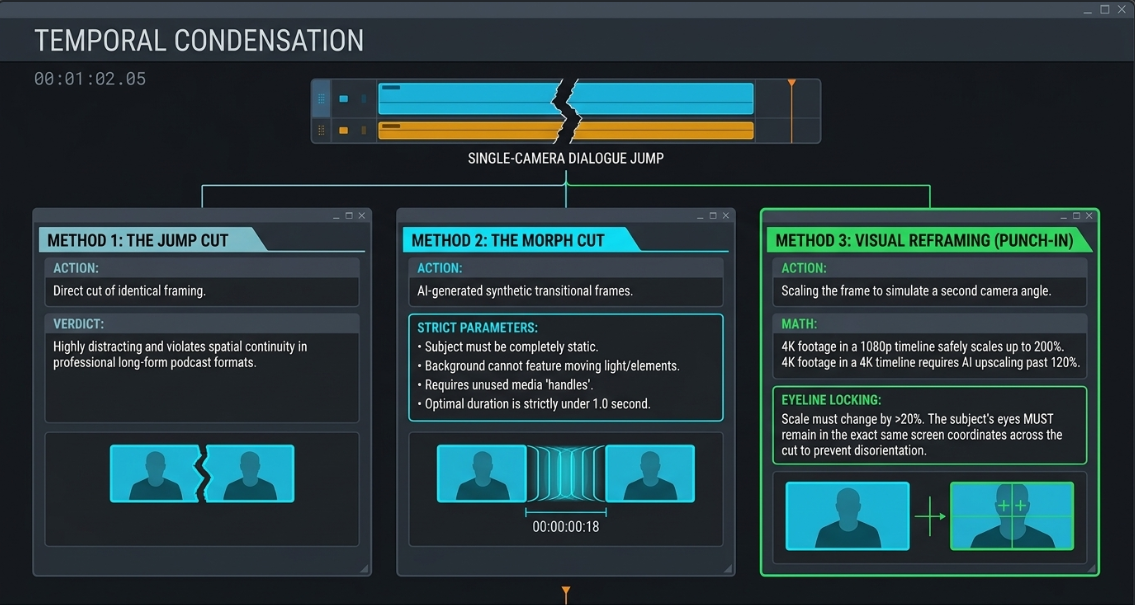
A jump cut is a direct cut between two sequential clips of the same subject taken from an identical camera position30. This causes the subject's face and body to appear to "jump" instantly forward in time30.
While jump cuts are common in fast-paced social media videos18, they can be distracting in professional, long-form podcast formats because they violate traditional continuity rules16.
Morph Cuts
To smooth out these visual jumps, editors can apply a morph cut transition32. This effect uses advanced face-tracking and optical-flow algorithms to analyze consecutive video frames and interpolate the pixels between them, generating synthetic transitional frames22. When successful, a morph cut makes the visual transition between edit points virtually invisible33.
However, morph cuts have several key technical limitations:
Subject Movement Limitations: The speaker's face and body must remain in nearly identical positions across the cut32. If they make sudden head movements, shift their hands, or blink during the transition, the algorithm can produce unnatural warping artifacts or "ghosting"33.
Background Consistency: The background behind the subject must remain completely static32. Any movement in the background, such as swaying trees or shifting light levels, will cause noticeable pixel distortion34.
Clip Handle Requirements: Like standard transitions, morph cuts require adequate "handles" (extra, unused frames at the beginning and end of a cut) to analyze the transition35. If a clip starts on its very first frame (indicated by a white triangle on the timeline), the transition cannot be applied35. This can be bypassed by performing a J-cut or L-cut to gain handles or setting the transition alignment to "Center at Cut" in the Effect Controls panel35.
Ideal Duration: To minimize warping artifacts, morph cut transitions should be kept short, typically lasting between 33.
Visual Reframing (Punch-ins)
Visual reframing, or "punching in," is a reliable technique for hiding jump cuts when working with a single high-resolution camera angle22. By scaling and repositioning the video frame at the edit point, editors can simulate a multi-camera shoot using a single camera angle22.
For a natural-looking transition, the change in scale must be distinct enough to feel intentional to the viewer22. To simulate a cut between a medium shot and a close-up, the image size should be changed by at least 22.
When working in a delivery timeline, source footage can be scaled up to without any perceptible loss in image quality29. If the project timeline itself is , scaling beyond may require AI-powered upscaling tools in post-production to preserve detail and clarity29.
Additionally, editors must carefully adjust the position of the punched-in frame to ensure the subject's eyes remain in the same portion of the screen across the cut29. This prevents the viewer's eyes from having to adjust to a new position, making the transition feel much smoother29.
Acoustic Engineering, Multitrack Checkerboarding, and Phase Optimization
While video engagement is important, audio quality is the most critical factor for viewer retention in podcast production28. Professional post-production requires systematic track management and a deep understanding of acoustic physics7.
The Checkerboarding Technique
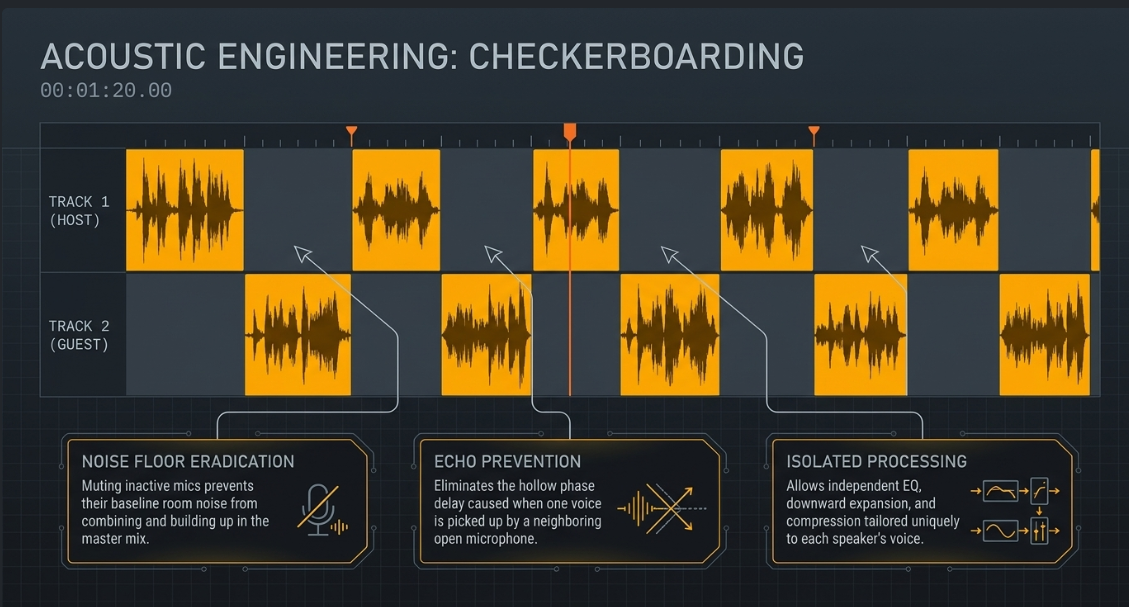
When editing a podcast with multiple microphones, the raw recordings will often contain background noise, room reflections, and bleed from other speakers37. To manage this, dialogue editors use a technique called "checkerboarding"28.
Checkerboarding involves separating each speaker's dialogue onto its own dedicated audio track and completely muting or deleting the portions of the track where they are not speaking36. On the timeline, the active audio clips alternate across different tracks, creating a pattern that resembles a checkerboard37.
Track Layout: Audio Checkerboarding
Track 1 (Host Mic): [ Dialogue Segment A ] [ Segment C ]
Track 2 (Guest Mic): [ Dialogue Segment B ]
^----------------------^------------------------^
Alternating active audio zones
This structural separation is essential for several reasons:
Speaker-Specific Processing: It allows editors to apply independent EQ, compression thresholds, and noise reduction tailored to each speaker's voice28.
Noise Floor Reduction: Muting inactive microphones prevents their noise floors from combining, keeping the overall noise floor low and the dialogue clean37.
Eliminating Echoes: It prevents the hollow, delayed sound that occurs when one person's voice is picked up by both their own microphone and a neighboring microphone13.
Acoustic Bleed and Phase Relationships
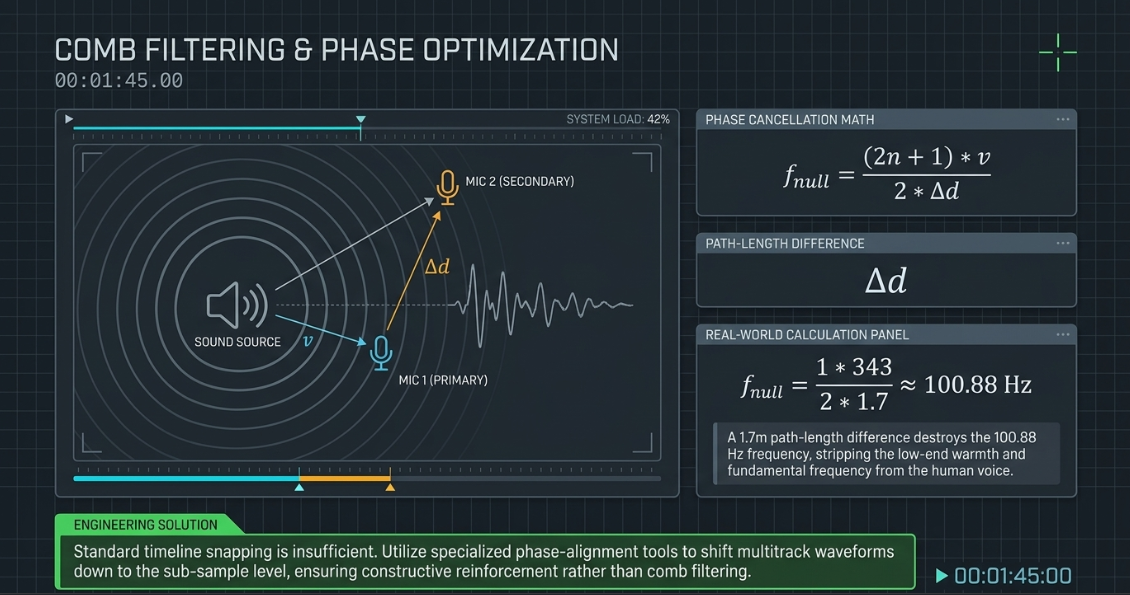
Acoustic bleed occurs when a speaker's voice is captured by a neighboring microphone in the same room38. Because the sound wave travels a further distance to reach the secondary microphone, it arrives slightly later than it does at the primary microphone7.
This arrival delay introduces phase differences between the two signals7. When these out-of-phase signals are summed together in the mix, they cause comb filtering7. Comb filtering occurs when certain frequencies cancel each other out while others are amplified, resulting in a thin, hollow, or "washy" sound7.
This phase relationship can be expressed mathematically. The null frequencies () where phase cancellation occurs are determined by the path-length difference ():
Where:
is the speed of sound in air (approximately at ).
is the physical path-length difference in meters between the speaker's mouth and the two microphones.
is an integer () representing the sequential null points.
For example, if a speaker is positioned from their own microphone and from a co-host's microphone, the path-length difference () is 7. The first phase cancellation () will occur at:
This cancellation falls directly within the fundamental frequency range of the human voice, resulting in a noticeable loss of low-end warmth and clarity7.
To prevent these phase issues, editors use specialized phase-alignment tools (such as Sound Radix Auto-Align Post) to align the waveforms down to the sub-sample level40. Once aligned, the signals reinforce each other rather than canceling out40.
Automated Mitigation: Gates, Expanders, and Spectral Separation
For long-form recordings, manually checkerboarding every edit can be incredibly time-consuming40. Editors often use automated dynamics processors to speed up this workflow:
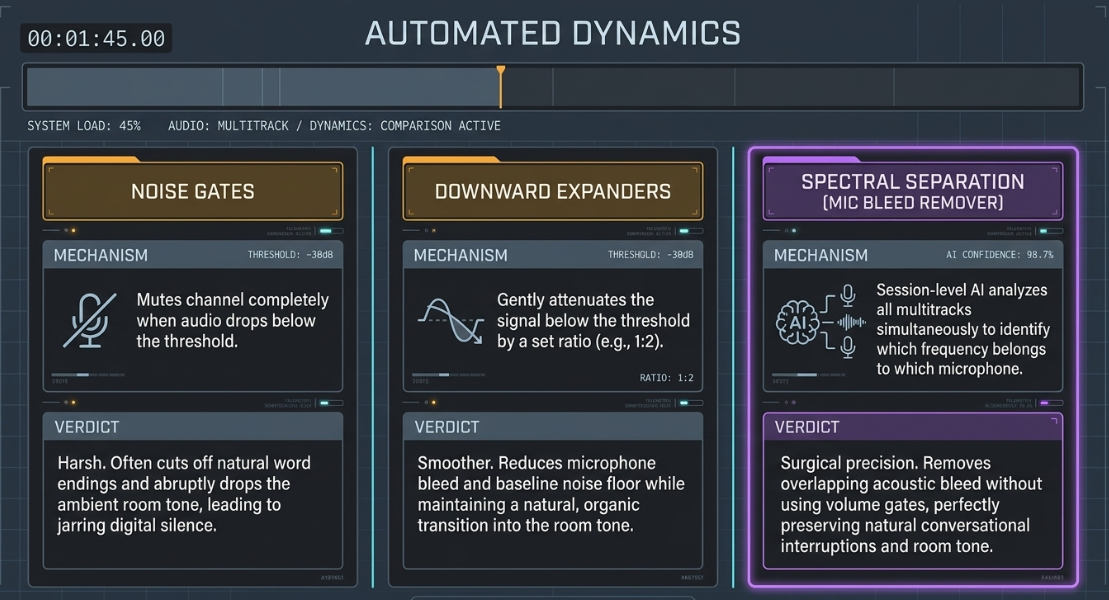
Noise Gates: A noise gate completely mutes an audio channel when the signal drops below a set threshold39. However, standard gates can sound harsh if they cut off natural word endings or abruptly drop the room tone, making the edit sound unnatural38.
Downward Expanders: Rather than completely muting the audio, an expander gently attenuates the signal below the threshold by a set ratio (e.g., )40. This reduces background bleed and noise floors while maintaining a natural-sounding transition40.
Multi-Track Spectral Separation: Advanced, session-level algorithms (such as Auphonic's Mic Bleed Remover) analyze all microphone tracks simultaneously38. Instead of simply gating the tracks based on volume, these tools use spectral analysis to identify which voice belongs to which microphone38. They then surgically remove the bleeding audio from neighboring tracks while preserving the natural room tone and overlapping speech38.
Integrated Hardware Switcher and Non-Linear Editor (NLE) Workflows
High-volume podcast studios use integrated hardware-software pipelines to streamline the transition from production to final delivery6.
The Blackmagic ATEM ISO and DaVinci Resolve Pipeline
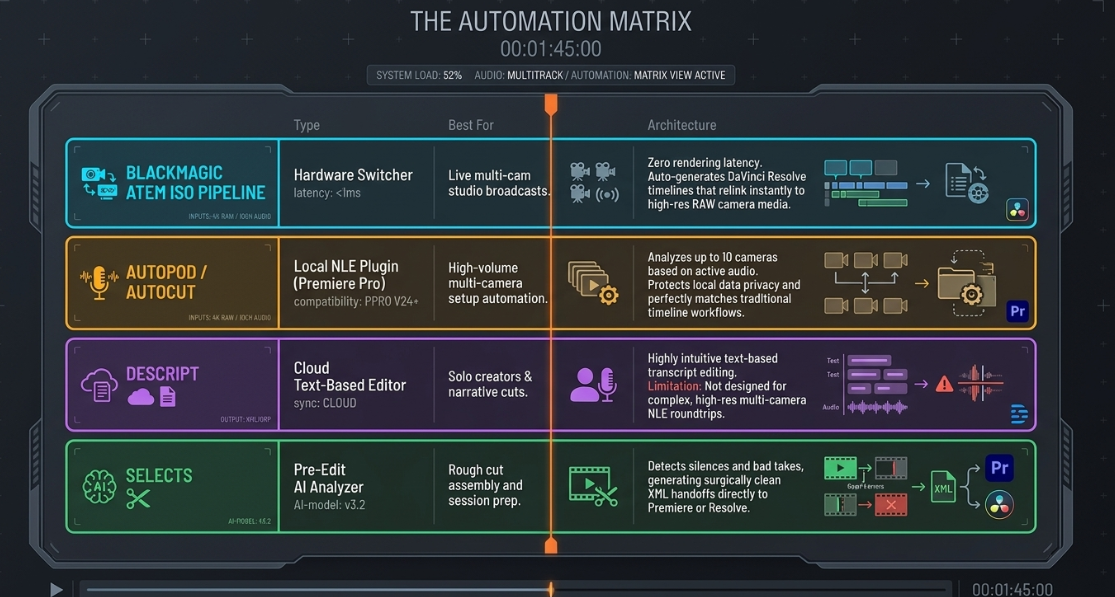
The Blackmagic ATEM Mini ISO series provides an efficient workflow for multi-camera video production45. By connecting up to eight HDMI cameras to the switcher, an operator can cut the show live during the recording session44.
The critical value of the "ISO" models lies in their ability to record each input as a separate, isolated video file onto an external USB-C drive45. Simultaneously, the switcher records a master "Program" mix and generates a DaVinci Resolve Project (.drp) file or an XML file containing all the metadata for the live cuts45.
[ Production Stage ]
Cameras 1-4 ---> ATEM Mini ISO ---> [ Records Master Program ]
---> [ Records Isolated ISO Feeds ]
---> [ Generates DaVinci Resolve Project (.drp) ]
[ Post-Production Stage ]
Open .drp in DaVinci Resolve ---> Relink ISOs to High-Res Camera Cards (BRAW/ProRes) ---> Apply Fine Cuts & Color Grades
This workflow offers several key advantages in post-production:
Instant Timeline Assembly: Opening the .drp file in DaVinci Resolve automatically builds a complete timeline of the live cut45. All cut points, dissolves, and graphic overlays are perfectly aligned to the synced audio tracks45.
Re-Editing Live Cuts: Because the timeline is built using the individual ISO files, editors can easily change any cut or switch camera angles directly on the timeline45.
High-Resolution Finishing: If the cameras recorded in high-resolution RAW formats (such as Blackmagic RAW) onto their internal media cards, the low-bitrate proxy files recorded by the ATEM can be instantly relinked to the original high-resolution assets in Resolve for final color grading and mastering45.
AI-Assisted Editing and NLE Automation Tools
For productions that do not use live physical switchers, post-production has been significantly accelerated by AI-assisted editing tools6. These tools automate the tedious, repetitive parts of the edit, allowing creators to focus on the creative aspects of storytelling49.
AutoPod / AutoCut: These plugins operate directly within NLEs like Adobe Premiere Pro6. They analyze multi-track audio to identify the active speaker, automatically sync the camera angles, and build a rough cut of the episode6. These tools are highly effective for multi-camera setups, reducing rough-cut assembly times by up to 50.
Descript: Descript uses a text-based approach to video editing50. Upon importing the raw footage, the platform transcribes the audio, allowing editors to cut and rearrange the video simply by editing the text transcript49. This is highly useful for solo podcasters and narrative-driven content, though it lacks the advanced multi-camera timeline controls found in dedicated NLEs50.
Selects: Selects is designed for rapid long-form footage preparation50. It specializes in analyzing transcripts to detect filler words, silences, and bad takes, allowing editors to clean up their footage before handing it off to an NLE for the final creative edit50.
Technical Delivery Specifications and Quality Control
To ensure podcast video and audio translate perfectly across all major distribution platforms, the final master file must adhere to precise technical standards42.
Audio Loudness Standards
Unlike raw audio peaks, which only measure the loudest instantaneous points in a file, loudness is measured in Loudness Units relative to Full Scale (LUFS)42. LUFS is an empirical measurement that represents how loud the audio actually feels to a human listener over time54.
Target Loudness: Spoken-word podcasts should target an integrated loudness of for stereo files, or for mono files42.
True Peak Limit: The true peak of the audio must never exceed (decibels True Peak)42. This provides of headroom to prevent inter-sample clipping and digital distortion when the audio is converted to lossy formats (like MP3 or AAC) by streaming platforms42.
Platform Normalization: Major streaming platforms normalize audio automatically to protect listeners from sudden volume changes42. Spotify and YouTube normalize content to , while Apple Podcasts normalizes to 54. Mastering to a consistent standard of with a peak ensures the podcast maintains clear, consistent volume across all platforms without triggering aggressive compression or limiting54.
Dynamic Range Control
Dynamic range refers to the difference between the quietest and loudest parts of your audio. For spoken-word podcasts, the dynamic range should be kept relatively consistent to ensure every word is clear and intelligible, even when listening in noisy environments37.
Loudness Range (LRA): Spoken-word content should maintain a Loudness Range of 42.
Solo Narration: For solo speakers, a narrower dynamic range of is ideal for a highly consistent and clear delivery42.
Multi-Host/Panel Discussions: Multi-host conversations require a slightly wider range of to preserve the natural feel of laughter, interruptions, and conversational dynamics42.
Acoustic Room Metrics
To achieve a professional-grade mix, the recording environment and raw audio files should meet specific acoustic baselines54:
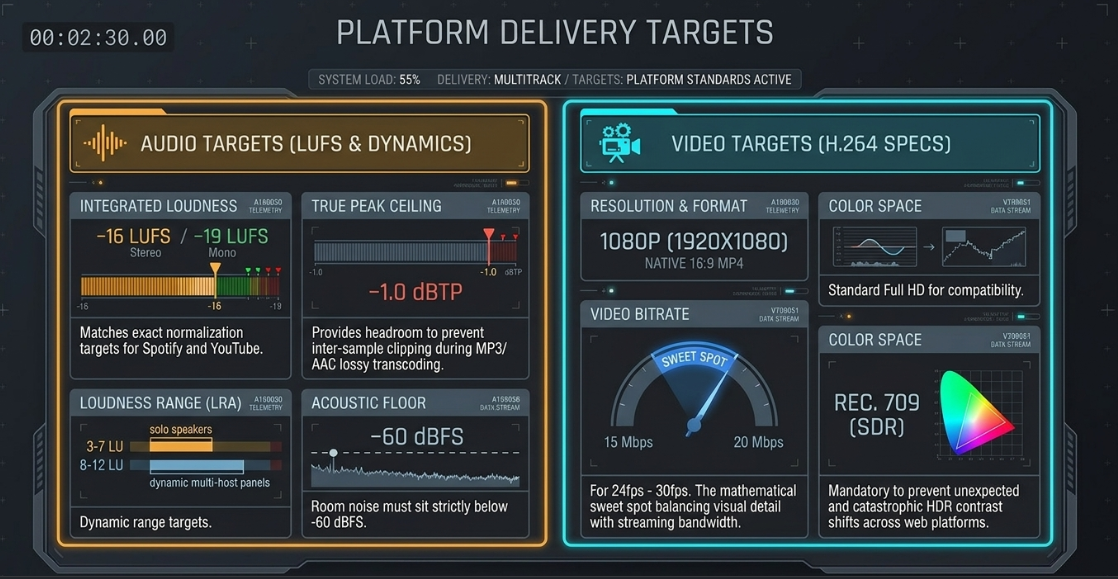
Noise Floor Baseline: The noise floor (the sound level of the room when no one is speaking) must be quieter than (ideally lower than ) to prevent noticeable background hiss or hum54.
Speech Intelligibility Standard: The fundamental frequencies of the human voice must be at least louder than the room's noise floor54. This ensures every word is clean, intelligible, and easy to understand54.
Video Export Settings
Video export settings must balance high image quality with manageable file sizes, ensuring the video streams smoothly across various devices and internet connections55.
Format and Codec: The industry standard for video delivery is an MP4 container utilizing the H.264 video codec55. This format provides excellent compression and is universally compatible with all web players and mobile devices55.
Resolution and Aspect Ratio: Full HD () with a native 16:9 aspect ratio is the standard for landscape video55. While resolution provides incredible detail, it also creates massive file sizes that can slow down downloads and strain listener bandwidth on mobile data plans56.
Video Bitrate: For video at standard frame rates (), the target target video bitrate should sit between 55. This range preserves visual detail while keeping file sizes reasonable for streaming and downloading55.
Color Space: Videos must be exported using the Rec. 709 color space with standard Standard Dynamic Range (SDR)59. High Dynamic Range (HDR) formats like Rec. 2020 are typically down-converted by video platforms to maintain compatibility with standard displays, which can sometimes lead to unexpected shifts in color or contrast59.
Technical Quality Control Checklist
Before exporting and distributing a video podcast, editors should perform a comprehensive quality control check to ensure the episode meets professional standards:
1. File Preparation and Structural Sync
[ ] Verify that all video sources have been successfully converted to a Constant Frame Rate (CFR) to prevent progressive drift3.
[ ] Confirm that external TCXO timecode sources matched frame-accurately across all recording devices2.
[ ] Check the start and end of the timeline to ensure the audio track matches the video frames perfectly, checking for any lip-sync alignment issues3.
[ ] Ensure all audio files are standardized to a broadcast sample rate of with a depth54.
2. Video Continuity and Geometry
[ ] Review every cut to ensure no cameras crossed the 180-degree conversational axis8.
[ ] Confirm that all close-up angles are framed symmetrically, maintaining consistent headroom and eye levels across speakers8.
[ ] Verify color grading consistency across all angles, using scopes (RGB Parade, Vectorscope) to match skin tones12.
[ ] Double-check all visual reframing/punch-ins to ensure they scale up by at least and that eye levels remain aligned across cuts to prevent jarring jumps22.
[ ] Inspect all morph cut transitions for warping artifacts, especially around fast head movements, hands, or blinking eyes33.
3. Dialogue and Pacing
[ ] Audit dialogue pacing to ensure natural pauses ( for sentences, for paragraphs) are maintained17.
[ ] Ensure all edits made to remove filler words have been smoothed over using natural breaths or room tone to prevent abrupt cuts15.
[ ] Confirm that transition elements (intro/outro music, sound effects, sponsor breaks) fade in and out cleanly with no sudden pops or clicks23.
4. Acoustic Integrity and Dynamics
[ ] Confirm that all active dialogue tracks have been successfully checkerboarded to isolate individual voices36.
[ ] Check overlapping speech sections for comb filtering or hollow sounds, using phase-alignment tools to resolve any phase issues7.
[ ] Verify that expanders or spectral noise-reduction tools are reducing background bleed naturally without cutting off word endings38.
[ ] Ensure the overall noise floor during silent moments remains below 54.
5. Final Export and Mastering
[ ] Verify the integrated loudness of the final master file hits the target of (stereo) or (mono)42.
[ ] Confirm that the true peak of the master file does not exceed to prevent clipping42.
[ ] Ensure the export video settings are set to resolution in the Rec. 709 color space55.
[ ] Export using an MP4 container with the H.264 video codec, targeting a bitrate of 55.
Works cited
Timecode Sync Guide: Prevent Sound Drift on Set - BlockReel DAO, https://blockreeldao.com/blog/timecode-sync-on-set-avoiding-drift-between-sound-and-camera
Mastering Timecode: Sync Your Audio and Video Like a Pro - PodcastVideos.com, https://www.podcastvideos.com/timecode-audio-video-sync-guide/
How to Fix Audio Sync Issues in Video Podcasts (2026 Guide), https://www.podcaststudioglasgow.com/podcast-studio-glasgow-blog/how-to-fix-audio-sync-issues-in-video-podcasts
What is Timecode and Why Do You Need It? | RØDE (GB), https://rode.com/en-gb/about/news-info/what-is-timecode-and-why-do-you-need-it
Multi-device audio/video recording drift over time, how to achieve proper sync? - Reddit, https://www.reddit.com/r/VIDEOENGINEERING/comments/1qrx8xo/multidevice_audiovideo_recording_drift_over_time/
How to edit a Podcast in Premiere Pro (Fast Multicam Workflow 2026) - AutoCut, https://www.autocut.com/en/blogs/edit-podcast-premiere-pro/
Working With Mic Bleed - Sound On Sound, https://www.soundonsound.com/techniques/working-mic-bleed
What is an Eyeline Match? Definition & Examples for Filmmakers - StudioBinder, https://www.studiobinder.com/blog/what-is-an-eyeline-match/
The Complete Video Podcast Blueprint: 1–4 Person Setups, Camera Angles, & Lighting Diagrams - Cutback, https://cutback.video/blog/the-complete-video-podcast-blueprint-1%E2%80%934-person-setups-camera-angles-lighting-diagrams
Optimizing a Multi-Camera Setup for Seamless Video Production - Ikan International, https://ikancorp.com/optimizing-multi-camera-setup/
Building a Simple Multicam Podcasting Kit - CVP.com, https://cvp.com/resources/articles/insights/building-a-simple-multicam-podcasting-kit
How to Perfectly Match Cameras for Multi-Cam Podcast Recording from Podlab's Ollie Kenchington - CVP.com, https://cvp.com/resources/articles/insights/how-to-perfectly-match-cameras-for-multi-cam-podcast-recording-from-podlabs-ollie-kenchington
Basic Setups for Multi-Camera Video Podcasts - YouTube, https://www.youtube.com/watch?v=ezxLkLl3MVQ
How to Edit Multi-Camera Podcast Footage: Step-by-Step Video Workflow - Vidpros, https://vidpros.com/how-to-edit-multi-camera-podcast-footage-step-by-step-video-workflow/
Editing Dialogue - Pacific Content | Podcast Strategy Blog, https://pacific-content.com/editing-um-dialogue/
Cuts in film: Learn about different types of cuts - Adobe, https://www.adobe.com/creativecloud/video/post-production/cuts-in-film.html
When Editing Out Silence To Increase Pacing, Be Sure To… - Podcast Engineering School, https://podcastengineeringschool.com/when-editing-out-silence-to-increase-pacing-be-sure-to/
J-Cuts and L-Cuts for Smooth Dialogue Edits - CapCut, https://www.capcut.com/create/j-cuts-and-l-cuts-dialogue-edits
L Cut vs J Cut: Types of Cuts in Film and How to Make Them - Vimeo, https://vimeo.com/blog/post/guide-to-film-cuts
J-Cuts & L-Cuts - Film School - WeVideo, https://www.wevideo.com/blog/j-cuts-l-cuts
Multicam Podcasts / Studio recordings: the correct angle chosen for the correct speaker | Eddie AI | Your AI assistant video editor, https://help.heyeddie.ai/en/articles/10548843-multicam-podcasts-studio-recordings-the-correct-angle-chosen-for-the-correct-speaker
Making Cuts look Smooth : r/editors - Reddit, https://www.reddit.com/r/editors/comments/njzjbn/making_cuts_look_smooth/
Podcast editing guide (2026): how to edit a podcast like a pro | LucidLink, https://www.lucidlink.com/blog/podcast-editing
A Video Editor's Guide to J Cuts and L Cuts - Soundstripe, https://www.soundstripe.com/blogs/a-video-editors-guide-to-j-cuts-and-l-cuts
Smoother and More Cinematic L-cuts and J-cuts in Video Editing - Boris FX, https://borisfx.com/blog/l-and-j-cuts-smoother-more-cinematic/
So what is exactly is the pint of J & L cuts? : r/davinciresolve - Reddit, https://www.reddit.com/r/davinciresolve/comments/1n7ujtv/so_what_is_exactly_is_the_pint_of_j_l_cuts/
Reaper for Podcasting Editing Part 3 | Podigy, https://www.podigy.co/reaper-for-podcasting-part-three
Expert Panel Outlines Efficient Dialogue Editing Workflows for Audio Post Production, https://www.podcastvideos.com/dialogue-editing-workflow-expert-panel-audio-post/
Editing a single cam doc and need to punch in to hide jump cuts during interviews - Reddit, https://www.reddit.com/r/editors/comments/1kfpgaf/editing_a_single_cam_doc_and_need_to_punch_in_to/
What is a Jump Cut? 5 Ways to Use Jump Cuts in Film - StudioBinder, https://www.studiobinder.com/blog/what-is-a-jump-cut/
AutoPod | Automatic Podcast Editing for Premiere Pro, https://www.autopod.fm/
What is Morph Cut in Video Editing? - Beverly Boy Productions, https://beverlyboy.com/filmmaking/what-is-morph-cut-in-video-editing/
Hey /r/editors, whats your opinion on Morph cuts? - Reddit, https://www.reddit.com/r/editors/comments/a0kt7i/hey_reditors_whats_your_opinion_on_morph_cuts/
How Good Is Adobe Premiere Pro's Morph Cut? - Motion Array, https://motionarray.com/learn/premiere-pro/how-good-is-adobe-premiere-pros-morph-cut/
newbie here! morph cut won't apply to both clips, any idea why? helpppp - Reddit, https://www.reddit.com/r/premiere/comments/1t4vl65/newbie_here_morph_cut_wont_apply_to_both_clips/
The Missing Feature: Why Premiere Pro Still Can't Split Speakers (and How to Fix It), https://www.premierecopilot.com/en/blog/speaker-diarization-split-audio-tracks-premiere-pro
Podcast Audio Production: 5 Essential Considerations (+ Tips) - WaveInformer, https://waveinformer.com/2024/01/15/podcast-audio-production-5-essentials/
Multitrack Clarity Redefined: Introducing our new Mic Bleed Remover - Auphonic, https://auphonic.com/blog/2025/10/08/mic-bleed-remover/
2 dialogue tracks. Can I reduce the audio on one while the other has dialogue? : r/premiere, https://www.reddit.com/r/premiere/comments/g381fq/2_dialogue_tracks_can_i_reduce_the_audio_on_one/
Podcast Editing: Phasing issue in Multitrack : r/audioengineering - Reddit, https://www.reddit.com/r/audioengineering/comments/1izjxkf/podcast_editing_phasing_issue_in_multitrack/
Dealing with mic bleed.. Post-production advice request. : r/audioengineering - Reddit, https://www.reddit.com/r/audioengineering/comments/9h3vix/dealing_with_mic_bleed_postproduction_advice/
How to Enhance Audio in Video Podcasts - LALAL.AI, https://www.lalal.ai/blog/how-to-enhance-audio-in-video-podcasts/
How long would it take to edit an 8 multicam video-podcast episode? - Reddit, https://www.reddit.com/r/editors/comments/1ga1hbb/how_long_would_it_take_to_edit_an_8_multicam/
Workflows for quick turnaround video podcast editing : r/editors - Reddit, https://www.reddit.com/r/editors/comments/1p11j90/workflows_for_quick_turnaround_video_podcast/
ATEM Mini | Blackmagic Design, https://www.blackmagicdesign.com/products/atemmini
Fast and Cost Effective Video Podcast Recording Setup - EnhanceAVL, https://enhanceavl.com/fast-and-cost-effective-video-podcast-recording-setup/
How To Use ATEM Mini Pro for Podcasters - Saspod, https://saspod.com/blog/post/how-to-use-atem-mini-pro-for-podcasters
Re-editing an ATEM ISO show from scratch, any tips? : r/blackmagicdesign - Reddit, https://www.reddit.com/r/blackmagicdesign/comments/wjvyff/reediting_an_atem_iso_show_from_scratch_any_tips/
The Ultimate AI Podcast Production Workflow for 2026, https://thepodcasthaven.com/ai-podcast-production-workflow/
4 Best AI Podcast Editors Compared: Selects, Descript, Autopod, and More - Cutback, https://cutback.video/blog/4-best-ai-podcast-editors-compared-selects-descript-autopod-and-more
Autopod vs Adobe Podcast vs Podcastle – A Complete Guide for Marketing Leaders in 2026, https://genesysgrowth.com/blog/autopod-vs-adobe-podcast-vs-podcastle
Autopod vs Descript - Swell AI, https://www.swellai.com/blog/autopod-vs-descript
Recordia Delivers Podcast Production Workflow with Blackmagic Design, https://www.blackmagicdesign.com/media/release/20260121-01
Why Your Podcast Sounds Amateur (5 Audio Specs Explained), https://www.podcaststudioglasgow.com/podcast-studio-glasgow-blog/the-5-audio-specs-that-separate-professional-from-amateur-podcasts
Best Export Settings for Podcast Videos: Guide to Video Export, Exporting Podcasts, and Podcast Settings - Vidpros, https://vidpros.com/best-export-settings-for-podcast-videos-guide-to-video-export-exporting-podcasts-and-podcast-settings/
Audio and Video Encoding Guidance - Castos Knowledge Hub, https://support.castos.com/article/177-encoding-guidance
Video and audio formatting specifications - YouTube Help, https://support.google.com/youtube/answer/4603579?hl=en
Audio requirements - Apple Podcasts for Creators, https://podcasters.apple.com/support/893-audio-requirements
Video specs - Spotify Support, https://support.spotify.com/us/creators/article/video-specs/
Maintaining Optimal Sound Quality in Podcast Recordings - Zencastr, https://zencastr.com/blog/maintaining-optimal-sound-quality-in-podcast-recordings