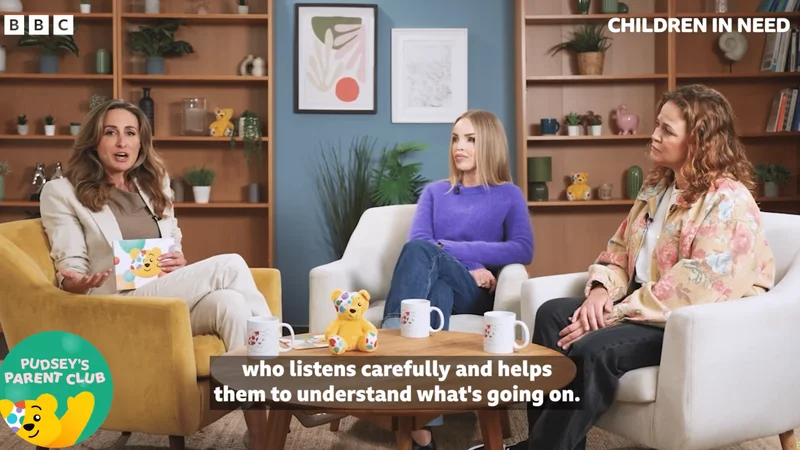
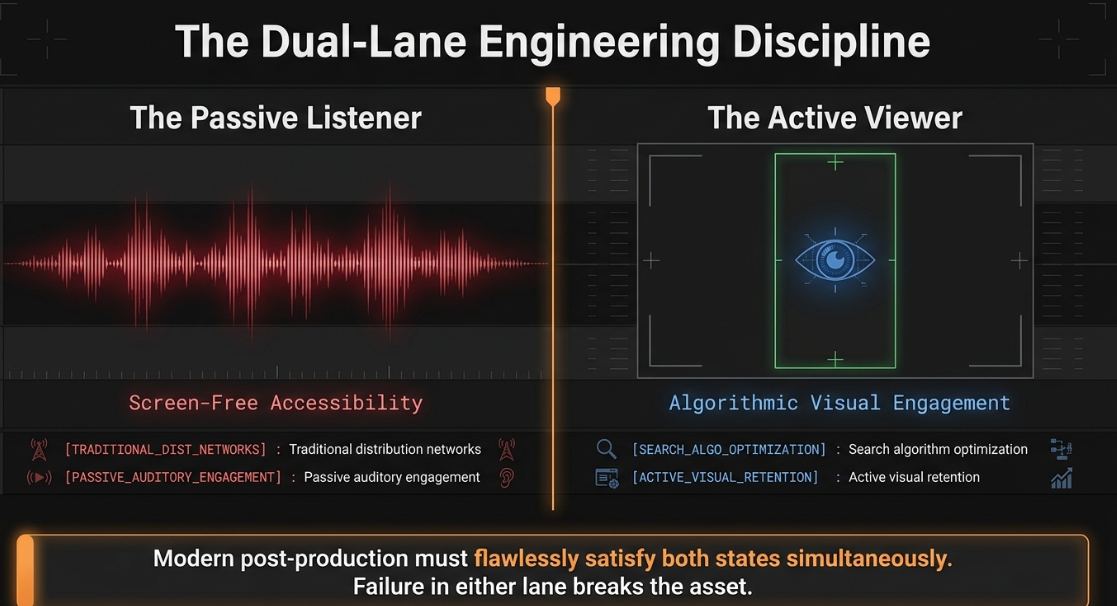
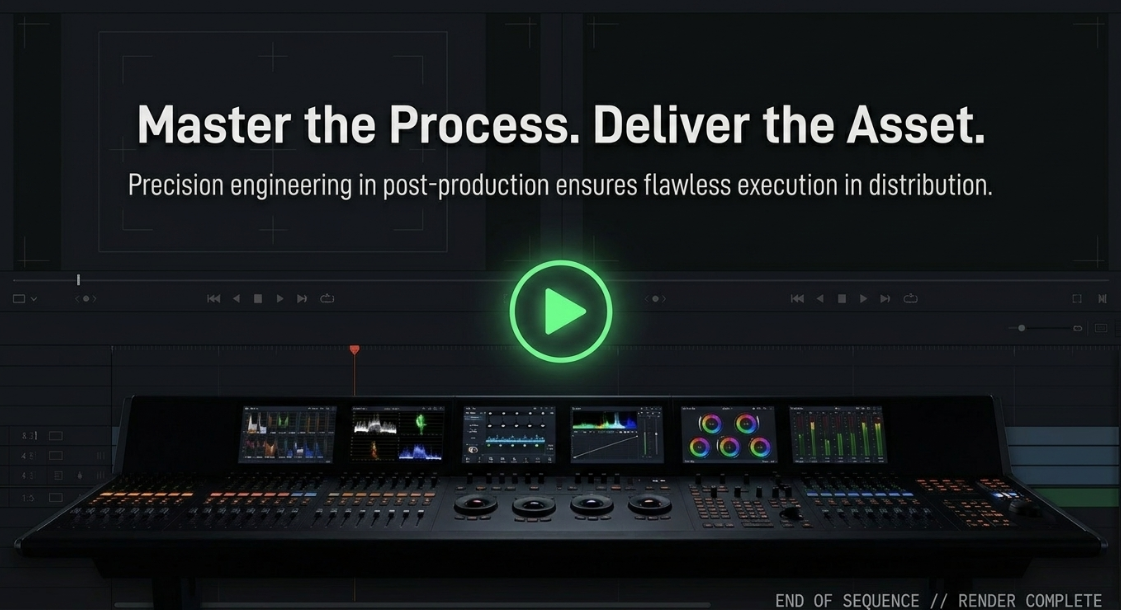
The transformation of podcasting from simple spoken-word audio files into highly engineered, multi-platform visual assets has reshaped the post-production workflow1. What historically required basic audio leveling and stereophonic editing now demands an intricate video engineering pipeline1. Modern video podcast production is a dual-lane discipline3. It must satisfy both the active visual engagement required by search algorithms and the passive, screen-free accessibility expected by traditional distribution networks3. Executing this process at a professional standard requires deep technical mastery across several disciplines, including non-linear editing (NLE) mechanics, multi-camera synchronization, scene-referred color management, and broadcast-legal quality control (QC) compliance1.
The Post-Production Stage Pipeline
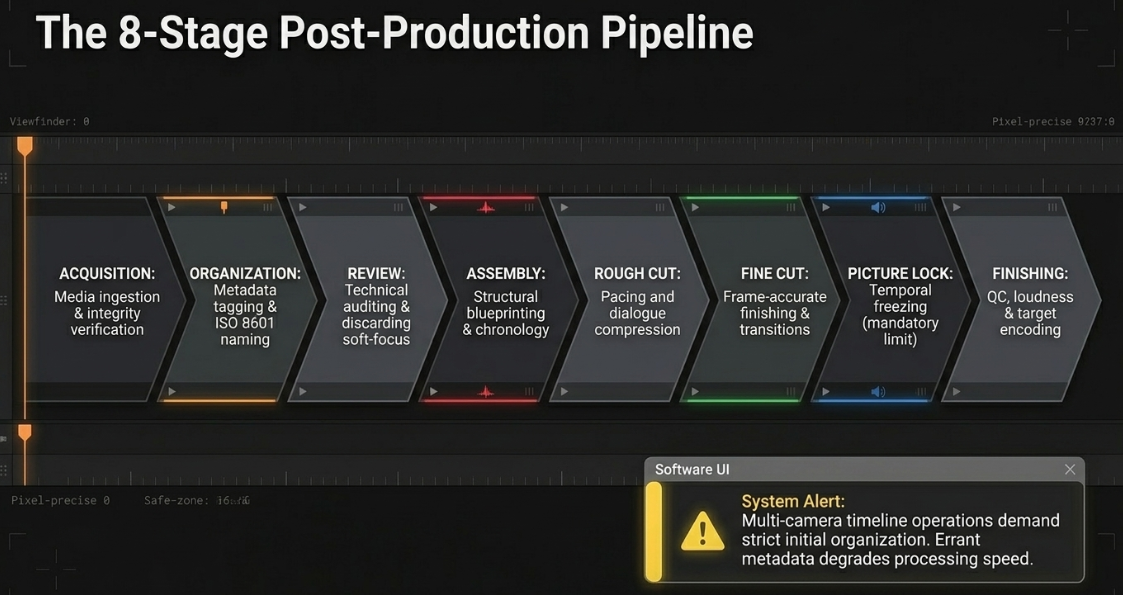
The post-production video editing workflow is structured as a non-destructive, linear progression designed to preserve raw asset metadata, manage storage, and maintain structural organization1. Because multi-camera timeline operations place heavy demands on system resources, a failure to establish a logical workflow during initial ingestion can lead to synchronization failures and processing delays during the finishing stages1.
Acquisition ---> Organization ---> Review & Selection ---> Assembly ---> Rough Cut ---> Fine Cut ---> Picture Lock ---> Finishing & Delivery
The professional video engineering pipeline is divided into eight discrete technical stages:
Throughout these editing stages, transitions act as the visual and auditory connective tissue of the program1. Direct cuts imply immediate continuity of action and time, whereas dissolves, wipes, and fades manipulate the viewer's perception of temporal transitions, spatial location, and thematic development1.
Advanced Cutting, Dialogue Pacing, and Transition Mechanics
In dialogue-driven post-production, editing is more than just cutting out mistakes1. It is an exercise in pacing and spatial storytelling1. The post-production engineer must construct a natural-feeling conversation using edits that do not distract the viewer1.
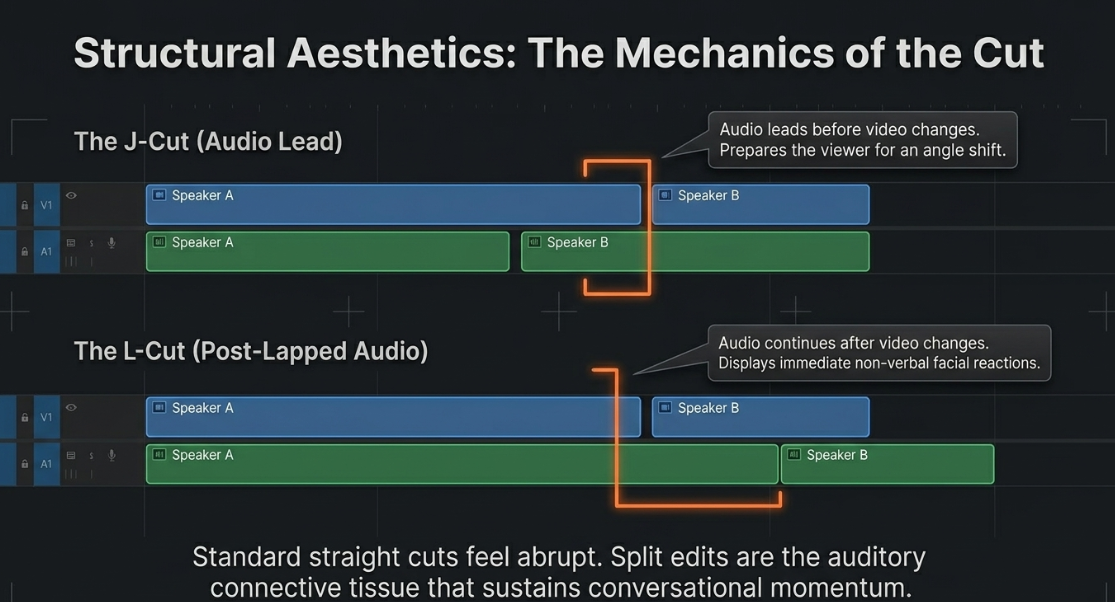
Split Edits: J-Cuts and L-Cuts
Standard straight cuts, where the audio and video transition at the exact same frame, can feel abrupt and unnatural in conversational scenes9. To create smoother transitions, editors use split edits—specifically J-cuts and L-cuts—which get their names from the physical patterns they form on the timeline of an NLE8.
J-Cut Configuration:
Video Track: [ Camera Angle A ][ Camera Angle B (Speaker B) ]
Audio Track: [ Speaker B Audio ][ Speaker B Audio continued ]
^ Audio leads before video changes (forms a "J" shape)
L-Cut Configuration:
Video Track: [ Camera Angle A (Speaker A) ][ Camera Angle B ]
Audio Track: [ Speaker A Audio continued ][ Speaker B Audio ]
^ Audio trails after video changes (forms an "L" shape)
In a J-cut (also known as an audio lead, audio under, or audio advance), the audio of the incoming clip plays before the visual cut occurs8. This technique prepares the viewer's brain for the visual transition9. For example, when transitioning between two speakers, hearing the second speaker's voice while still viewing the first speaker's reaction creates a natural flow that pulls the viewer's attention forward8.
In an L-cut (or post-lapped audio edit), the audio of the outgoing clip continues playing even after the video transitions to the incoming shot8. In dialogue, this allows the editor to display reaction shots8. Keeping the first speaker's voice active while cutting to the listener's face allows the viewer to see non-verbal reactions and expressions8. This approach helps establish setting, dialogue flow, and character dynamics without forcing the viewer to stare at whoever is speaking for every word8.
Temporal Manipulation: Jump Cuts, Smash Cuts, and Elliptical Edits
Temporal manipulation allows the editor to adjust pacing, energy, and continuity12:
The Jump Cut: This technique involves removing a section from a continuous, single-camera shot, causing the subject to appear to "jump" forward in time13. While historically popularized in French New Wave cinema by directors like Jean-Luc Godard in Breathless, the jump cut is used in modern podcasts to adjust pacing, remove pauses, and eliminate filler words like "um" or "ah"13.
The Smash Cut: An abrupt, sudden cut from one aesthetic extreme to another (e.g., from a quiet, dark room to a loud, bright environment)8. This technique is used to startle the audience, underscore punchlines, or shift the conversational tone12.
The Cross Cut (Parallel Editing): Splicing between actions occurring simultaneously in different locations12. In a podcast, this technique can be used to show both sides of a remote interview12.
The Elliptical Edit: A technique that condenses long, repetitive sequences (such as a guest explaining a complex idea or traveling to a location) down to only the essential narrative beats to compress time16.
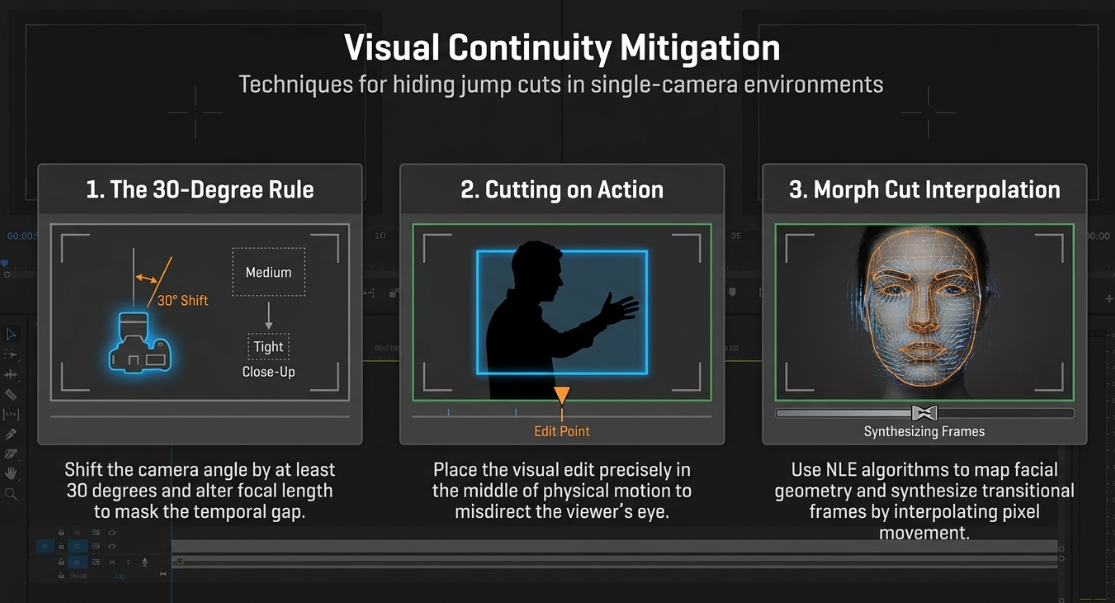
Visual Continuity Mitigation
Unmitigated jump cuts on a single camera angle can create distracting visual "pops" that disrupt the viewer's immersion13. To maintain visual continuity while editing talking-head footage, post-production engineers apply three fundamental techniques:
The 30-Degree Rule: This standard rule dictates that to cut between two shots of the same subject without a jarring transition, the camera's angle must shift by at least 30 degrees, and the lens focal length must change significantly (e.g., transitioning from a medium close-up to a tight close-up)13.
Cutting on Action: Placing the visual edit directly in the middle of a physical motion (such as a hand gesture or head tilt) helps hide the cut13. The viewer's eye is busy following the physical motion, which draws attention away from the transition13.
Morph Cut Interpolation: Modern NLEs feature automated transition tools (such as Adobe Premiere Pro's Morph Cut or DaVinci Resolve's Smooth Cut) that use face tracking and optical flow analysis18. The software maps the facial geometry on either side of a jump cut and synthesizes transitional frames by interpolating pixel movement, making the edit look like a single, continuous take18.
The table below outlines common cutting techniques and their specific post-production applications:
Synchronization, Temporal Drift, and Diarization Physics
Maintaining synchronization across multiple camera feeds and high-fidelity external audio recorders is a foundational challenge in video podcast engineering19.
Waveform Alignment vs. SMPTE Timecode
Post-production workflows utilize manual, automatic, or timecode-based synchronization methods depending on the complexity of the shoot19. Manual alignment involves finding a distinct, sharp audio and visual spike—such as a clapperboard slate, a hand clap, or a loud verbal cue like yelling "MARK!"—to manually line up audio tracks5. Automatic waveform synchronization uses software algorithms to match scratch audio from the cameras with high-fidelity external audio5.
For professional multi-camera and broadcast workflows, SMPTE timecode synchronization is the standard19. This protocol embeds a unique time stamp directly into the metadata of each recording device20:

Where 


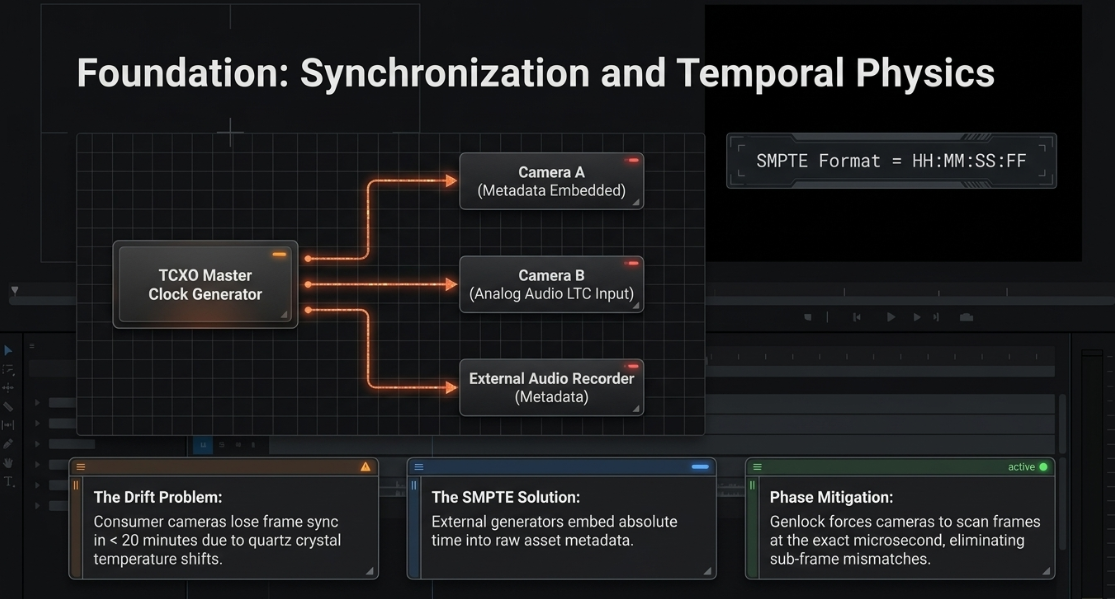
Clock Drift and Hardware Mitigation
Internal camera and recorder clocks rely on quartz crystal oscillators that are vulnerable to drift caused by temperature fluctuations and hardware limitations20. Consumer cameras can lose frame sync in less than 20 minutes22. Over a standard two-hour podcast recording, this drift can cause the audio and video to fall out of sync by 5 frames or more22. This issue is exacerbated when cameras record using variable frame rates (VFR) or when there are frame rate mismatches, such as mixing 30 fps and 29.97 fps files22.
To eliminate drift, production teams use external timecode generators equipped with Temperature-Compensated Crystal Oscillators (TCXOs)20. These generators are physically connected to "jam-sync" their internal clocks before filming begins20. If a camera lacks a dedicated LTC timecode input, the timecode signal is recorded as an audible signal directly onto an unused analog audio channel20. In post-production, translation software reads this audio signal and converts it into standard timecode metadata, allowing the editing software to align all tracks instantly with frame-level accuracy20.
Timecode Sync Workflow:
[TCXO Master Clock Generator]
|
+---> Jam-Sync Camera A (Embeds Metadata)
|
+---> Jam-Sync External Recorder (Embeds Metadata)
|
+---> Audio LTC Input on Camera B (Analog Audio Track) ---> [Post-Production Demodulator] ---> Timecode Metadata
Additionally, genlock can be used to synchronize the sensor scanning rates of multiple cameras at the frame level22. While timecode ensures that each recording device starts and stamps its frames in alignment, genlock forces the cameras to capture each frame at the exact same microsecond, eliminating sub-frame phase issues22. If genlock is not used, cameras can still drift slightly over time, even with a shared timecode signal22. Software tools like PluralEyes 4 can correct this in post-production by applying adaptive time-stretching to align drifting waveforms22.
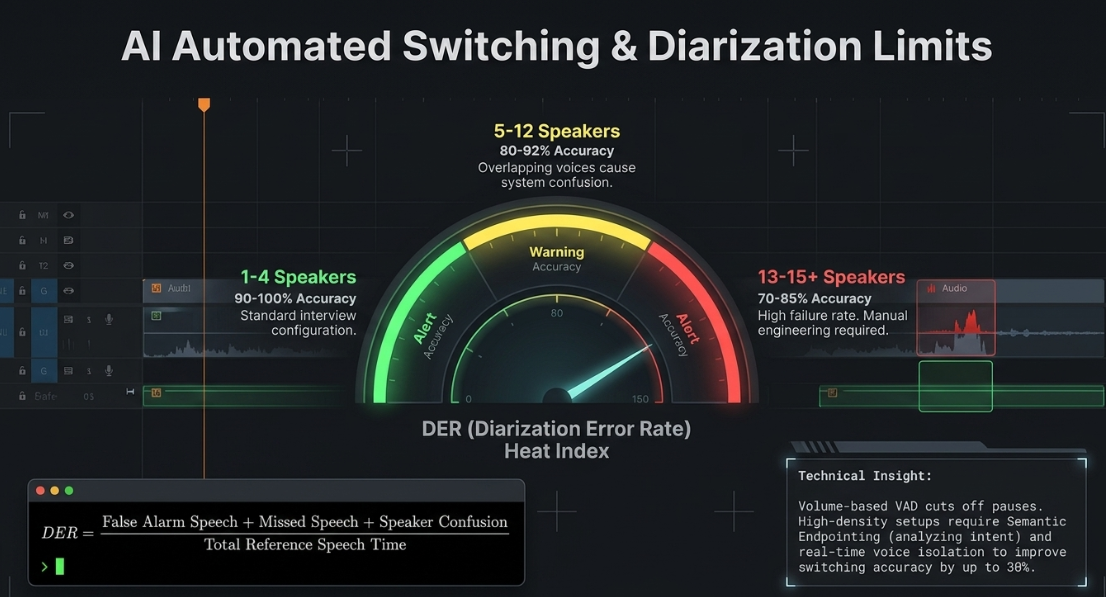
AI-Driven Active Speaker Detection and Diarization
To streamline multi-camera editing, modern workflows integrate AI-driven automated switching systems (such as AutoCut or Premiere Assistant)24. These tools analyze isolated audio tracks, identify the active speaker, and execute automated camera cuts on the timeline24. Underpinning these systems are speaker diarization algorithms that analyze, segment, and label audio streams based on speaker identity28.
The accuracy of speaker diarization is measured using the Diarization Error Rate (DER)28:

Where:
False Alarm Speech refers to silence or background noise incorrectly labeled as active dialogue28.
Missed Speech occurs when active dialogue frames are not identified by the system28.
Speaker Confusion occurs when speech is attributed to the wrong speaker28.
The performance of diarization and automated switching systems is heavily dependent on the number of speakers and the quality of the audio28. When working with clean, isolated audio from 2 to 4 speakers, modern systems can achieve a DER below 10%, enabling highly accurate automated switching28. However, if the recording environment contains high background noise, room reflections, or overlapping speech (such as interruptions), the DER can exceed 20%, resulting in erratic camera cuts that require manual correction in post-production28.
To improve accuracy, professional setups use real-time semantic endpointing (such as Soniox v4) rather than traditional, volume-based Voice Activity Detection (VAD)32. Volume-based VAD listens for silence and can cut off a speaker if they pause during a long sentence32. Semantic endpointing, however, analyzes context, rhythm, and intent to determine when an utterance is complete, preventing premature camera cuts32. Additionally, real-time voice isolation systems (such as Hecttor AI) can separate overlapping voices and reduce background noise before the audio is processed, improving automated switching accuracy by up to 30%31.
Color Space Engineering, Camera Matching, and Finishing
Multi-camera podcasts are often shot using different camera sensors, color gamuts, and gamma curves33. To achieve visual consistency, post-production workflows must implement a structured, scene-referred color management system1.
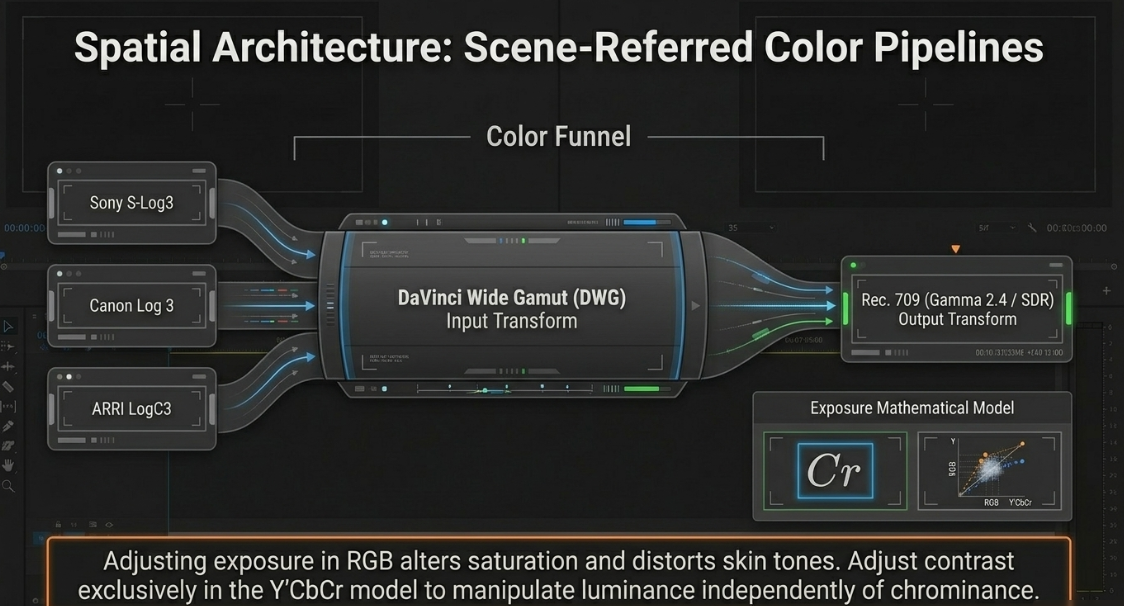
Color Management Architectures
Rather than color grading raw footage directly on the timeline, professional workflows use a standardized color management framework, such as DaVinci Resolve Color Management (RCM), ACES, or a manual Color Space Transform (CST) node pipeline33.
This process involves a two-step transformation:
Input Transformation: Proprietary camera log files (such as Sony S-Log3, Canon Log 3, ARRI LogC3, or RED Log3G10) are mapped into a single, wide working color space33. In DaVinci Resolve, DaVinci Wide Gamut (DWG) and DaVinci Intermediate are standard choices33. This step ensures all footage responds consistently and predictably to grading adjustments33.
Output Transformation: After creative grading is complete, the unified working space is mapped to a display-referred target, typically Rec. 709 with a 2.4 Gamma curve for standard high-definition television and web delivery33. This step also incorporates tone mapping (such as Luminance Mapping set to a maximum input of 10,000 nits and output of 100 nits) to preserve highlight and shadow detail33.
Exposure Adjustments: Y'CbCr vs. RGB Space
Adjusting exposure and contrast behaves differently depending on the color model used during processing:
Y'CbCr Color Model: This model separates the luminance (


RGB Color Model: In this model, contrast adjustments simultaneously modify the red, green, and blue color channels1. Pushing exposure or contrast in RGB naturally increases saturation1. While useful for creative color enhancements, this can distort delicate skin tones and disrupt color matching across cameras if not carefully controlled1.
Camera Matching and Verification
To match multiple cameras, colorists use reference tools such as vectorscopes and waveform monitors34. A vectorscope plots the hue and saturation of an image relative to calibrated color targets34. By analyzing the skin tone indicator line on a vectorscope, a colorist can adjust color wheels to align skin tones across different angles34. Automated tools (like DaVinci Resolve's Shot Match) and camera-matching plug-ins (like Cinematch) accelerate this process by applying sensor-specific matrix calculations to align the primary color values of different cameras34.
Additionally, when working with multicam sequences, colorists open the multicam clip in the timeline view to edit the source camera clips directly25. Applying color correction and effects directly to the source angles ensures that changes carry over to every cut in the master timeline25. This workflow saves time and ensures visual consistency across all edits25.
Low-Light Finishing and Keying in Blackout Environments
Editing footage shot in dark or blackout environments presents unique challenges, including digital noise, color casts, and loss of shadow detail37:
Digital Noise Reduction: Low-light footage is prone to grain37. Editors apply noise reduction filters (such as temporal and spatial noise reduction in DaVinci Resolve) to clean up flat, dark areas without losing fine textures37. After noise reduction, subtle sharpening is applied to keep the image crisp37.
Color Cast Correction: Unpredictable practical lighting can introduce unwanted color tints37. Colorists use color wheels to neutralize these shifts and restore accurate skin tones37.
Layer-Based Compositing: In blackout sets, editors can use layer-based compositing to blend practical lights (such as candles, neon signs, or light panels) with exposure adjustments, recovering shadow details while keeping highlights clean37.
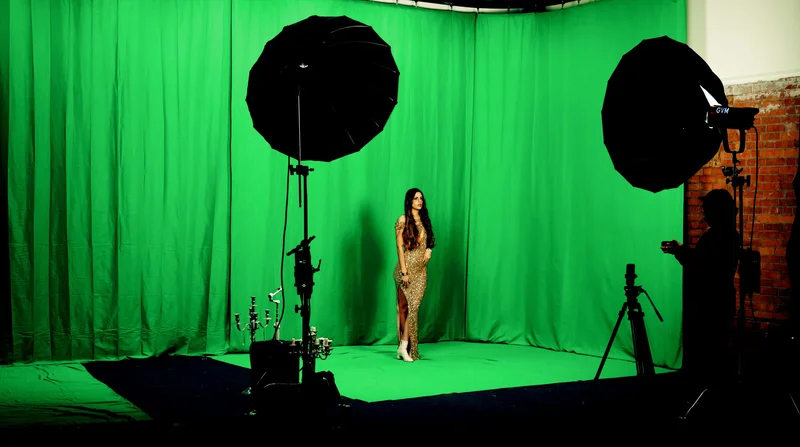
Chroma Key Keying: When using green screens, teams can choose between real-time hardware keying or post-production keying40. While real-time keying is useful for live broadcasts, post-production keying offers advanced software tools for edge blending, spill suppression, and color correction, resulting in a cleaner, more realistic composite40.
Social Media Extraction and Vertical Safe Zone Topography
Video podcasts serve as a central source of short-form content3. Post-production teams often extract highlight clips, format them for vertical screens, and distribute them across mobile platforms3.
Highlight Selection and Formatting
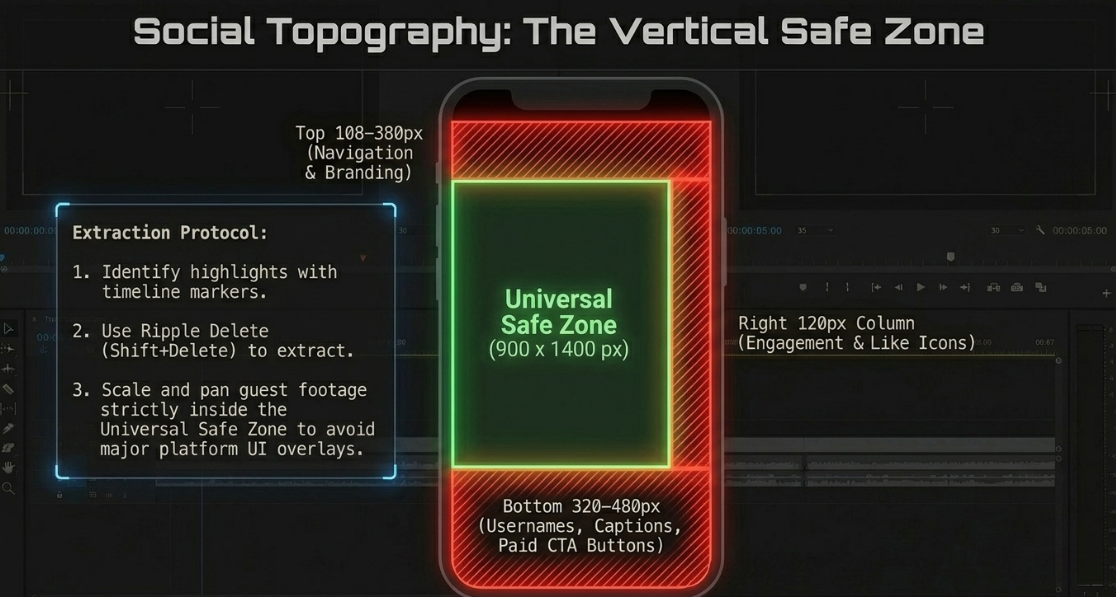
During the editing process, editors can identify potential social media clips using colored timeline markers (such as orange, yellow, or green)41. Once the master edit is complete, these marked clips are isolated and consolidated on a vertical timeline using ripple delete commands (Shift+Delete) to remove empty space41. The editor then scales the selected camera angles, pans the footage to center the guest, and exports the highlights with dedicated burnt-in subtitles41.
Vertical Safe Zone Topography
Formatting 16:9 widescreen footage for a vertical 9:16 aspect ratio (
TikTok UI Topography (1080x1920 Canvas):
+------------------------------------------+ ^
| [Navigation: Following / For You] | | Top Blocked: 108–160 px
+------------------------------------------+ v
| [ ] | ^
| [P] | | Right Blocked Column:
| [L] | | 120 px (Profile, Likes,
| UNIVERSAL SAFE ZONE [A] | | Comments, Shares)
| (900 x 1400 px) [Y] | |
| [I] | |
| [N] | |
| [G] | v
+------------------------------------------+ ^
| [Username, Caption, Paid Ad CTA Button] | | Bottom Blocked: 320–480 px
+------------------------------------------+ v
Different platforms feature unique user interface overlays:
TikTok UI Obstructions: TikTok features a highly restrictive overlay system42. Engagement buttons block a 120-pixel column along the right edge, while the username, caption text, and interactive call-to-action (CTA) buttons can cover up to 480 pixels from the bottom of the frame43. Navigation bars cover an additional 108 to 160 pixels at the top43.
Instagram Reels UI Obstructions: The Reels interface features a top-blocked zone of 210 pixels and a bottom-blocked zone of 310 pixels44. Text or visual elements placed within 84 pixels of the right edge also risk being obscured by interactive icons44.
YouTube Shorts UI Obstructions: Shorts reserve 380 pixels at both the top and bottom of the frame for system UI43. The right-side interaction icons occupy a 120-pixel column, while the left margin has a 60-pixel obstruction zone43.
Additionally, sponsored posts and paid ads on these platforms include an interactive CTA button (such as "Shop Now" or "Learn More")44. These buttons add an extra 50 pixels of blocked space at the bottom of the frame, bringing the total bottom-blocked area to over 370 pixels on platforms like TikTok44.
To prevent key visual details from being covered, post-production teams use tools like Kreatli or SafeFrame AE to preview safe zone overlays directly in their compositions42. Design and layout elements should be kept within a universal, centralized 


Audio Processing, Loudness Engineering, and Broadcast Compliance
Professional audio engineering for visual podcasts requires a balance of acoustic precision, dynamic control, and technical compliance1.
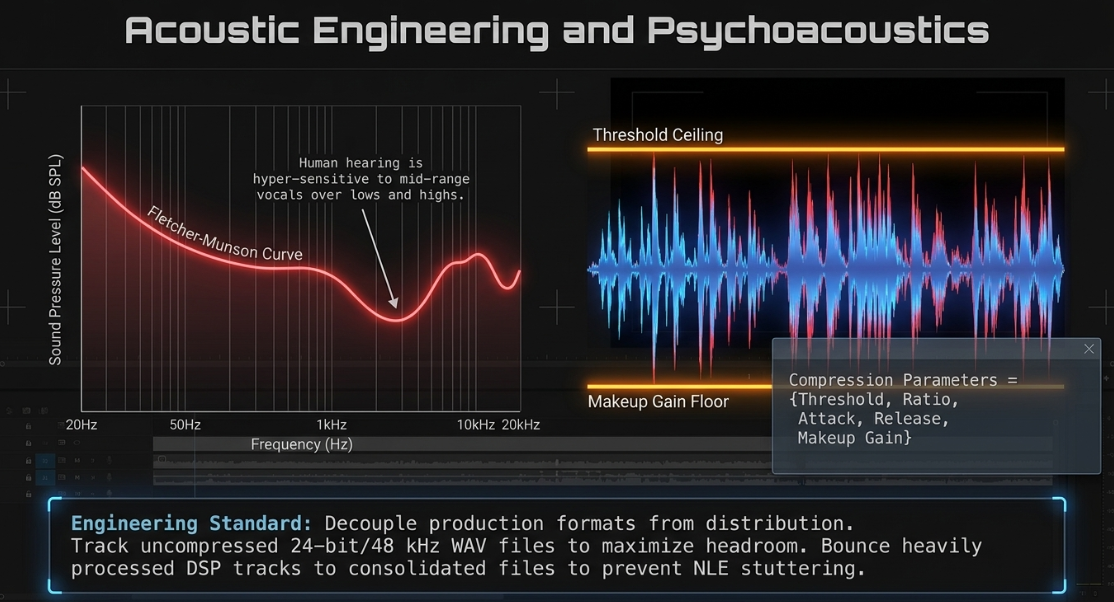
The Fletcher-Munson Influence and Dynamic Control
A foundational principle of audio engineering is rooted in psychoacoustics, specifically the Fletcher-Munson curves of equal loudness2. Human hearing is non-linear; we perceive low and high frequencies differently depending on the overall volume level, and our ears are naturally more sensitive to mid-range vocal frequencies2. Because of this, listeners naturally perceive louder audio as having better quality, even if the dynamic range has been heavily compressed2. To achieve a professional sound, engineers use dynamic processors (such as compressors, limiters, and expanders) to manage levels2:

[cite: 2]
A professional workflow decouples the production format from the distribution format4. Dialogue is tracked and processed using uncompressed 24-bit WAV files at a sample rate of 44.1 kHz or 48 kHz to maximize dynamic range and headroom4. These files are later compressed to consumer formats (such as MP3 or AAC-LC) during the final export4.
When prepping files for final delivery, mono tracks must be split and mixed down correctly4. This step helps prevent acoustic phase cancellation issues, which can occur when mixing down stereo channels and lead to thin-sounding audio4. Additionally, as an editor stacks real-time digital signal processing (DSP) plug-ins, the system's CPU load increases4. To free up processing power and prevent timeline stuttering, engineers bounce heavily processed tracks down to clean, consolidated audio files4.
Acoustic Metrics and Standards Compliance
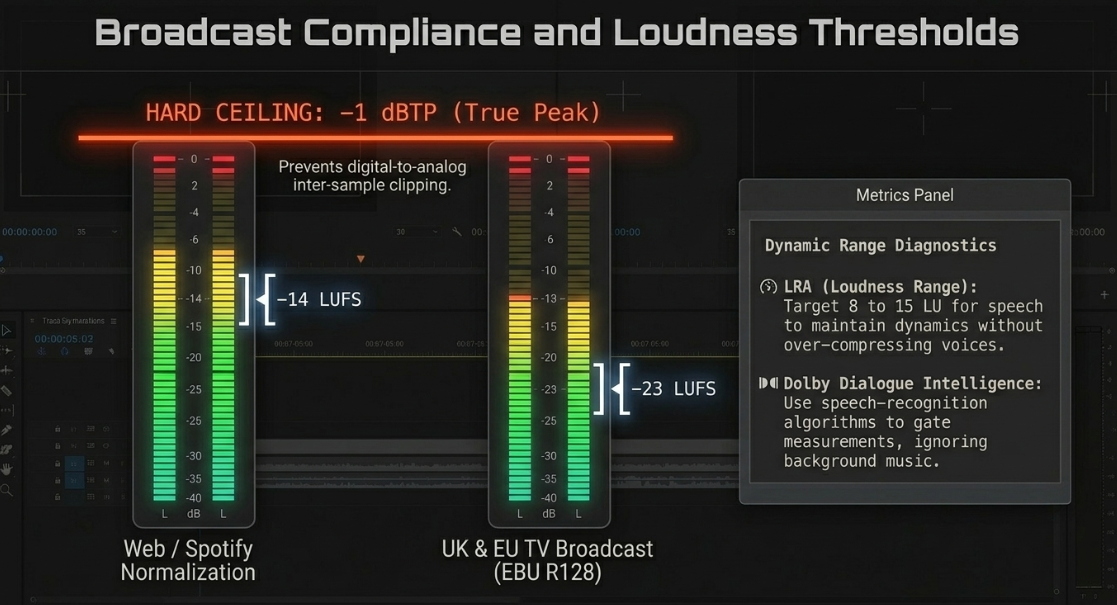
Standard peak meters (measured in dBFS) only track electrical voltage peaks and do not accurately reflect how loud an audio file feels to a human listener7. To address this, modern broadcast standards measure perceived loudness using Loudness Units relative to Full Scale (LUFS)7.
To ensure technical compliance, post-production engineers monitor several key parameters:
Integrated Loudness (

True Peak (dBTP): This metric detects inter-sample peaks that standard peak meters (dBFS) fail to register7. Inter-sample peaks occur during digital-to-analog reconstruction, where interpolation between digital samples can exceed 0 dBFS and cause clipping distortion7. Maintaining a safe True Peak ceiling prevents downstream audio distortion on consumer playback devices7.
Loudness Range (LRA): This statistical measurement of the variation in loudness over a program indicates the overall dynamic range49. In speech-focused podcasts, an LRA of 8 to 15 LU represents a healthy balance, keeping dialogue intelligible without over-compressing the natural dynamics of the voices50.
Dolby Dialogue Intelligence: Traditional loudness measurements can be skewed by background music or sound effects50. Dialogue Intelligence uses speech-recognition algorithms to measure the loudness of vocal channels only when speech is active, ensuring consistent dialogue levels regardless of backing tracks50.
The table below outlines international broadcast standards and platform-specific loudness requirements:


Master Encoding and Quality Control Specifications
The final step in the video engineering workflow is rendering the master export file1. Delivering video files across decentralized RSS feeds and centralized platforms (like Spotify and YouTube) requires careful balancing of image resolution, compression bitrates, and keyframe intervals3.
General Web and Social Delivery Configurations
For standard web platforms, video files must be optimized for fast streaming and broad hardware compatibility6:
Codecs and Containers: Standard distribution uses H.264 High Profile or HEVC (H.265) codecs packaged within an MP4 container6.
Bitrate Targets: Standard high-definition (1080p) files are encoded at a Constant Bitrate (CBR) of 25 Mbps3. For 4K UHD masters, the bitrate targets scale to 35-50 Mbps to preserve fine details and prevent compression artifacts3.
Keyframe Intervals (GOP Size): To ensure smooth playback and responsive scrubber controls, files should use a keyframe interval of approximately one keyframe per second3. This setting prevents buffer delays when searching through a timeline3.
Audio Encoding: Audio is encoded using a stereophonic AAC-LC codec with a minimum bitrate of 192 Kbps and a 48 kHz sampling rate6.
Aspect Ratios: Horizontal video uses a standard 16:9 widescreen layout (


Premium Broadcast and Apple Music Mastering Specifications
For premium broadcast delivery and distribution platforms like Apple Music and high-end Spotify Video, files must meet strict, uncompressed master specifications55:
Video Format: Apple ProRes 422 HQ55.
Resolution and Frame Rate:

Video Bitrate:

Audio Configuration: Uncompressed PCM audio with a 48 kHz sampling rate and a 24-bit depth55.
Thumbnail Indexing: Submissions must designate a specific "Thumbnail Index Start" frame55. This metadata flag designates the exact frame used to generate high-resolution previews across search listings55.
The table below outlines standard and premium mastering specifications:


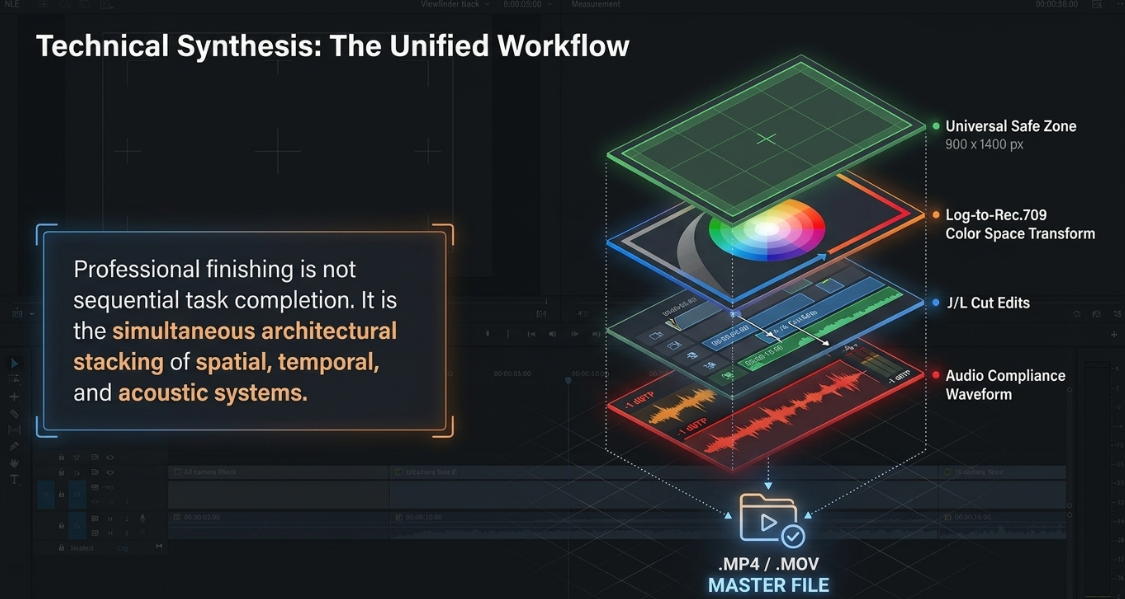
Technical Conclusions and Actionable Recommendations
To deliver a high-quality, professional video podcast, production teams must move beyond basic editing practices and implement a structured, technical workflow. Combining creative storytelling with precise engineering standards ensures that content remains engaging, visually consistent, and technically compliant across all distribution platforms.
Phase 1: Ingestion and Pre-Production Calibration
Standardize Sample Rates: Configure all digital audio interfaces and portable recorders to capture uncompressed 24-bit WAV files at 48 kHz, matching the standard audio track sample rate used in video timelines4.
Implement External Timecode Systems: Equip cameras and field recorders with external TCXO timecode generators to eliminate clock drift20. If a camera lacks a dedicated timecode input, record the timecode as an analog audio signal onto an unused channel to ensure frame-accurate alignment in post-production20.
Phase 2: Dialogue Pacing and Multi-Camera Editing
Use J-Cuts and L-Cuts: Incorporate split edits to create a natural conversational flow, letting the audio lead or trail the visual cut to display non-verbal reactions8.
Smooth Dialogue Cuts: When removing filler words or long pauses on a single camera angle, apply the 30-degree rule or use morph cut transitions to mask visual jump cuts13.
Automate Multicam Switching: Use AI-driven active speaker switching tools to build the initial timeline assembly24. Keep individual speaker audio tracks isolated to ensure diarization accuracy28.
Phase 3: Spatial Color Management and Visual Matching
Establish a Managed Color Workflow: Use a standardized color management framework (such as DaVinci Resolve Color Management or ACES) to unify different camera sensors into a shared working color space33.
Balance Exposures in Y'CbCr: Adjust exposure and contrast using the Y'CbCr color model to keep luma adjustments separated from color saturation, preserving natural skin tones1.
Grade the Multicam Source: Open the multicam clip in the timeline view to apply color correction and creative grades directly to the source angles, ensuring changes propagate across every edit25.
Phase 4: Social Media Optimization and Safe Zone Layouts
Design within Safe Zones: Keep subtitles, logos, and critical visual elements inside the universal

Account for Interactive Elements: Leave extra margin at the bottom of the frame to accommodate user captions and paid CTA buttons, which can block up to 480 pixels of vertical screen space43.
Phase 5: Audio Quality and Quality Control Compliance
Manage Loudness Standards: Deliver final audio mixes using standard LUFS targets (e.g., -14 LUFS for streaming, -23 LUFS for European broadcast) and set True Peak limits to -1 dBTP to prevent distortion and clipping on consumer devices7.
Optimize Export Settings: For standard web streaming, export H.264 files at 25-35 Mbps with keyframe intervals set to one per second to ensure smooth playback and responsive navigation3. For broadcast delivery, export uncompressed ProRes 422 HQ files at 220 Mbps55.
Works cited
Video Engineering in a Professional Podcast Post-Production - Finchley Studios, https://www.finchley.co.uk/finchley-learning/visual-podcast/video-engineering-in-a-professional-podcast-post-production
Audio Engineering in a Professional Podcast Post-Production - Finchley Studios, https://www.finchley.co.uk/finchley-learning/visual-podcast/audio-engineering-in-a-professional-podcast-post-production
Video Execution of a Professional Podcast - Finchley Studios, https://www.finchley.co.uk/finchley-learning/visual-podcast/video-execution-of-a-professional-podcast
Audio Execution for a Professional Podcast - Finchley Studios, https://www.finchley.co.uk/finchley-learning/visual-podcast/audio-execution-for-a-professional-podcast
How to Sync Audio and Video Like a Pro in 2025 - NearStream, https://www.nearstream.us/blog/how-to-sync-audio-and-video
Video specs - Spotify Support, https://support.spotify.com/us/creators/article/video-specs/
Podcast Loudness Standards 2026: Spotify, Apple, YouTube Requirements, https://sone.app/blog/podcast-loudness-standards-2026-spotify-apple-youtube
Smoother and More Cinematic L-cuts and J-cuts in Video Editing - Boris FX, https://borisfx.com/blog/l-and-j-cuts-smoother-more-cinematic/
J-Cuts and L-Cuts for Smooth Dialogue Edits - CapCut, https://www.capcut.com/create/j-cuts-and-l-cuts-dialogue-edits
So what is exactly is the pint of J & L cuts? : r/davinciresolve - Reddit, https://www.reddit.com/r/davinciresolve/comments/1n7ujtv/so_what_is_exactly_is_the_pint_of_j_l_cuts/
L cut: What is an L cut and J cut in film? - Adobe, https://www.adobe.com/creativecloud/video/post-production/cuts-in-film/l-and-j-cut.html
L Cut vs J Cut: Types of Cuts in Film and How to Make Them - Vimeo, https://vimeo.com/blog/post/guide-to-film-cuts
Jump Cut Definition: A Modern Creator's Guide - Klap, https://klap.app/blog/jump-cut-definition
What Is a Match Cut? Definition, Examples, and How to Use It - Boris FX, https://borisfx.com/blog/what-is-a-match-cut/
How to Record High-Quality Remote Interviews: The Broadcast Engineer's Guide (2026), https://aflalo.com/how-to-record-high-quality-remote-interviews-the-broadcast-engineers-guide-2026/
Learning about Continuity Editing - Film Studies - YouTube, https://www.youtube.com/watch?v=yCQXbjGWffA
Storyboarding Tutorial - "The Do's and Don'ts" - Skwigly Animation Magazine, https://www.skwigly.co.uk/storyboarding-tutorial-pt-1-the-dos-and-donts/
Mastering A.I. For Adobe Creative Professionals - Key Code Media | Audio Visual Systems Integrator, https://www.keycodemedia.com/mastering-a-i-for-adobe-creative-professionals/
Sync Audio and Video Perfectly Every Time - Aeon, https://project-aeon.com/blogs/sync-audio-and-video
Mastering Timecode: Sync Your Audio and Video Like a Pro - PodcastVideos.com, https://www.podcastvideos.com/articles/timecode-audio-video-sync-guide/
Wireless Mic Setup for Dual-Camera Shoots: A Creator's Guide - Sennheiser, https://www.sennheiser.com/en-ae/stories/the-pulse/the-pulse-stories/wireless-mic-setup-for-dual-camera-shoots-a-creators-guide
Would use a time-code device such as a Tentacle Sync -E help prevent audio drift? - Reddit, https://www.reddit.com/r/videography/comments/n25s27/would_use_a_timecode_device_such_as_a_tentacle/
Fundamentals of Video Engineering - MxU, https://app.getmxu.com/playlists/fundamentals-of-video-engineering
How to auto-edit multi-camera podcasts in Premiere Pro (AutoCut 2026) - YouTube, https://www.youtube.com/watch?v=F264QlX7qcU
Avoid These 5 Common Multicam Editing Mistakes in Premiere Pro (2026) - Cutback, https://cutback.video/blog/avoid-these-5-common-multicam-editing-mistakes-in-premiere-pro-(2025)
Premiere Pro Multicam Editing: Tools & Tips Guide - Cutback, https://cutback.video/blog/the-ultimate-guide-to-multicam-editing-in-premiere-pro-best-tools-tips-workflows
How to edit a multi-cam podcast with ONE Camera (Premiere & DaVinci) - YouTube, https://www.youtube.com/watch?v=Se1EuZwZDYw
Best Speaker Diarization Tools in 2026 (Apps, APIs & Open-Source) - NovaScribe, https://novascribe.ai/compare/best-speaker-diarization-tools
AI Voice Recognition: A Beginner's Guide (2026) - Deepgram, https://deepgram.com/learn/ai-voice-recognition-beginners-guide
How to Improve Speech Recognition Accuracy: Tips and Techniques - DEV Community, https://dev.to/sciforce/how-to-improve-speech-recognition-accuracy-tips-and-techniques-2ank
Voice Isolation & Noise Cancellation Built for Conversations and AI Systems - Hecttor AI, https://hecttor.ai/voice-isolation
Soniox v4 Real-Time: The new standard for real-time speech AI, https://soniox.com/blog/2026-02-05-soniox-v4-real-time
How to Color Manage using Nodes in DaVinci Resolve - Frame.io Insider, https://blog.frame.io/2024/01/08/color-management-nodes-davinci-resolve/
color matching 3 cameras for Podcast/interview style : r/ColorGrading - Reddit, https://www.reddit.com/r/ColorGrading/comments/192uqt9/color_matching_3_cameras_for_podcastinterview/
Questions about Project Settings & Color Space Transform - Blackmagic Forum • View topic, https://forum.blackmagicdesign.com/viewtopic.php?f=21&t=200645
Color Safety Nets: Legalizer Nodes Prevent Broadcast Rejects - Beverly Boy Productions, https://beverlyboy.com/film-technology/color-safety-nets-legalizer-nodes-prevent-broadcast-rejects/
Editing Blackout Set Footage: Best Free Video Editing Software for Dark Scenes, https://www.finchley.co.uk/finchley-learning/editing-blackout-set-footage-best-free-video-editing-software-for-dark-scenes
How to Match Colors Between Two Clips in Resolve 20? - Blackmagic Forum • View topic, https://forum.blackmagicdesign.com/viewtopic.php?f=21&t=220994
Save HOURS Editing MultiCamera Projects In Davinci Resolve - YouTube, https://www.youtube.com/watch?v=dhy3gRXzuu8
Real-Time Chroma Key vs. Post-Production Keying: Pros and Cons - Finchley Studios, https://www.finchley.co.uk/finchley-learning/real-time-chroma-key-vs-post-production-keying-pros-and-cons
How To Edit A Multicam Podcast In Davinci Resolve! - YouTube, https://www.youtube.com/watch?v=en8oBGdnBlo
TikTok Safe Zone (2026) — Dimensions, Text Safe Area, Overlay & Template - Kreatli, https://kreatli.com/guides/tiktok-safe-zone
Safe Zones… Guides, Free Overlays for Reels, TikTok, and Shorts - 2025 - Orson Lord, https://orsonlord.com/articles/free-safe-zone-overlays-for-reels-tiktok-and-shorts
Social Media Safe Zones: Full Guide for Creators (2026) | AdaptlyPost, https://adaptlypost.com/en/blog/social-media-safe-zones-2026-complete-guide
Using Safe Zones to Protect Your Designs from Social Media UI | Abyssale Help Center, https://help.abyssale.com/en/articles/419257-using-safe-zones-to-protect-your-designs-from-social-media-ui
Safe Zone Hub 2026 — Instagram Reels, TikTok, YouTube Shorts Dimensions, Overlays & Checkers - Kreatli, https://kreatli.com/guides/safe-zone-guide
Made a FREE plugin: preview TikTok, Reels & Shorts safe zones directly in your comp : r/AfterEffects - Reddit, https://www.reddit.com/r/AfterEffects/comments/1rrxukn/made_a_free_plugin_preview_tiktok_reels_shorts/
Video and audio formatting specifications - YouTube Help, https://support.google.com/youtube/answer/4603579?hl=en
Broadcast Loudness Made Simple - NUGEN Audio, https://nugenaudio.com/broadcast-loudness-made-simple/
Loudness metering – MiRA, https://doc.flux.audio/mira/Metering_Loudness.html
Worldwide Loudness Delivery Standards - RTW Audio, https://www.rtw.com/blog/rtw-knowledge-base-1/worldwide-loudness-delivery-standards-4
How to Upload & Grow a Video Podcast on Spotify (2026) - Vidpros, https://vidpros.com/spotify-video-podcast/
Publishing videos - Spotify Support, https://support.spotify.com/us/creators/article/publishing-videos/
Upload Spotify video, https://believe-group.my.site.com/HelpCenter/s/article/Upload-Spotify-video