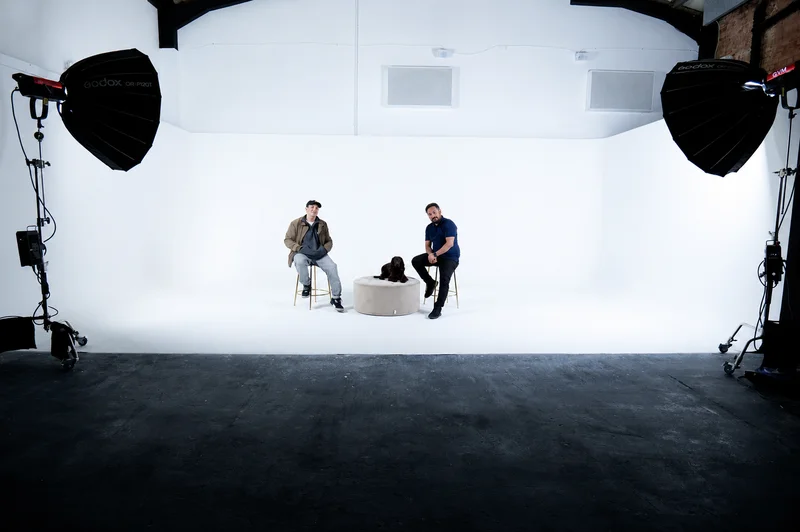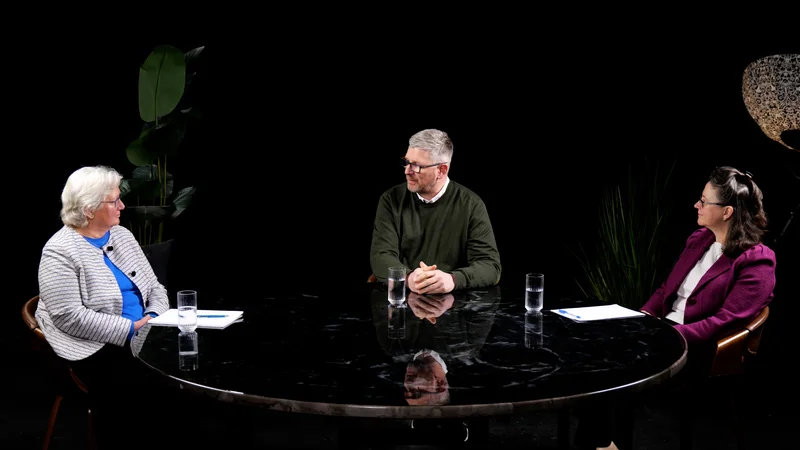
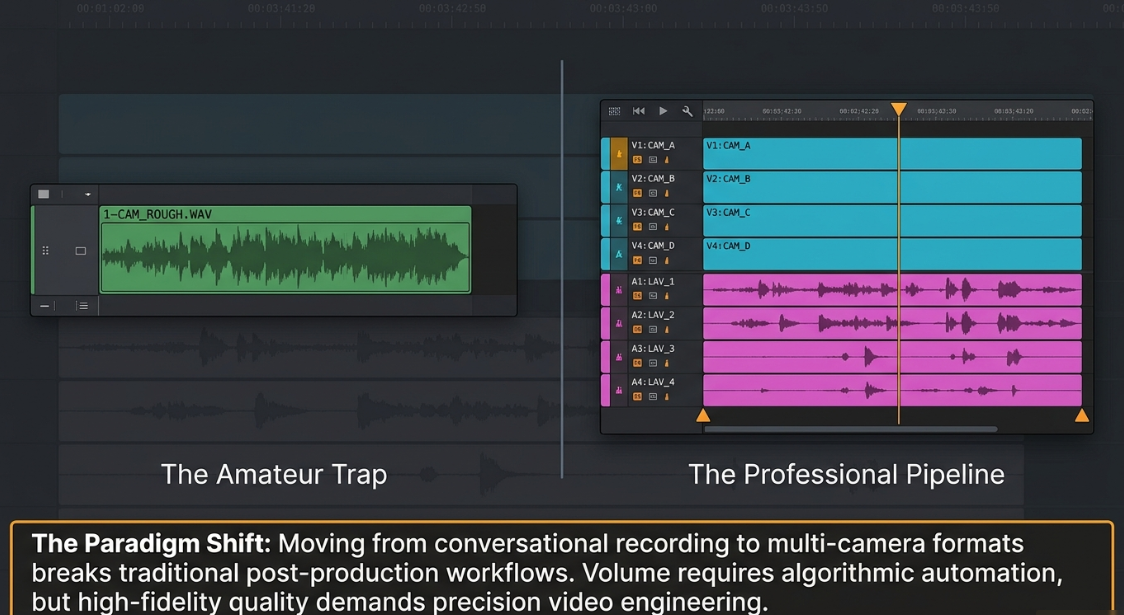
The scaling of digital talk formats has elevated video podcasting from basic conversational recording to a complex discipline requiring precise video engineering, automated multi-camera assembly, and robust post-production infrastructure. As productions transition from single-camera configurations to multi-camera setups, the editing process demands specialized workflows. These practices must maintain sync, optimize dialogue pacing, preserve multi-channel audio tracks, and enable efficient delivery across horizontal and vertical platforms.
Source Synchronization and Multi-Channel Ingestion Pipelines
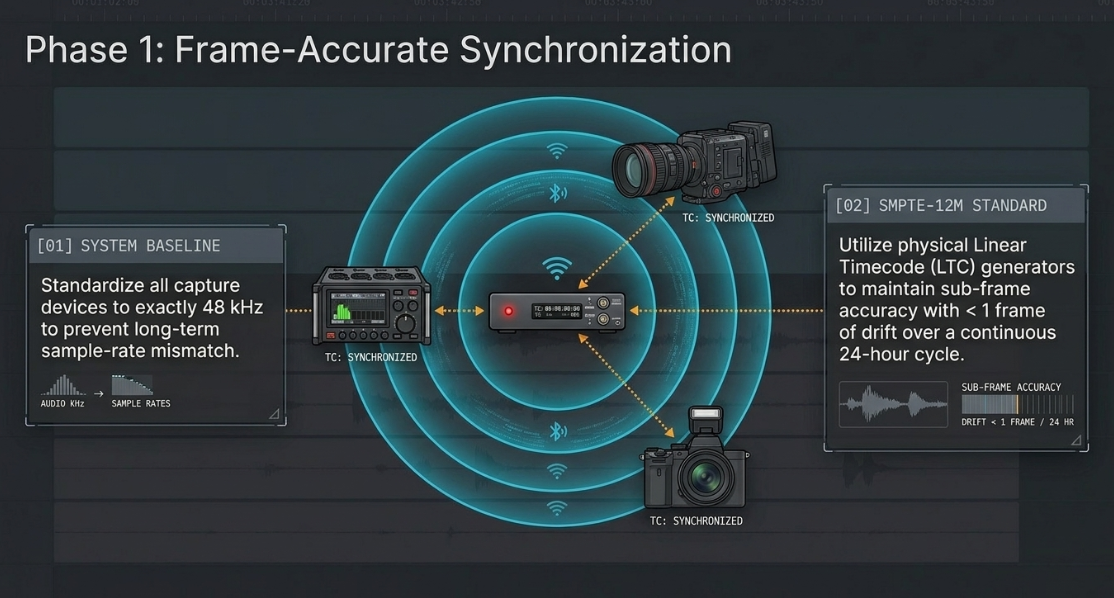
The technical foundation of any multi-camera video podcast edit is frame-accurate synchronization across all capture devices1. Standardizing the audio sample rate across all recording interfaces at 48 kHz is a critical baseline requirement1. This standardization prevents sample-rate mismatch issues and long-term drift over extended recordings1.
To achieve frame-accurate synchronization across multiple cameras and external audio recorders, the integration of physical Linear Timecode (LTC) generators is the industry standard3. Miniature hardware units, such as the Tentacle SYNC E mkII or Track E, act as master or jam-synced timecode sources that broadcast SMPTE-12M standard signals via Bluetooth Low Energy (BLE)4. This setup maintains synchronization with a drift of less than one frame over a continuous 24-hour cycle5.
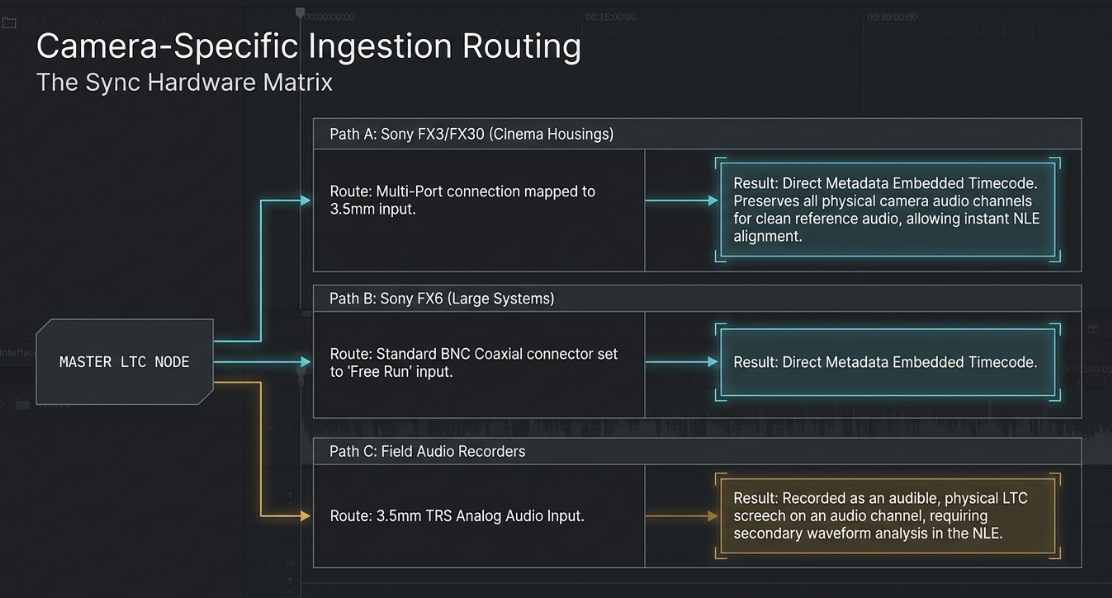
Integrating LTC timecode into cinema-grade camera systems requires configurations specific to each camera model:
Sony FX3 and FX30: These compact cinema platforms do not feature native BNC timecode inputs6. Instead of using a traditional jam-sync method via an audio input channel, a specialized cable links the multi-port micro-USB terminal of the camera directly to the 3.5mm output of the timecode generator4. This connection allows the camera to decode the LTC signal, display the synchronized timecode on the monitor, and embed the timecode directly into the sub-frame metadata of the recorded video files, preserving the audio tracks for clean reference audio6.
Sony FX6: This larger system utilizes standard BNC connectors6. The timecode run mode must be set to "Free Run" with the display select mapped to "Timecode," ensuring that the incoming signal from the master LTC generator continuously increments regardless of whether the camera is actively recording6.
Master Timecode Generator (LTC / BLE)
│
├───► Sony FX3/FX30 (Multi-Port to 3.5mm Link) ──► Metadata Embedded TC
├───► Sony FX6 (BNC Coaxial Free Run Input) ──────► Metadata Embedded TC
└───► Field Audio Recorder (LTC Audio Track) ─────► SMPTE-12M Audio Track
Once the footage is brought into a non-linear editor (NLE), synchronization can be handled natively7. In Adobe Premiere Pro, creating a multi-camera source sequence using the native LTC setting allows the software to align clips automatically using the embedded audio timecode tracks7. In DaVinci Resolve, editors can use the "Update Timecode from Audio Track" feature7. This command analyzes the LTC audio track waveform, extracts the temporal metadata, and overwrites the file's native camera timecode metadata7. This allows for instant multi-camera clip alignment based on absolute timecode7.
For workflows utilizing an ATEM ISO switcher, the video engineer can perform live cuts during production8. This live switching saves a DaVinci Resolve Project (DRP) file that mirrors the live edit points on a synchronized timeline8. Any cutting mistakes or retakes made on set are noted with approximate timecodes, allowing the post-production team to adjust the cuts quickly8.
To maximize camera coverage without adding more physical angles, editors can use 4K sensor cropping8. By shooting the host and guest in 4K, the editor can crop the frame in post-production to generate tight close-up angles8. This technique can expand a simple physical setup into a virtual multi-camera timeline, providing close-ups of each speaker along with a master two-shot8.
Finally, processing pipelines must handle the distinction between "Overlapping Audio" and "Non-Overlapping Audio" assets9. Overlapping audio describes traditional multi-camera, multi-mic studio tracking where all devices record simultaneously, allowing synchronization based on shared audio waveforms or reference scratch audio9. Non-overlapping audio describes remote interview platforms like Zoom or Riverside where uncorrelated assets must be sequenced based on chronological timestamps and metadata logic to reconstruct a cohesive conversation9.
Algorithmic Multi-Camera Assembly and Automation Benchmarks
The traditional manual switching of multi-camera sequences is historically one of the most labor-intensive phases of podcast post-production1. Modern workflows address this bottleneck by integrating algorithmic automation engines that generate a structured rough cut within minutes1. These automated multi-camera editing engines utilize diverse methodologies to parse audio and visual assets:
Volume-Based Tracking (e.g., AutoCut, FireCut): These tools use amplitude threshold detection8. The algorithm monitors discrete audio tracks associated with individual microphones and triggers a camera switch to the corresponding angle when a speaker's audio signal crosses a pre-configured decibel threshold8. While processing is fast, volume-based systems are highly susceptible to error in scenarios with high bleed or ambient studio noise, often triggering false cuts during laughter or table taps8.
Speech-Detection & Contextual AI (e.g., Premiere Assistant): This advanced class of automated switcher operates at the word level rather than relying on volume12. By generating a text transcription first, the engine identifies exactly which words are spoken by which participant, understanding dialogue pacing and conversational shifts12. This method results in far fewer false transitions and maintains more natural visual pacing12.
Neural-Engine Computer Vision (e.g., DaVinci Resolve SmartSwitch): This system uses multimodal analysis13. Resolve’s DaVinci Neural Engine analyzes both the multi-mic audio waveforms and the visual elements of the video clips (specifically lip and mouth movements)13. By cross-referencing acoustic activity with facial motion, it accurately identifies the active speaker, even when multiple participants speak simultaneously13. Users can choose between "Audio Only" for fast processing or "Audio + Video" for complex, highly detailed visual verification14.
Pre-NLE Preparation Assistants (e.g., Cutback Selects, Eddie): Platforms like Selects act as a buffer before entering the NLE11. These tools ingest raw footage, perform multi-camera synchronization, remove designated silence intervals, and output a color-coded XML sequence for Premiere Pro, DaVinci Resolve, or Final Cut Pro9. This non-destructive pipeline allows the editor to start inside the NLE with a pre-assembled timeline15.
Despite the efficiency of automated switchers, they cannot replace human editorial judgment8. Volume-based algorithms often make abrupt cuts in the middle of words or phrases, and they lack the contextual understanding to insert reaction shots of a listener smiling or nodding8. In addition, many of these plugins struggle with multi-speaker cross-talk or background bleed, requiring significant post-automation cleanup8.
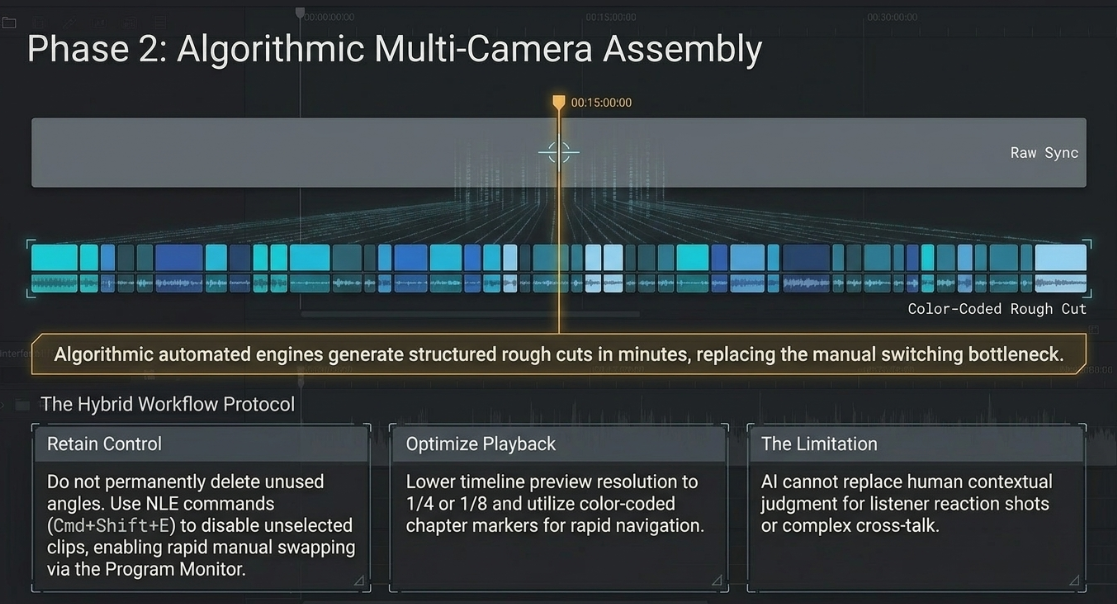
To maintain creative control, editors use a hybrid workflow8. In Premiere Pro, plugins like AutoCut can generate a multicam sequence directly on top of the active timeline, rather than permanently chopping up the source clips18. Unused video angles are disabled (using commands like Cmd+Shift+E) rather than deleted, allowing the editor to easily double-click any section and swap angles using the standard Program Monitor Multi-Camera view18.
To further optimize system performance during playback, editors can lower the timeline preview resolution to 1/4 or 1/8 and apply green, yellow, and red color-coded chapter markers to organize key moments and transitions efficiently19.
Dialogue Engineering, Pacing, and Jump-Cut Smoothing
Refining dialogue in a video podcast requires balancing structural pacing with seamless visual continuity20. The removal of filler words (such as "um," "uh," and "like") and long pauses is essential for modern high-retention formats, but aggressive cutting can lead to a highly disjointed output20.
When modifying dialogue cadence, several industry conventions help ensure a natural sound:
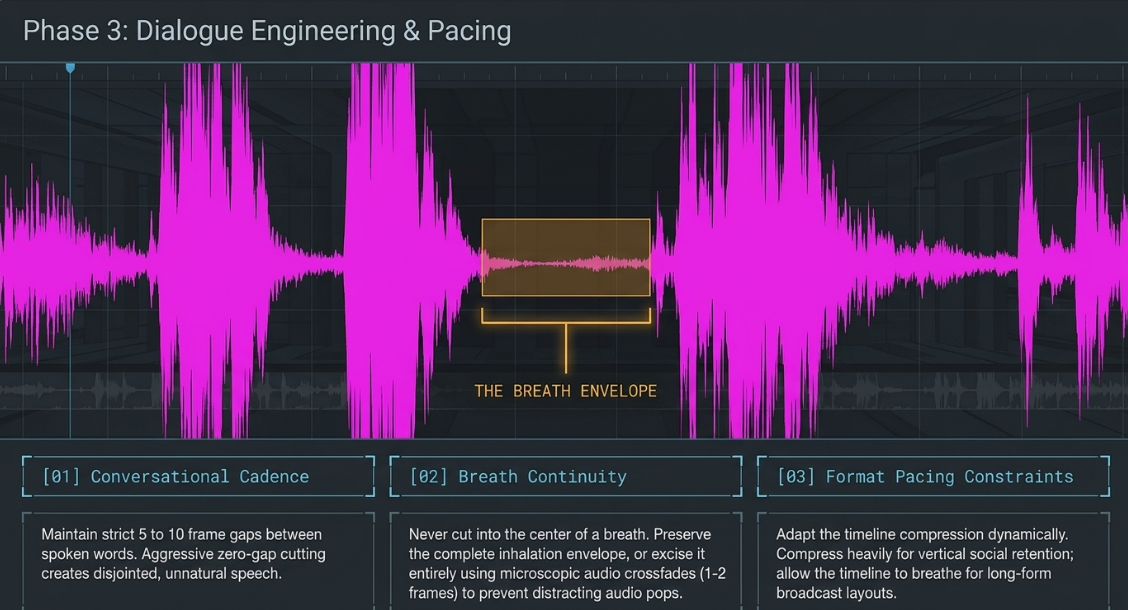
Conversational Cadence: Editors should maintain a baseline gap of 5 to 10 frames between spoken words to preserve normal human speech rhythms20.
Breath Continuity: A common error is cutting into the middle of a speaker's breath20. Video engineers must preserve the complete inhalation/exhalation envelope or excise it entirely with microscopic audio crossfades (typically 1 to 2 frames) to avoid distracting clicks or pops20.
Format Pacing Constraints: While digital and social platforms favor fast pacing where pauses are compressed to near-zero, long-form and broadcast video require longer natural pauses to allow key points to breathe20.
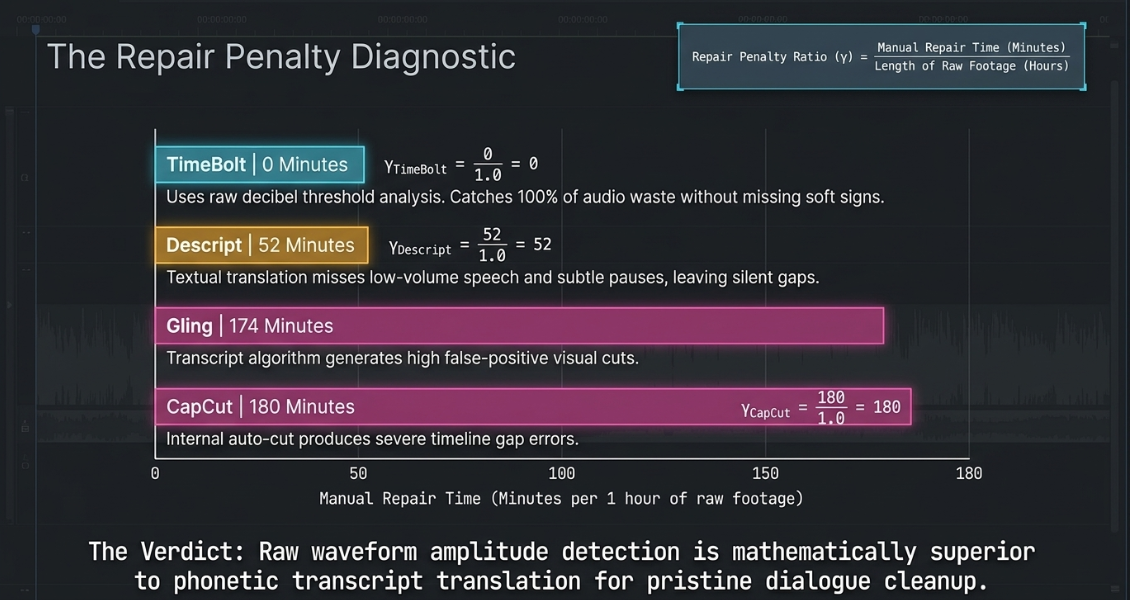
To accelerate the removal of dead air and verbal pauses, engineers utilize specialized cleanup software23. A comparative analysis demonstrates that waveform-based cleanup tools, such as TimeBolt, generally achieve higher accuracy than transcript-dependent platforms like Descript or Gling24. Transcript-based engines analyze phonetic data, which can cause them to miss low-volume speech, subtle sighs, or soft pauses, leaving behind silent gaps that require manual correction24. In contrast, TimeBolt's waveform analysis detects 100% of audio waste based on raw decibel thresholds, eliminating false positives and minimizing manual timeline cleanup24.

Analyzing empirical benchmark data shows a notable difference in efficiency between these editing tools:


This comparison shows that transcript-dependent tools can require up to three hours of manual cleanup per hour of footage to repair visual jump-cuts, sync drift, and missed speech, whereas raw waveform processing eliminates these post-cut corrections24.
An aggressive dialogue cleanup inevitably generates numerous visual jump-cuts on the timeline16. To smooth these transitions on a single-camera angle without resorting to B-roll cutaways, engineers use frame-interpolation transitions:
Adobe Premiere Pro Morph Cut: This effect applies facial tracking and optical flow interpolation across a cut25. It analyzes the facial structure in the frames immediately preceding and following the edit point and synthesizes a transition to blend the head position seamlessly26.
DaVinci Resolve Smooth Cut: Powered by DaVinci’s Speed Warp and Optical Flow rendering, this transition blends adjacent frames to mask the visual jump28.
To prevent morphing transitions from generating unnatural artifacts—such as shifting backgrounds, floating ears, or "glitching" textures—the following optimization techniques must be applied26:
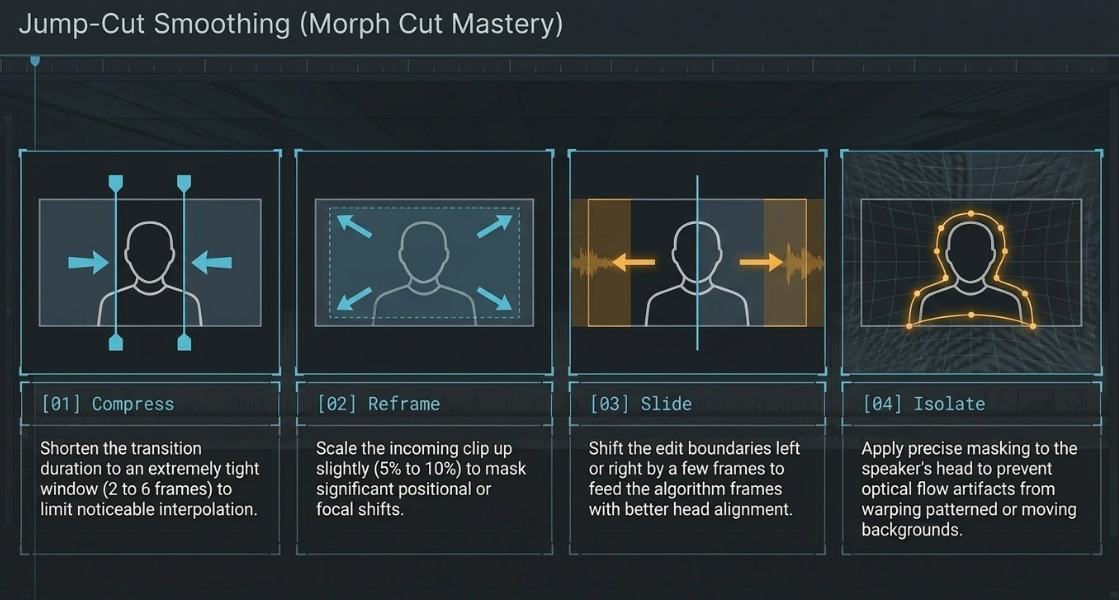
Keep Transitions Extremely Short: The default transition duration should be shortened to 2 to 6 frames31. This restricts the interpolation to a highly compressed window, making the morph fast and less noticeable31.
Reframe and Scale: If the speaker's head shifts significantly, scale the incoming clip up slightly (typically 5% to 10%)33. This focal change masks the positional shift, allowing the NLE to align and interpolate the frames more clean33.
Slide Edit Points: If a morph looks unnatural, slide the transition boundaries a few frames left or right31. This changes the source frames used for interpolation, often finding a point with better head alignment31.
Isolate with Masking: If background movement (such as a pattern or moving light) causes interpolation artifacts, mask the speaker's head33. The morph is applied strictly to the isolated subject, keeping the background locked33.
Advanced Audio Routing and Track Mapping in Nested Multi-Cam Sequences
A frequent point of failure in multi-camera post-production is the improper routing of multi-channel audio tracks34. When multiple speakers are captured on discrete microphones (such as localized lavaliers and directional boom mics) alongside camera reference audio, the NLE must preserve these individual tracks through all nesting and editing phases8.
In Adobe Premiere Pro, mapping multi-channel audio within a multi-camera source sequence requires careful configuration34:
Ingestion and Track Modification: Before nesting, the editor must select all raw audio and video clips in the Project Panel, right-click, select Modify > Audio Channels (or press Shift + G), and change the Clip Channel Format to "Mono"36. The Number of Audio Clips must be set to match the exact count of physical microphones used on set36.
Sequence Alignment Settings: When executing Create Multi-Camera Source Sequence, the Audio Preset must not be left on "Automatic"37. Instead, the Sequence Settings should be mapped to "All Cameras" or "Mono" to ensure that every individual mic track is routed to a corresponding discrete track in the target sequence, rather than being consolidated into a stereo mixdown36.
Nested Panning Protocols: When nesting a multi-camera group into a master editing sequence, the NLE's Audio Track Mixer requires precise channel mapping34. To prevent channels from summing or bleeding, odd-numbered tracks must be panned hard left (100% L) and even-numbered tracks panned hard right (100% R)34. This routing configuration preserves the individual audio streams, allowing the editor to apply discrete EQ and compression to each speaker's microphone34. If a nested sequence is incorrectly set to stereo, it can force multi-channel files into a mono mixdown, locking the individual tracks and preventing separate processing38.
In DaVinci Resolve, managing multi-camera audio is handled through the Fairlight page or Clip Attributes39:
Fairlight Channel Splitting: By default, multi-channel clips may be interpreted as a single stereo track40. The editor can navigate to Fairlight > Linked Groups, unlink the automated stereo grouping, and convert the track format to mono39. This separates the embedded channels into discrete tracks, allowing the sound mixer to isolate individual lavalier and boom inputs39.
Sync-and-Drop Workflow: Many advanced editors prefer to separate video and audio handling entirely39. The multi-camera clip is created using video files and reference scratch audio only39. This multi-camera clip is placed on a timeline, and the high-fidelity master audio files from the external recorder are manually synced directly underneath39. The scratch audio within the nested multi-camera sequence is then muted39. This approach keeps the audio independent of camera switching, avoiding track mapping errors39.
To maintain conversational engagement, editors use split-edit techniques, specifically J-cuts and L-cuts41:
J-Cut Mechanics: In a J-cut, the incoming speaker's audio is heard before the video cuts to their close-up, allowing the viewer to hear the start of the response while still seeing the host's reaction41.
L-Cut Mechanics: In an L-cut, the outgoing speaker's audio continues under the video of the next shot, keeping the focus on the speaker's concluding thoughts while visually introducing the listener's reaction41.
To execute these split edits without breaking synchronization, editors expand the audio track linked to the multi-camera clip (using Control-S in Final Cut Pro) and turn off the linked selection tool in Premiere or Resolve39. This allows the audio and video edit points to be trimmed independently39. The edit points can be rolled frame-by-frame using the comma (,) and period (.) keys, or shifted by exact timecode increments without shifting the overall timeline alignment19.
A critical final step before exporting project files to external colorists or sound designers is flattening the multi-camera sequence36. Since target color platforms (like DaVinci Resolve) and digital audio workstations (like Pro Tools) cannot resolve NLE-specific nested structures, the multi-camera tracks must be flattened36. This process dissolves the nested sequence wrapper, exposing the original, un-nested video cuts and discrete audio files to ensure accurate metadata matching during the XML or AAF conform process36.
Downstream Repurposing, Creative Safe Zones, and Local Workstation Infrastructure
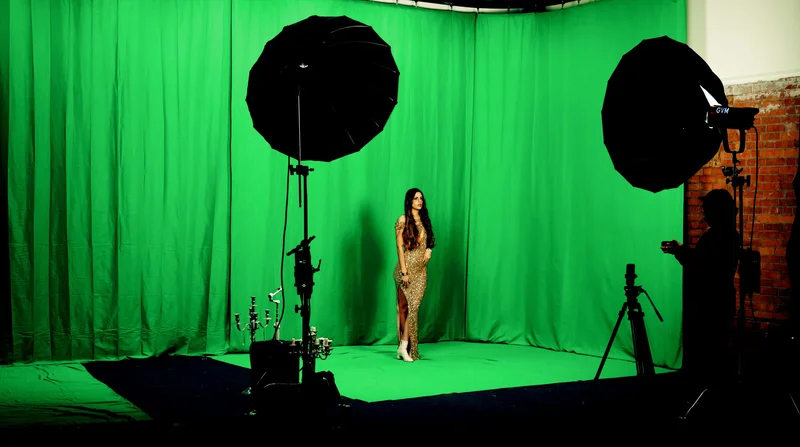
The modern video podcast lifecycle relies heavily on repurposing horizontal 16:9 episodes into high-performance 9:16 vertical video assets, such as Instagram Reels, TikToks, and YouTube Shorts1. This workflow requires a highly structured technical approach to handle safe zones and visual composition44.
Technical Specifications for Vertical Video
Industry standards for professional vertical video delivery mandate precise export parameters to ensure optimal playback across all major platforms43:
Resolution: 1080x1920 pixels is the standard baseline43. For high-density screens, exporting at 1440x2560 pixels is recommended to prevent upscaling artifacts during platform ingestion47.
Codec & Bitrate: MP4 utilizing the H.264 compression standard is required for broad device compatibility43. Bitrates must be target-tuned between 8 to 12 Mbps43.
Temporal settings: A locked frame rate of 30 frames per second (fps) is the standard, though 60 fps may be used for high-action content43.
Audio: AAC format at a sample rate of 48 kHz, stereo or dual-mono, with a bitrate of 128 to 192 kbps43.
Unified Meta Ads and Platform Safe Zones
In 2026, Meta unified the safe zone templates for Instagram Stories, Instagram Reels, Facebook Stories, and Facebook Reels into a single integrated framework44. This standardization helps prevent interactive platform user interface (UI) elements from blocking critical visual elements, captions, or logos44. On a standard 1080x1920 canvas, the specific margins are defined as44:
Top Safety Margin (14% / 270px): Must remain clear of critical titles or logos44. This area is reserved for profile icons, usernames, timestamps, and platform navigation elements44.
Bottom Safety Margin (35% / 670px): This large exclusion zone is reserved for interactive overlay elements, including calls-to-action (CTAs), likes, shares, comments, descriptions, and audio track attribution44. No critical text, subtitles, or branding should be placed in this lower portion44.
Side Margins (6% / 65px on each side): Must be kept clear of text to prevent clipping on screens with curved edges44.
Safe Content Area (51% / pixels 250 to 1248): The central band of the vertical frame is the only universal safe zone across all platforms, including TikTok and YouTube Shorts, ensuring complete visibility of key content43.
Composition Rules for Vertical Video
When reframing horizontal 16:9 footage into a vertical timeline, standard rule-of-thirds principles must be adapted to accommodate the narrow portrait canvas43:
Vertical Centering: In horizontal video, placing a subject directly in the center can appear static and uninteresting43. In vertical video, centering the subject is essential to keep them within the narrow horizontal viewing area43.
Eye-Line Placement: The subject's eye-line should be positioned within the upper-central third of the frame, approximately 15% to 25% from the top43. This placement sits just below the top safety margin, drawing the viewer's focus naturally43.
Graphic and Captions Band: Primary on-screen subtitles, automated captions, and callouts must be kept within the central third of the screen, ideally between 30% and 60% from the top, or at a consistent baseline of 65% to 70% to sit safely above the bottom UI overlay43.
Dynamic Reframing: While automated reframing tools (such as Premiere's Auto Reframe or CapCut Auto Reframe) accelerate the initial layout process1, manual keyframing is often necessary43. When a speaker moves or shifts within a cropped horizontal frame, the editor must manually keyframe the horizontal position to keep the subject centered and avoid cutting off their face43.
Collaborative Network Shared Storage
Editing high-density multi-camera timelines featuring uncompressed or high-bitrate video formats (such as ProRes, DNxHR, or raw camera formats) requires a high-bandwidth, redundant, and low-latency shared storage infrastructure3. This prevents dropped frames, lags, and timeline crashes during real-time multi-camera playback19.
For collaborative post-production teams, specialized Network Attached Storage (NAS) configurations are essential to handle high throughput:
OWC Jellyfish Architectures: The Jellyfish platform utilizes the ZFS file system, providing built-in data integrity and multi-drive redundancy51. In standard RAID-Z1 configurations, it can sustain a physical drive failure within the storage pool without loss of media51. The Jellyfish Nomad is an all-NVMe mobile shared solution offering up to 6000 MB/s aggregate bandwidth over 6 direct-connected 10GbE client ports, making it ideal for on-set editing49. The Jellyfish Studio is a desktop SSD/HDD hybrid delivering up to 3500 MB/s throughput with up to 14 direct client connections (6 x 10GbE and 8 x 1GbE), removing the need for external network switches51. The ecosystem includes software utility tools like Jellyfish Connect for instant client mounting, Jellyfish Manager for simplified folder permission management, and Jellyfish Media Manager for automated proxy generation52.
QNAP Enterprise NAS: QNAP systems provide high-speed connectivity via Thunderbolt 4, 10GbE, and 25GbE interfaces50. Integrating QNAP QM2 PCIe expansion cards allows for M.2 NVMe SSD caching, which significantly improves read/write speeds, reduces database latency, and accelerates rendering tasks50. These setups support direct database hosting and automatic project locking, allowing multiple editors to collaborate simultaneously in DaVinci Resolve Studio and Adobe Premiere Pro without performance bottlenecks50.
Conclusions
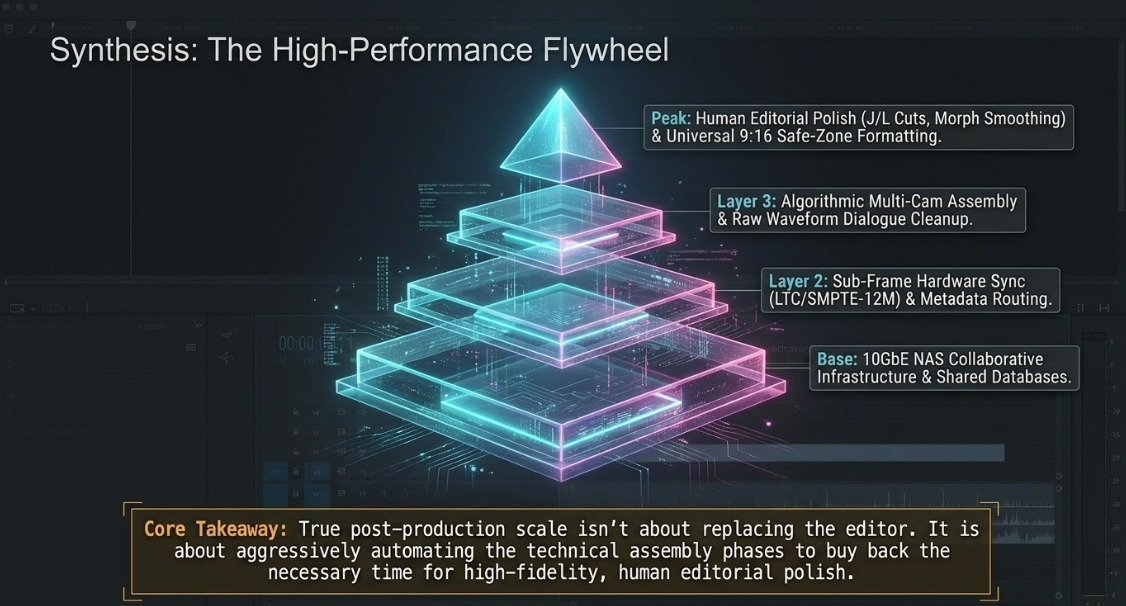
A professional, high-performance video podcast post-production workflow requires integrating rigorous technical standards across every stage of the pipeline. Achieving frame-accurate synchronization begins with hardware-driven LTC, using the SMPTE-12M standard to link separate audio and multi-camera captures. While automated AI-driven editing tools generate valuable baseline rough cuts, a manual pass by a skilled editor remains essential to refine pacing, add reaction shots, and ensure professional creative timing.
In addition, clean dialogue edits require managing visual continuity with carefully configured morph transitions, while multi-channel audio tracks must be properly routed through nested sequences to preserve individual mic channels. Finally, downstream vertical repurposing must follow unified platform safe zones to ensure high-retention social media deliverables, supported by a high-speed shared storage infrastructure (such as 10GbE OWC Jellyfish or QNAP NAS) to enable seamless, collaborative, and frame-accurate editing.
Works cited
How to edit a Podcast in Premiere Pro (Fast Multicam Workflow 2026) - AutoCut, https://www.autocut.com/en/blogs/edit-podcast-premiere-pro/
How to Edit Multi-Camera Podcast Footage: Step-by-Step Video Workflow - Vidpros, https://vidpros.com/how-to-edit-multi-camera-podcast-footage-step-by-step-video-workflow/
Tentacle SYNC STUDIO | Sync Software for Mac, https://tentaclesync.com/products/sync-studio-software
Configurer un Tentacle Sync E mkII | Timecode multicam audio vidéo | ONEWAY Avignon, https://www.location-camera.com/fr/content/12-configurer-tentacle-sync-e-mkii-tournage-multicam
Tentacle Sync SYNC E | Small & Lightweight Timecode Generator, https://tentaclesync.com/products/sync-e
These Will Save You HOURS of Editing: Tentacle Sync Workflow, https://www.keithknittel.com/articles/these-will-save-you-hours-of-editing-tentacle-sync-workflow
How can I sync audio with LTC without overwriting original camera TC? (Premiere workflow), https://www.reddit.com/r/editors/comments/1lcpnt5/how_can_i_sync_audio_with_ltc_without_overwriting/
Workflows for quick turnaround video podcast editing : r/editors - Reddit, https://www.reddit.com/r/editors/comments/1p11j90/workflows_for_quick_turnaround_video_podcast/
Multicam Podcasts / Studio recordings: the correct angle chosen for the correct speaker | Eddie AI | Your AI assistant video editor, https://help.heyeddie.ai/en/articles/10548843-multicam-podcasts-studio-recordings-the-correct-angle-chosen-for-the-correct-speaker
Can I edit multicamera sequence live through Premiere Pro? - Adobe Community, https://community.adobe.com/questions-729/can-i-edit-multicamera-sequence-live-through-premiere-pro-1408854
This AI Tool Just Changed Podcast Editing - YouTube, https://www.youtube.com/watch?v=0v4oy1rbn5c
Best Multi-cam Editing Plugins for Premiere Pro Users in 2026 - Cutback, https://cutback.video/blog/best-multi-cam-editing-plugins-for-premiere-pro-users
How to Edit Multicam in DaVinci Resolve - Cutback, https://cutback.video/blog/how-to-edit-multicam-in-davinci-resolve
Thanks to DaVinci Resolve Team for the Built In Multicam Switcher : r/davinciresolve, https://www.reddit.com/r/davinciresolve/comments/1l4tsgo/thanks_to_davinci_resolve_team_for_the_built_in/
4 Best AI Podcast Editors Compared: Selects, Descript, Autopod, and More - Cutback, https://cutback.video/blog/4-best-ai-podcast-editors-compared-selects-descript-autopod-and-more
Descript vs CapCut for AI Video Editing: A Hands-On Workflow Comparison - Vmaker AI, https://www.vmaker.com/blog/descript-vs-capcut-for-ai-video-editing/
What tools are you using to speed up rough cuts lately? : r/editors - Reddit, https://www.reddit.com/r/editors/comments/1p5nijm/what_tools_are_you_using_to_speed_up_rough_cuts/
How to auto-edit multi-camera podcasts in Premiere Pro (AutoCut 2026) - YouTube, https://www.youtube.com/watch?v=F264QlX7qcU
How long would it take to edit an 8 multicam video-podcast episode? - Reddit, https://www.reddit.com/r/editors/comments/1ga1hbb/how_long_would_it_take_to_edit_an_8_multicam/
How to Make Cuts Less Jarring When Client Wants ALL Filler Words or False Starts Removed : r/editors - Reddit, https://www.reddit.com/r/editors/comments/1t5889j/how_to_make_cuts_less_jarring_when_client_wants/
From rough to ready: A beginner's guide to podcast editing, https://podcast.adobe.com/en/guides/from-rough-to-ready-a-beginners-guide-to-podcast-editing
Should I edit out "umms", "ahhs", and silences from my podcasts? Or should I keep those in the podcast episode? - Reddit, https://www.reddit.com/r/podcasting/comments/1j5uizy/should_i_edit_out_umms_ahhs_and_silences_from_my/
Best AutoCut Agent for Podcast Clips in 2026 | Top 6 Tools Reviewed - CapCut, https://www.capcut.com/resource/top-6-autocut-agents-for-podcast
AI Video Editor Alternatives (Longform): TimeBolt vs Descript vs Gling vs Loom, https://www.timebolt.io/blog/ai-video-editor-showdown-long-form-accuracy-test
Smoother transitions when removing filler words from script | Voters - Descript - Canny, https://descript.canny.io/feature-requests/p/smoother-transitions-when-removing-filler-words-from-script
How to Create a Morph Cut Glitch Transition Effect in Adobe Premiere Pro - YouTube, https://www.youtube.com/shorts/WPPkjqjTx5k
Apply Morph Cut to smooth jump cuts in Premiere - Adobe Help Center, https://helpx.adobe.com/premiere/desktop/add-video-effects/apply-video-transitions/apply-morph-cut-to-smoothen-jump-cuts.html
DaVinci Resolve 20 Quick Tip — The Secret to Invisible Jump Cuts - YouTube, https://www.youtube.com/watch?v=rNRc5Wtg29s
The PERFECT Match Cut / DaVinci Resolve Tutorial - YouTube, https://www.youtube.com/watch?v=MMQKOZcwz1k
How to do Fast and Easy Morphing Transitions in DaVinci Resolve - Sound & Design, https://soundand.design/how-to-do-fast-and-easy-morphing-transitions-in-davinci-resolve-fa3081cb426
Episode 25 - Morph Cut - Tutorial for Adobe Premiere Pro CC 2015 - YouTube, https://www.youtube.com/watch?v=8s83KuOjLyI
Morph Transitions in Davinci Resolve | A How To Tutorial - YouTube, https://www.youtube.com/watch?v=gPZKGRUCfhA
How to Create a Morph Cut in Premiere Pro: How Channel with GJ - YouTube, https://www.youtube.com/watch?v=aET-u5R6cis
HELP! Multicam sequences outputting audio to mono track : r/premiere - Reddit, https://www.reddit.com/r/premiere/comments/1n0y686/help_multicam_sequences_outputting_audio_to_mono/
Multicam Sequence audio pulling stereo when I need mono - Adobe Community, https://community.adobe.com/questions-729/multicam-sequence-audio-pulling-stereo-when-i-need-mono-1418301
mapping audio channels on multicam clips - Adobe Community, https://community.adobe.com/questions-729/mapping-audio-channels-on-multicam-clips-1416275
Premiere Pro: Which Multicam Audio Settings To Use [u] - Larry Jordan, https://larryjordan.com/articles/premiere-pro-cc-which-multicam-audio-settings-to-use/
Audio only playing Mono - nested multicam - Adobe Community, https://community.adobe.com/questions-729/audio-only-playing-mono-nested-multicam-1388326
How to get dual mono audio working in multicam clip? : r/davinciresolve - Reddit, https://www.reddit.com/r/davinciresolve/comments/131jihv/how_to_get_dual_mono_audio_working_in_multicam/
View topic - Accessing audio tracks individually in a Multicam edit - Blackmagic Forum, https://forum.blackmagicdesign.com/viewtopic.php?f=21&t=190112
How to Edit Videos: L-Cuts and J-Cuts - TechSmith, https://www.techsmith.com/blog/how-to-edit-videos-l-cuts-and-j-cuts/
Create split edits in Final Cut Pro for Mac - Apple Support (NZ), https://support.apple.com/en-nz/guide/final-cut-pro/ver1632d82c/mac
9:16 Aspect Ratio (2026): Exact Pixels, Safe Zones & Setup in Every Editor, https://edicionvideopro.com/en/editing-techniques/916-aspect-ratio-guide-vertical-video-for-tiktok-reels/
Meta Ads Safe Zones 2026: The Exact Pixels Where Your CTAs Get Cut Off | 1ClickReport, https://www.1clickreport.com/blog/meta-ads-creative-safe-zones-2026-guide
Vertical Video 2026: Safe Zones, Text, and Editing — How to Create Content That Doesn't Cut Through Algorithms - Postmypost, https://postmypost.io/resources/vertical-video-2026-safe-zones-text-and-editing-how-to-create-content-that-doesn-t-cut-through-algorithms
TikTok media specs & best practices (2026) - HeyOrca, https://www.heyorca.com/blog/tiktok-media-specs-best-practices-2026
Meta Ads Aspect Ratios: Every Placement, Every Format, One Guide - Ads Uploader, https://adsuploader.com/blog/meta-ads-aspect-ratios
Meta Ad Sizes 2026: Every Placement Spec + Safe Zones - Ryze AI, https://www.get-ryze.ai/blog/facebook-ad-sizes-complete-specs-guide-for-2026
OWC Jellyfish - high speed, scalable NAS built for video - MacSales.com, https://eshop.macsales.com/shop/jellyfish-nas-storage
Best Storage for Video Production - QNAP, https://www.qnap.com/en/solution/video-storage
OWC Jellyfish Studio – Pro SSD/HDD NAS for Media Teams, https://www.owc.com/solutions/jellyfish/studio
OWC Jellyfish - The Best NAS Storage Solution for Video Teams, https://www.owc.com/solutions/jellyfish
QNAP Content Creation | Secure, collaborative, and huge storage solutions for content creators, https://www.qnap.com/en/solution/content-creation
Discover the BEST Setup for 10GbE Video Editing on Your QNAP NAS, https://www.qnap.com/en-gr/qutube/video/k9RzGPXugtI