Introduction to Vocal Audio Degradation
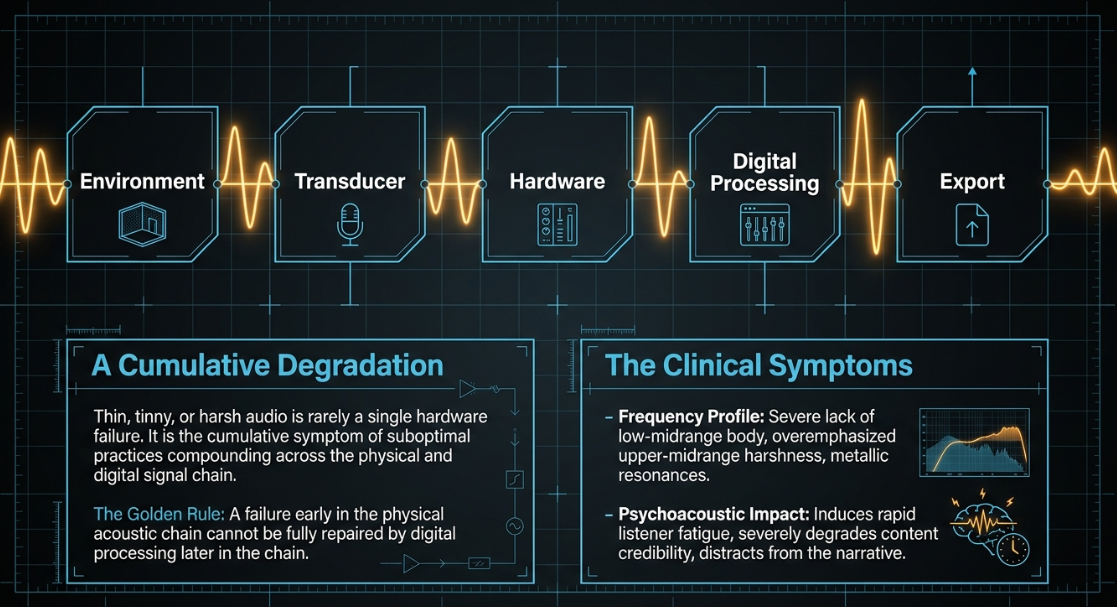
The proliferation of digital audio content has democratized broadcasting, allowing creators to produce globally accessible media from residential environments. However, the pursuit of professional, broadcast-quality audio is frequently hindered by a phenomenon commonly described by listeners and producers alike as a "tinny," "thin," or "harsh" sound. Tinny audio is characterized by a conspicuous lack of low-midrange frequencies, an overemphasis on upper-midrange harshness, and occasionally, metallic or robotic algorithmic resonances (Sonix). Rather than being the result of a single catastrophic hardware failure, thin audio is typically the cumulative symptom of suboptimal practices distributed across the entire acoustic and digital signal chain (YouTube).
The origin of these auditory artifacts can be traced back to the physical recording space, improper hardware utilization, the physics of transducer placement, aggressive operating system noise-suppression algorithms, and misguided post-production processing. Achieving a rich, resonant vocal presence-often colloquially referred to as "broadcast weight" or "body"-requires a comprehensive understanding of room acoustics, transducer physics, analog preamplification, and digital signal processing. The psychoacoustic impact of thin audio is profound; it induces rapid listener fatigue, reduces the perceived credibility of the content, and fundamentally distracts from the spoken narrative. This report synthesizes technical data, hardware specifications, and psychoacoustic principles to exhaustively detail the causes of thin podcast audio and present robust, evidence-based methodologies for its remediation.
The Physical Environment and Acoustic Reflections
The foundational element of any acoustic recording is the physical space in which the primary capture occurs. A ubiquitous indicator of a sub-par podcast recording is a highly reverberant, hollow sound resulting from untreated room acoustics (Buzzsprout).
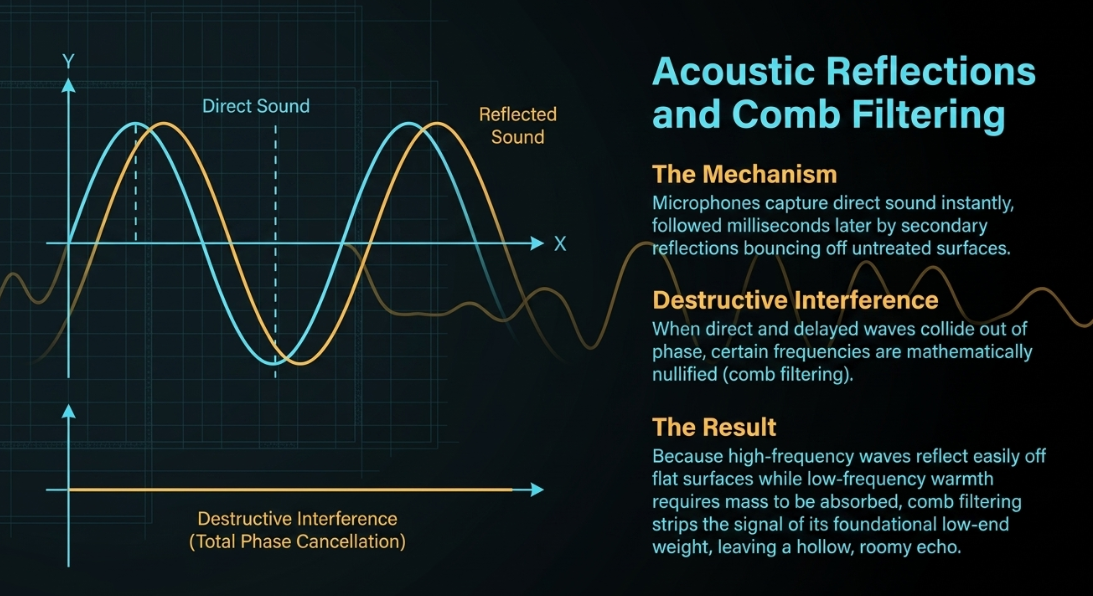
The Mechanics of Reverberation and Comb Filtering When a vocalization occurs, acoustic energy emanates in three dimensions. The microphone capsule captures the direct sound from the speaker's mouth, but milliseconds later, it also captures secondary and tertiary reflections bouncing off walls, ceilings, windows, and adjacent hard furniture. In small, untreated rooms characterized by bare drywall and hardwood floors, these reflections arrive at the microphone capsule very rapidly. When these reflected sound waves mix with the direct sound wave, they create a destructive phenomenon known as acoustic phase cancellation, often resulting in comb filtering (Forward Audio).
Depending on the precise time delay of the reflection-which is dictated by the dimensions of the room and the speed of sound-certain frequencies will be mathematically reinforced through constructive interference, while others will be nullified through destructive interference (Mastering BOX). Because high-frequency waves possess shorter wavelengths, they are easily reflected by flat surfaces, while lower frequencies require significant physical mass to be absorbed. The result of this acoustic physics is an audio signal stripped of its fundamental low-end warmth, leaving only a hollow, roomy, and thin echo that severely degrades the broadcast quality (Buzzsprout).
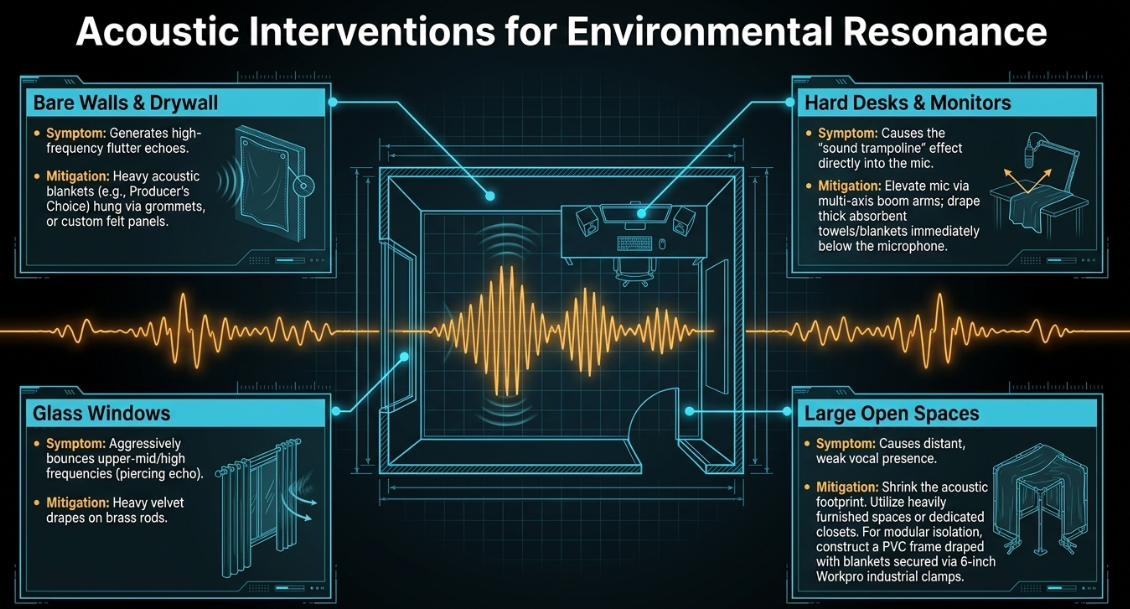
Mitigating Room Reflections Remedying acoustic deficiencies requires the introduction of sound-absorbing materials to intercept and dissipate acoustic reflections before they return to the microphone capsule. While specialized commercial acoustic foam is highly effective in dedicated studios (East Coast Studio), numerous budget-friendly and architectural interventions can significantly alter the acoustic profile of a residential space, effectively neutralizing the reflections that cause tinny audio. Table 1 outlines the primary sources of environmental reflection and their respective evidence-based acoustic treatments.
Table 1: Acoustic Interventions for Environmental Resonance Control
For maximum isolation in challenging environments, constructing a localized, modular vocal booth is highly recommended. By utilizing a small closet or constructing a freestanding PVC pipe frame draped with heavy acoustic blankets, a podcaster can artificially reduce the volume of the recording environment (I Want To Be A Voice Actor!). Employing heavy-duty industrial clamps, such as 6-inch Workpro clamps, allows for the secure manipulation of these blankets to eliminate gaps where sound might escape or enter (I Want To Be A Voice Actor!). This method deadens external reflections and forces the microphone to exclusively capture the direct, non-reflected vocal source, thereby preserving the low-end weight of the audio (YouTube).
Transducer Physics and Microphone Technique
If the acoustic environment is sound, the subsequent potential point of failure is microphone selection and physical technique. The single most common behavioral cause of thin, tinny audio is an improper physical distance maintained between the speaker's vocal tract and the microphone capsule (Reddit).
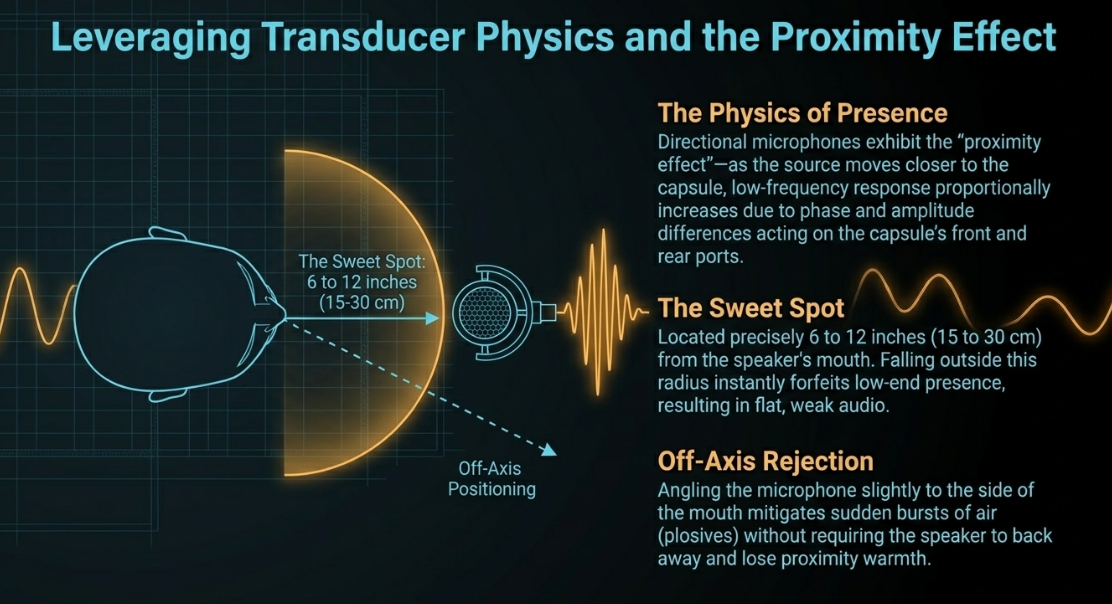
The Proximity Effect A fundamental characteristic of directional microphones-specifically those exhibiting cardioid, supercardioid, and hypercardioid polar patterns-is a physical phenomenon known as the "proximity effect" (Shure). The proximity effect dictates that as the sound source moves physically closer to the directional microphone capsule, the microphone's low-frequency response proportionally increases (Shure). This phenomenon is caused by the phase and amplitude differences of low-frequency sound waves acting simultaneously on the front and rear ports of the directional capsule.
When a podcaster records from a distance of several feet, or inadvertently leans back in their chair during a recording session, the benefits of the proximity effect are entirely lost. Consequently, the microphone outputs a flat, weak, or artificially bright signal that lacks vocal authority and presence. Conversely, leveraging the proximity effect intentionally imparts deep resonance and richness-the classic, authoritative "radio voice" (Shure Europe).
The optimal placement to balance warmth without inducing "muddy" or overly bass-heavy distortion is known within the audio engineering discipline as the "sweet spot" (Shure). For the vast majority of directional microphones utilized in podcasting, this sweet spot is located precisely 6 to 12 inches (15 to 30 cm) from the speaker's mouth (Shure). Furthermore, off-axis positioning-angling the microphone slightly to the side of the mouth rather than directly in front of the lips-can mitigate sudden bursts of air (plosives) without requiring the speaker to move further away and forfeit the crucial low-end presence provided by the proximity effect (YouTube).
Microphone Typologies and Hardware Reliability The mechanical design of the microphone itself heavily influences the tonal balance of the recording. While condenser microphones capture an exceptionally wide frequency range and transient detail, they are highly sensitive and will brutally expose a poorly treated, reverberant room (Resonate Recordings). Conversely, dynamic microphones are inherently less sensitive, making them superior at rejecting off-axis room noise, though they require significantly more preamplification gain (Resonate Recordings). Furthermore, the physical orientation differences between side-address and end-address microphone capsules must be respected; speaking into the top of a side-address microphone will result in an incredibly thin, off-axis, and muffled sound (YouTube).
Table 2 details specific, highly regarded microphone models utilized to achieve a thick, professional vocal tone.
Table 2: Microphone Typologies for Thick Vocal Capture
When selecting hardware, reliability and physical connection integrity are paramount. Complex digital microphones with touch-screen interfaces and micro-USB connections-such as certain iterations of the Shure MV7-can be prone to catastrophic mid-recording failures if the cable slips, resulting in lost audio or reset parameters (Buzzsprout). Audio professionals often prefer solid, physical hardware buttons and robust XLR connections to guarantee time-tested reliability over finicky digital features (Buzzsprout).
Multi-Microphone Configurations and Phase Cancellation
In podcast formats featuring multiple hosts or guests conversing in the same physical room, a thin, weak, or bizarrely hollow sound is frequently the result of electronic phase cancellation (Mastering BOX).
The Mechanics of Phase Alignment Audio phase describes a sound wave's precise position in its $360^{\circ}$ cycle at a specific moment in time (Mastering BOX). When a single voice is captured by two separate microphones located at different distances from the speaker, the physical sound wave travels through the air and arrives at the second microphone slightly later than it arrives at the primary microphone (Mastering BOX). If these two microphone signals are summed together (e.g., mixed into a single mono podcast track), the peaks of the waveform from the primary microphone may align precisely with the troughs of the waveform from the secondary microphone. If the signals are perfectly $180^{\circ}$ out-of-sync, they completely cancel each other out at specific frequencies through a process of destructive interference (Mastering BOX). The low-end and fundamental frequencies of the human voice are typically the first casualties of phase cancellation, resulting in a sudden drop in volume, a loss of dynamic impact, and a hollow, tinny sound that makes the vocal appear to vanish mysteriously from the mix (Mastering BOX).
The 3-to-1 Rule for Microphone Placement To minimize microphone bleed and prevent the onset of phase cancellation, audio engineers rigorously adhere to the 3-to-1 rule. This geometric principle dictates that the distance between any two active microphones must be at least three times the distance between the primary microphone and its intended sound source (Shure Middle East and Africa). For instance, if Speaker A is positioned 6 inches from Microphone A, Microphone B must be placed at least 18 inches away from Microphone A (Shure Middle East and Africa).
While the 3-to-1 rule does not literally alter the mathematical phase relationship of the audio waves, it leverages the inverse-square law of sound propagation. It ensures that by the time Speaker A's voice bleeds into Microphone B, the acoustic volume of that bleed is significantly attenuated by the physical distance (YouTube). A level difference of approximately 10 dB between the primary signal and the bleeding signal is generally sufficient to prevent noticeable destructive comb filtering (DPA Microphones). Furthermore, pointing the directional microphones away from one another maximizes their off-axis rejection capabilities (Reddit).
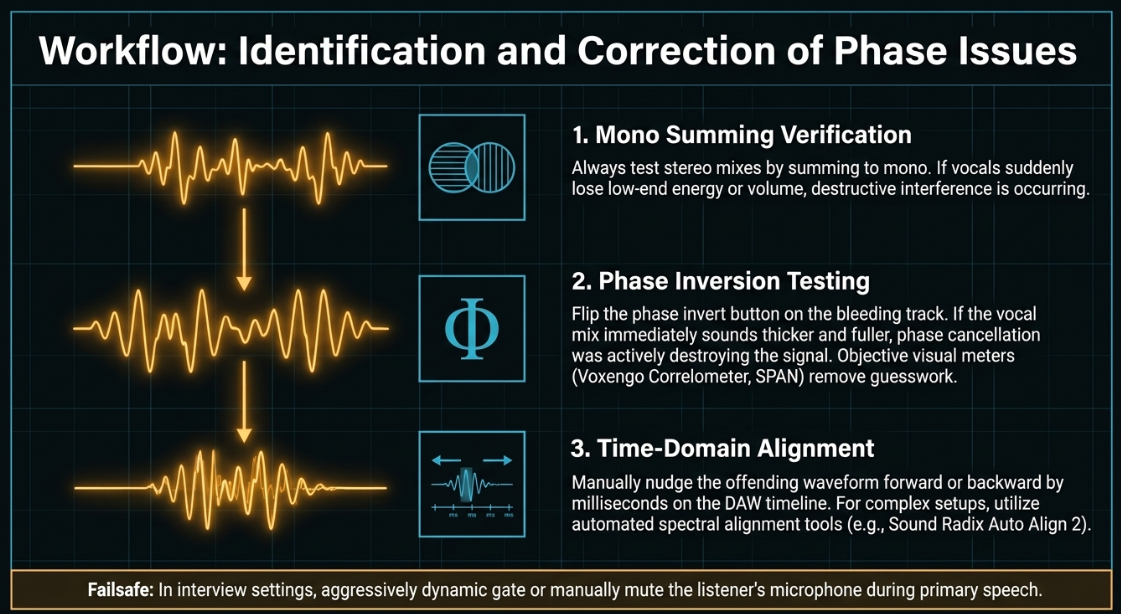
Identification and Correction of Phase Issues Phase issues are often described by mix engineers as "silent killers" because they are not immediately obvious during tracking until the final mix is scrutinized (YouTube). Several technical workflows can be employed to detect and rectify phase cancellation:
Mono Summing Verification: Always test a stereo mix by summing it to mono playback. If a vocal suddenly sounds hollow, quieter, or loses significant low-end energy when summed to mono, phase cancellation is actively destroying the signal (Remasterify).
Phase Inversion (0) Testing: Most digital audio workstations (DAWs) and analog consoles feature a phase invert button. Flipping the phase on the bleeding track mathematically reverses the direction of the sound wave, turning peaks into dips. If flipping the phase suddenly causes the vocal mix to sound thicker and fuller, it confirms that destructive interference was previously occurring (Remasterify).
Visual Correlation Meters: Objective visual tools, such as the Voxengo Correlometer, ADPTR Metric AB, or SPAN, can analyze the spectral relationship between tracks and display phase correlation mathematically, removing the guesswork from auditory evaluation (Remasterify).
Time-Domain Alignment: If multi-mic bleed is unavoidable due to space constraints, manually nudging the waveform of the offending track forward or backward by a few milliseconds on the DAW timeline can align the phases constructively (Mastering The Mix). Advanced automated plugins, such as Sound Radix Auto Align 2, can instantly analyze time-domain phase differences and apply spectral correction to perfectly align complex multi-mic setups (Reddit).
Dynamic Gating: The most foolproof, brute-force method of preventing phase cancellation in an interview setting is to aggressively gate or manually mute the listener's microphone entirely while the primary speaker is talking (Reddit).
Hardware Interventions: Interfaces, Pre-amplification, and Monitoring
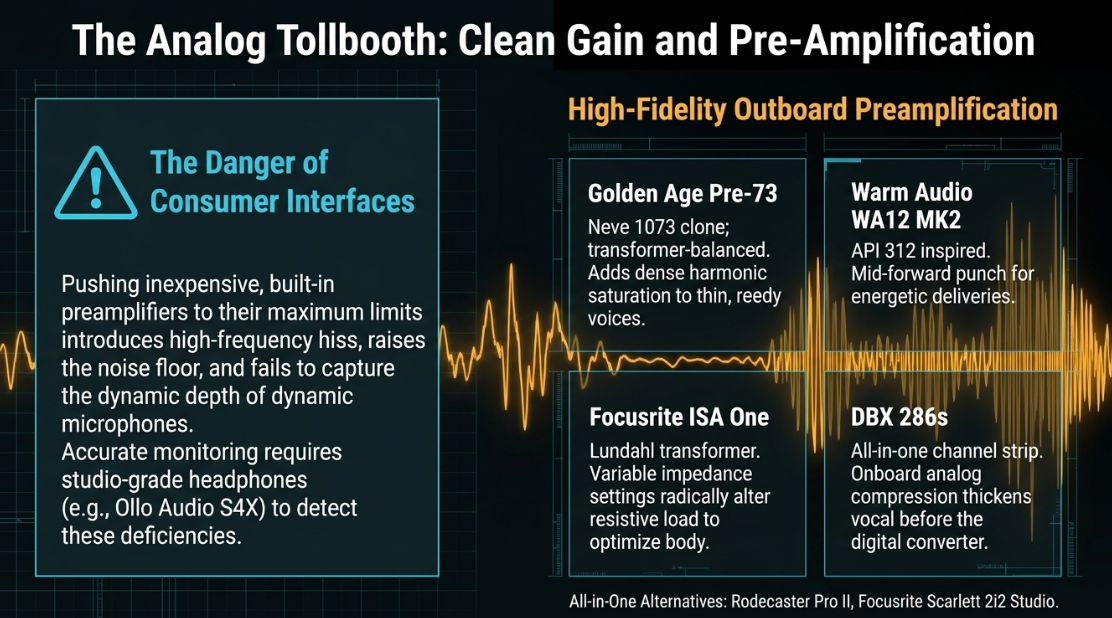
The translation of acoustic energy into an analog electrical signal, and subsequently into a digital file, relies heavily on the quality of the microphone preamplifier and the audio interface. A pervasive cause of thin, lifeless audio is relying on weak, inexpensive built-in preamplifiers that cannot provide adequate clean gain (Reddit).
For podcasters utilizing professional dynamic microphones, immense amounts of clean gain are mechanically required to induce a strong signal. If a consumer-grade interface's built-in preamps are pushed to their maximum limit to achieve audible levels, they introduce high-frequency hiss, raise the noise floor, and fail to capture the dynamic, transient depth of the vocal. Integrating a dedicated outboard preamplifier can inject analog warmth, harmonic density, and significant "weight" into an otherwise sterile digital signal (Universal Audio).
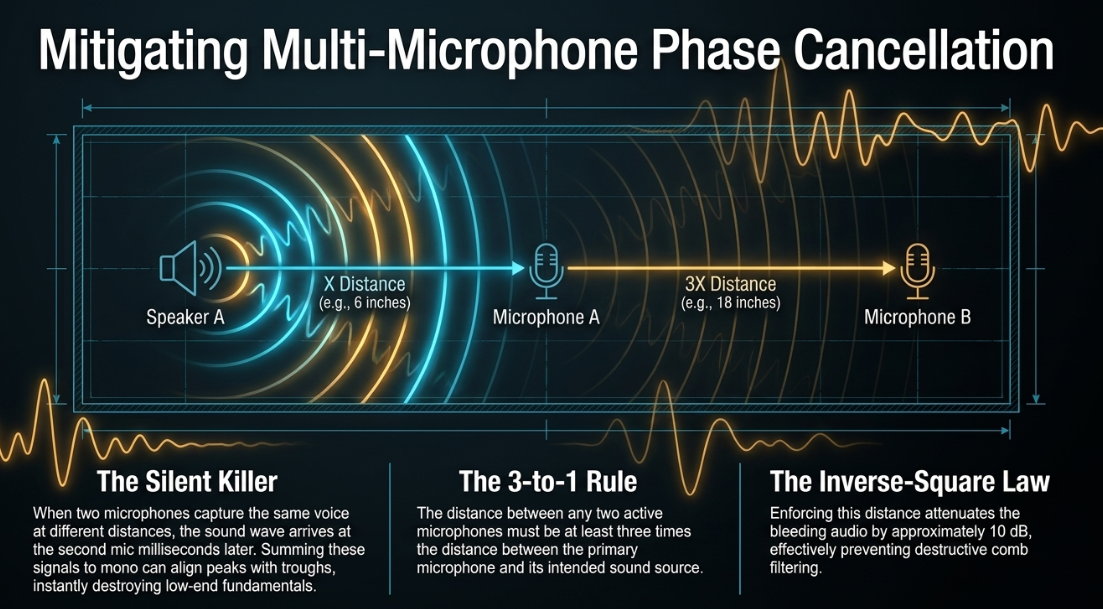
Table 3 outlines highly regarded budget preamplifiers (under $1000) utilized specifically to thicken vocal signals before they reach the analog-to-digital converter.
Table 3: High-Fidelity Preamplification Topologies
In addition to outboard preamplifiers, all-in-one production studios like the Rodecaster Pro II bundle pristine preamps with built-in DSP (Digital Signal Processing), providing podcasters with broadcast-quality audio routing in a simplified modular package (NearStream). The Focusrite Scarlett 2i2 Studio Bundle is also noted for its clean, reliable performance in entry-level professional setups (NearStream).
Crucially, the ability to detect thin audio relies entirely on accurate monitoring. Listening through consumer-grade earbuds will mask frequency deficiencies. Utilizing flat-response, studio-grade headphones-such as the Ollo Audio S4X or high-end Sennheiser models-ensures that the producer hears the unexaggerated truth of the deep bass and highs, allowing for accurate diagnosis of tinny recordings (YouTube).
Operating System Enhancements and Algorithmic Artifacts
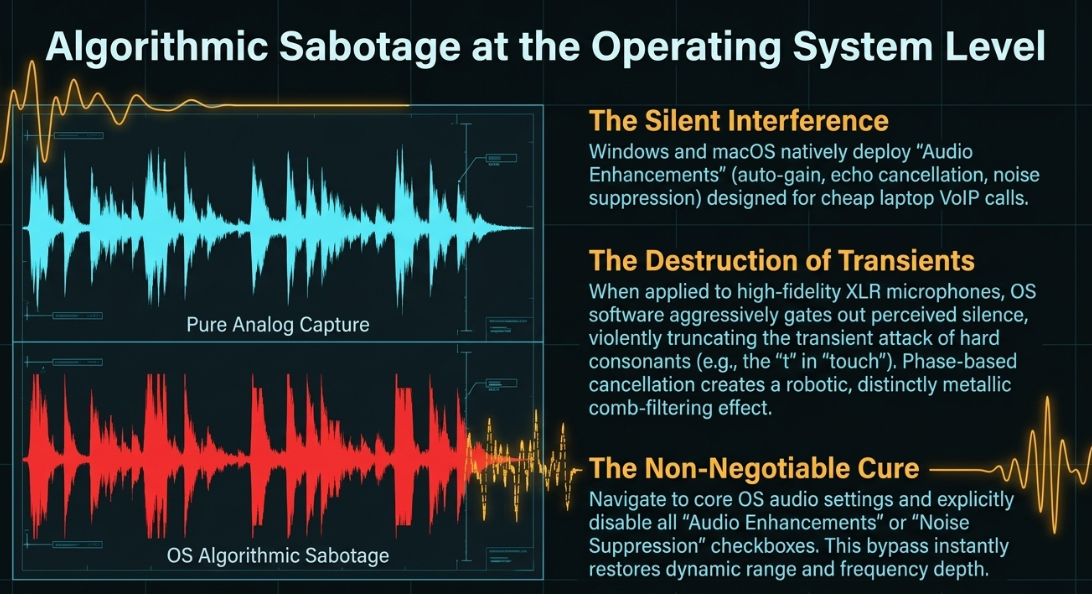
A frequently overlooked, yet highly destructive, variable in modern desktop podcast production is the silent interference of background audio algorithms embedded directly within operating systems. Both Windows and macOS feature native "Audio Enhancements," which seamlessly deploy automatic noise suppression, echo cancellation, and auto-gain control on incoming microphone signals. While these algorithmic enhancements are highly beneficial for casual VoIP video calls using inexpensive, built-in laptop microphones in noisy environments, they are catastrophic for professional XLR condenser and dynamic microphones.
When a high-fidelity, full-spectrum audio signal passes through an OS-level noise suppression algorithm, the software attempts to aggressively gate out what it falsely perceives as background silence. In doing so, it frequently truncates the transients of hard consonants (such as the 't' in 'touch' or the 'k' in 'work'), chopping off the attack of the words. Furthermore, phase-based noise cancellation algorithms create severe digital comb filtering, leaving the resulting vocal sounding murky, robotic, and distinctly metallic-the very definition of "tinny".
The immediate, non-negotiable cure for this specific manifestation of thin audio is to navigate to the system's core audio settings (e.g., in Windows: Start > Settings > System > Sound > Input Device Properties > Additional device properties) and explicitly disable all "Audio Enhancements" or "Noise Suppression" checkboxes. Bypassing these embedded algorithms instantly restores the full dynamic range, accurate transient response, and frequency depth to the microphone signal, allowing the DAW to capture the pure analog source (Reddit).
Post-Production Remediation: Equalization and Clarity
If a podcast has been recorded with proper microphone technique in an acoustically controlled environment, post-production processing is utilized to polish the raw audio into a finished, broadcast-ready product. A professional vocal chain typically follows a specific order of operations to ensure clarity and thickness: Corrective Equalization → Noise Gate De-Esser Compression Additive Equalization / Harmonic Saturation Corrective and Additive Equalization (EQ) Limiting (Plugin Boutique).
Equalization is the most powerful tool for directly and surgically combating thin audio. By manipulating the amplitude of specific frequency bands, engineers can carve out muddy room resonances and artificially restore the missing "body" of a vocal. A standard, highly effective EQ protocol for thickening a thin podcast vocal involves the following sequential steps:
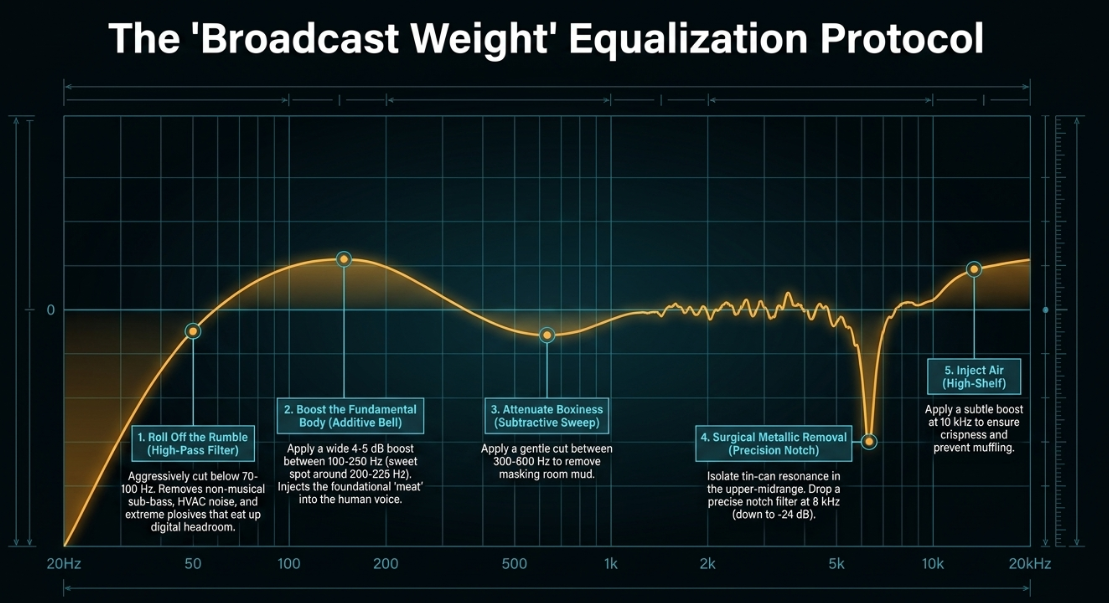
High-Pass Filtering (Roll off the Rumble): Implement a high-pass filter to aggressively roll off frequencies below 70-100 Hz. While it seems counterintuitive to cut bass to fix a thin vocal, sub-bass rumble, HVAC noise, mechanical vibrations, and extreme proximity plosives eat up massive amounts of digital headroom (Waves Audio). Removing this non-musical, ultra-low energy tightens the signal and allows the true vocal fundamentals to sit cleanly in the mix (Waves Audio).
Boosting the Fundamental Body: The weight, warmth, and "meat" of the human voice reside heavily in the lower-midrange. Using a wide, natural-sounding bell-shaped EQ curve, apply a 4 to 5 dB boost anywhere between 100 Hz and 250 Hz (often finding the precise sweet spot around 200-225 Hz depending on the speaker's physiology). This specific, targeted additive move immediately transforms a weak recording into a resonant, "broadcast-style" voice (YouTube).
Attenuating Boxiness and Mud: Often, attempting to boost the low-end reveals masking room resonances that make the vocal sound as though it were recorded inside a cardboard box. Sweep a narrow EQ band between 300 Hz and 600 Hz to locate this "boxiness" or "mud," and apply a gentle subtractive cut. Further up the spectrum, a cut between 600 Hz and 2 kHz can alleviate a "honky" or nasal tone (YouTube).
Surgical Removal of Metallic Frequencies: If the audio has a distinct metallic, tin-can resonance, it is generally located in the extreme upper-midrange. In software like Audacity or advanced EQ plugins (e.g., FabFilter Pro-Q 3), users can deploy the Equalization tool to drop a precise notch filter. Setting plot marks at 7 kHz and 9 kHz, and dragging the 8 kHz mark down drastically to -24 dB will often completely isolate and eliminate the piercing metallic ring without dulling the overall speech intelligibility (Sonix).
Adding High-End Crispness: Finally, to ensure the thickened vocal does not sound muffled, a very subtle high-shelf boost around 10 kHz can inject "air" and crispness back into the recording, finalizing the professional sheen (YouTube).
Post-Production Remediation: Dynamics and Saturation
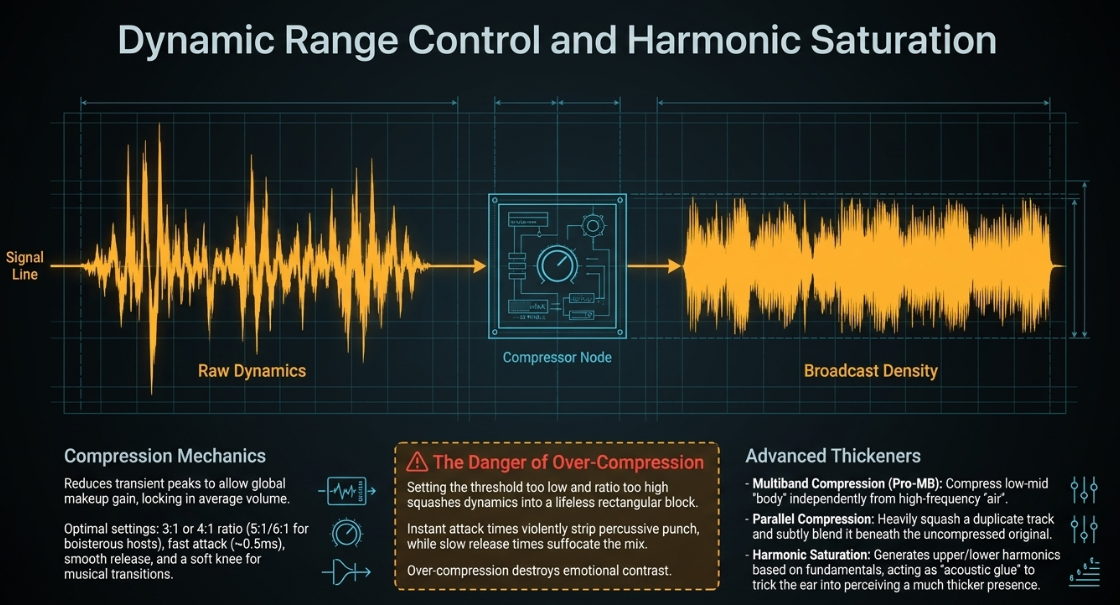
Once the tonal balance has been established and frequencies surgically corrected via EQ, dynamic range compression is applied to ensure the vocal remains consistent in volume and impact. A compressor automatically reduces the volume of the loudest transient peaks based on a set threshold, allowing the entire track's average volume (makeup gain) to be raised globally, resulting in a significantly denser, thicker, and more locked-in sound (Waves Audio).
Compression Mechanics and Best Practices For standard solo spoken word, a low-to-medium ratio (e.g., 3:1 or 4:1) is optimal for maintaining a natural, conversational sound. However, highly dynamic, loud speakers or boisterous podcast hosts may require a harder 5:1 or 6:1 ratio to properly tame volume spikes (YouTube). A fast attack time (approximately 0.5 milliseconds) catches transient peaks quickly before they clip the digital output, while a relatively long, smooth release time ensures the compression behaves transparently, preventing a "pumping" sound (Universal Audio). Utilizing a "soft knee" setting ensures that the transition of the audio crossing the threshold into active compression is gradual and musically pleasing, rather than a sudden, hard mathematical brick wall (Universal Audio).
The Psychoacoustic Danger of Over-Compression While compression is vital for thickening vocals, over-compression is a primary contributor to harsh, fatiguing, and utterly lifeless audio. Over-compression occurs when the threshold is set too low and the ratio is set too high, aggressively squashing the natural dynamic range into a narrow, unyielding rectangular block (Remasterify).
When the soft, intimate parts of a vocal and the loud, emphatic parts sound exactly the same in volume, the emotional contrast of the human voice is destroyed (Mastering.com). Furthermore, if the compressor's attack time is set entirely too fast, the compressor instantly clamps down on the initial transient of every single word. This violently strips the audio of its percussive "punch," making the voice sound dull, distant, and small, even if the overall peak volume meters indicate that the track is technically loud. Conversely, if the release time is too slow, the compressor never fully recovers to a state of zero gain reduction, perpetually pinning the audio down and causing the mix to sound suffocated. Mixing engineers must constantly monitor visual waveform data-ensuring natural peaks and valleys remain visible on the screen-while relying on trained auditory intuition to prevent squeezing the life out of the track (Mastering.com).
Advanced Thickeners: Multiband, Parallel, and Saturation If a single standard compressor fails to add enough weight, engineers turn to advanced dynamic and harmonic techniques.
Multiband Compression: Tools like FabFilter Pro-MB allow engineers to compress specific frequency ranges independently. For example, the low-mid "body" of the vocal can be heavily compressed and brought forward without affecting the dynamics of the high-frequency "air" (YouTube).
Parallel Compression: This technique involves duplicating the vocal track, heavily compressing the duplicate until it is completely squashed and dense, and then subtly mixing it back underneath the uncompressed, dynamic original track. This yields the thickness of heavy compression while retaining the natural, uncompressed transient peaks of the original performance (YouTube).
Harmonic Saturation: To further combat thinness, engineers heavily utilize harmonic saturation plugins (e.g., Softube Saturation Knob, Abbey Road Saturator). Saturation introduces subtle analog distortion (harmonics) mathematically based on the fundamental frequencies of the recorded track. By generating brand new upper and lower harmonics that were not present in the original recording, saturation acts as acoustic glue. It adds perceived warmth, analog density, and grit, effectively tricking the human ear into perceiving a much thicker, more robust vocal presence without simply turning up the volume (Waves Audio).
Artificial Intelligence Restoration and Matching Tools
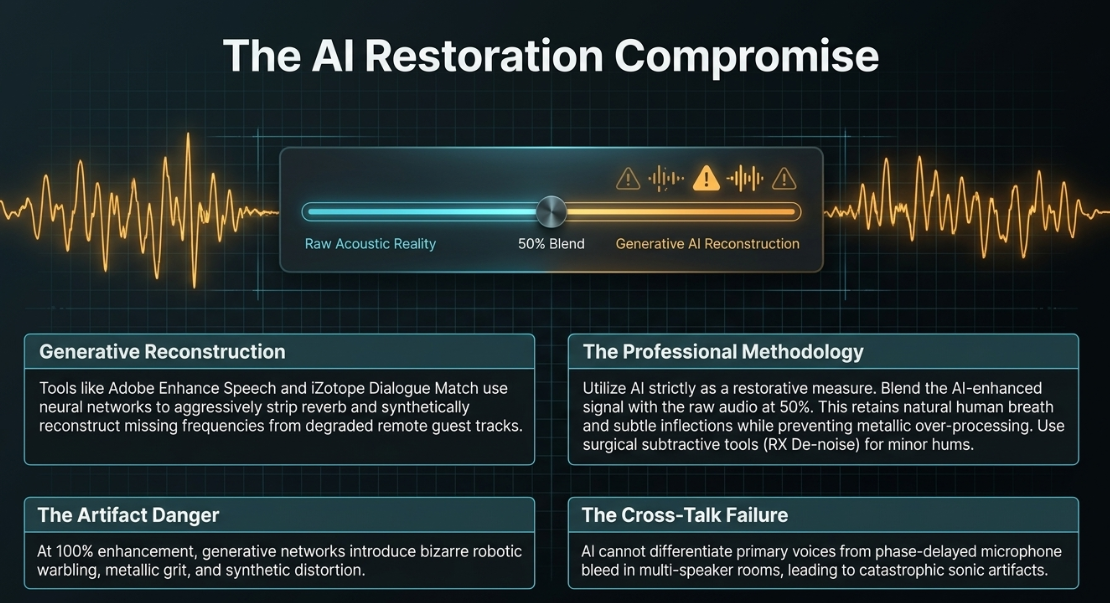
In recent years, highly complex machine learning algorithms and neural networks have been developed to salvage inherently flawed audio that traditional EQ and compression cannot fix. When a producer receives multiple audio takes recorded in vastly different spaces (resulting in mismatched, jarring edits), plugins like iZotope's Dialogue Match can analyze the sonic profile, EQ, and reverb tail of one superior recording and mathematically force the thin, disparate recording to match it perfectly (iZotope).
Furthermore, generative AI tools such as Adobe Enhance Speech have revolutionized the restoration of remote guest recordings. Often, remote guests are recorded in poor acoustic environments (like tiled kitchens) using substandard laptop microphones. Operating via a simple, browser-based drag-and-drop interface, these AI tools analyze the degraded audio and aggressively strip away background noise, room echo, and HVAC hum. They then synthetically reconstruct missing frequencies, often making a thin laptop microphone magically mimic the rich frequency response of a high-end dynamic broadcast microphone.
Limitations and Artifacts of AI Enhancement However, total reliance on AI enhancement presents severe specific caveats regarding audio quality and thinness. If a track is processed at a 100% enhancement level, the generative neural network can frequently introduce bizarre digital artifacts, robotic warbling, and a harsh, over-processed "grit" or distortion to the vocals (Reddit).
Most critically, these AI tools currently struggle immensely with multi-speaker audio and cross-talk. If there is microphone bleed between two hosts in the same room, the AI cannot differentiate the primary voice from the phase-delayed bleed, resulting in catastrophic sonic artifacts and the destruction of the audio file (The Podcast Consultant). Experienced audio engineers utilize AI enhancement strictly as a restorative measure for severely compromised tracks, often intentionally blending the AI-enhanced signal with the original, un-enhanced audio at a lower percentage (e.g., 50%). This blending technique retains the natural human breath sounds, subtle vocal inflections, and acoustic reality of the speaker, while simultaneously preventing the introduction of metallic, over-processed generative tones (Reddit). For minor room echo or localized background hums, targeted subtractive tools like iZotope RX De-noise or manual surgical EQ remain vastly superior to blunt-force AI generation (Reddit).
File Encoding and Bitrate Optimization
The final, crucial stage of podcast production is exporting the digital audio file for RSS distribution and consumer streaming. The most impeccably recorded, acoustically treated, and expertly mixed vocal will instantly revert to sounding thin, swishy, and degraded if it is exported with improper encoding parameters.
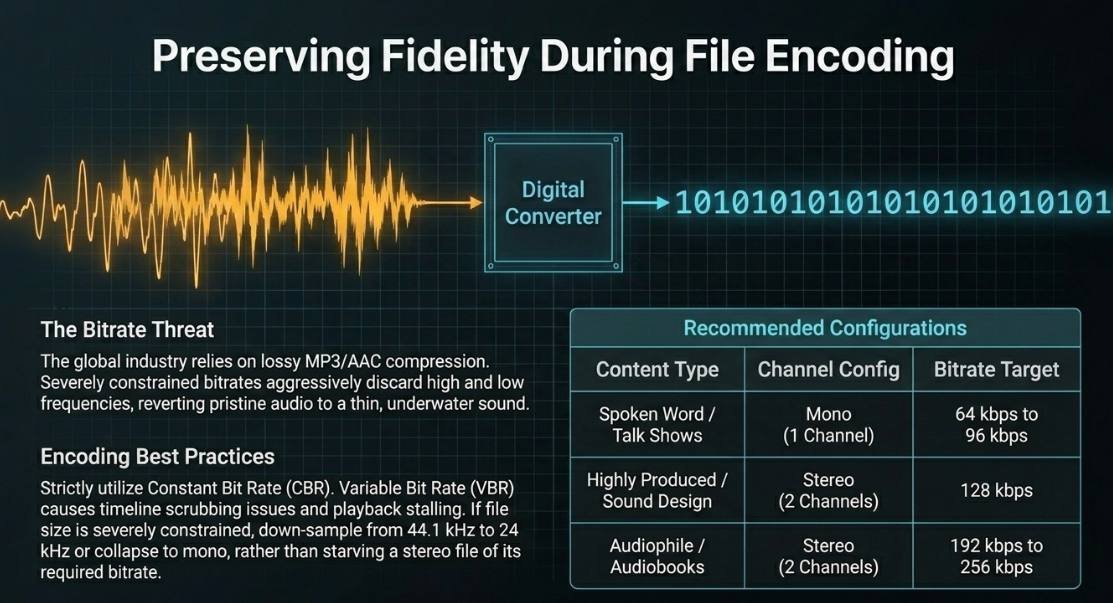
Digital audio files are binary representations of analog sound waves, captured as tens of thousands of individual digital snapshots (samples) per second. Uncompressed formats (such as WAV or AIFF) contain the highest amount of data and absolute fidelity, representing the truest capture of the audio, but their massive file sizes render them entirely unsuitable for standard podcast RSS streaming (Adobe). Consequently, the global podcasting industry relies on lossy compression formats, primarily MP3 and AAC (RSS.com).
The quality and thickness of these compressed audio files are entirely dictated by their bitrate the amount of digital data transferred per second, measured in kilobits per second (kbps) (Adobe). A higher bitrate retains more complex spectral information and harmonic density. Conversely, a severely constrained, low bitrate aggressively discards high and low frequencies to save space, resulting in a thin, watery, underwater-sounding playback (Adobe).
Table 4 summarizes the industry-standard bitrate configurations required to maintain vocal thickness during podcast RSS distribution.
Table 4: Recommended Bitrate Configurations for Podcast Distribution
For the vast majority of standard spoken-word podcasts, exporting at 96 kbps in a strictly Mono configuration strikes the perfect mathematical balance. This setting ensures an incredibly small file size for fast cellular downloading without causing a perceivable loss in audio thickness or quality to the average listener (Medium). If the podcast heavily features complex stereo music sweeps or intricate soundscapes, elevating the output to 128 kbps Stereo is universally recommended to prevent frequency smearing (RSS.com).
Furthermore, it is highly recommended to strictly utilize Constant Bit Rate (CBR) encoding rather than Variable Bit Rate (VBR) when exporting the final mix. While VBR attempts to save server space by dynamically lowering the bitrate during silent passages, this algorithmic shifting causes severe playback stalling and timeline scrubbing issues across various mobile podcast applications (Reddit). Finally, if overall file size is strictly constrained by a hosting provider, audio engineers can precondition the audio by down-sampling the project from 44.1 kHz or 48 kHz down to 24 kHz, or by collapsing wide stereo files to mono. These preconditioning steps preserve far more vocal fidelity and thickness than simply starving a stereo file of its required bitrate during the final render (RSS.com).
Conclusion
The persistent manifestation of "tinny," thin, or metallic audio in podcast production is rarely a localized anomaly that can be solved with a single click; rather, it is indicative of a systemic breakdown within the acoustic, electronic, or digital recording chain. Eradicating this issue and achieving a thick, professional vocal presence requires a holistic, multi-disciplinary approach to audio engineering.
First and foremost, the physical acoustic environment must be aggressively controlled via dense absorption materials to prevent high-frequency reflections and the subsequent comb filtering that hollows out a vocal. Second, producers must rigorously enforce proper microphone technique, capitalizing heavily on the physics of the proximity effect by maintaining a strict 6 to 12-inch distance from directional capsules to ensure a robust, low-frequency foundation. In complex multi-microphone scenarios, strict geometric adherence to the 3-to-1 rule, combined with active phase correlation analysis and timeline alignment, is absolutely required to prevent destructive interference from silently destroying the mix.
Digitally, users must remain constantly vigilant against intrusive operating system noise-suppression algorithms that inadvertently gate transients and phase-shift the analog signal. In post-production, a highly delicate and intentional balance must be struck: surgical equalization (boosting 100-250 Hz to add physical body while simultaneously notching out 7-9 kHz to eliminate metallic ringing) should be paired with controlled, slow-release dynamic compression. Mix engineers must actively avoid the pitfalls of over-compression, which annihilates transient punch and emotional contrast, and must approach generative AI enhancement tools with extreme caution to prevent introducing synthetic distortion and robotic artifacts.
Ultimately, rich, professional, and authoritative broadcast audio cannot be magically or retroactively injected into a fundamentally flawed recording. By securing the physical acoustic capture of the sound wave, executing intelligent analog preamplification, applying disciplined, subtractive digital processing, and ensuring mathematical accuracy during file encoding, producers can permanently cure the affliction of thin podcast audio and deliver a superior listening experience.