Section I: Foundation — Beyond the Booth: Understanding Studio Integrity
Achieving superior audio quality in the high-stakes, time-sensitive environment of a London podcast studio requires more than just high-end equipment; it demands rigorous professional discipline founded on a deep understanding of acoustic science. For content creators investing in premium space in a dense metropolis, success hinges on minimizing post-production repair, maximizing capture fidelity, and leveraging the engineering designed into the facility.
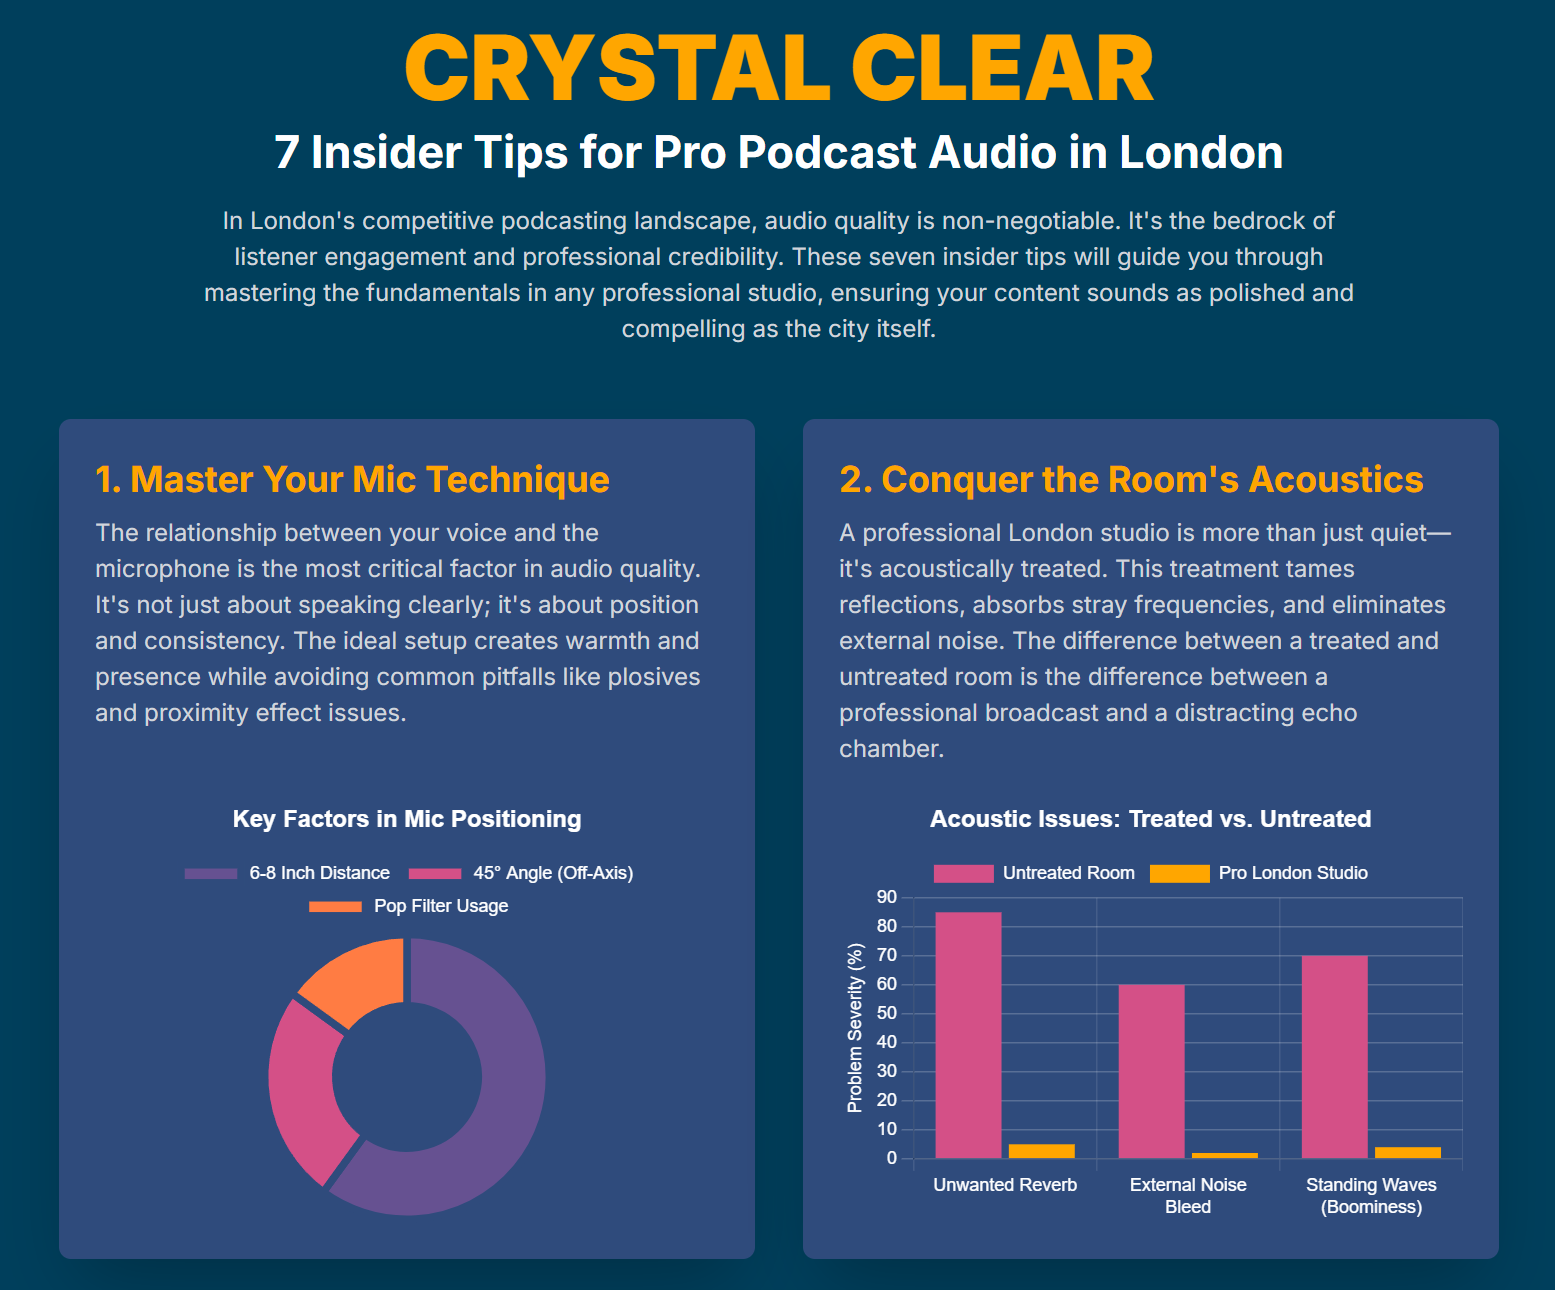
Image Credit: Finchley Studio
1.1. Architectural Acoustics: The Non-Negotiable Bedrock
A professional podcast studio, such as those operated by TYX or Finchley, differentiates itself through its foundational commitment to architectural acoustics [1, 2]. The analysis confirms that capturing clean, professional content is impossible without a highly controlled acoustic environment [1]. This control is achieved through two distinct, yet equally vital, disciplines: sound isolation and acoustic treatment.
Sound isolation, commonly referred to as soundproofing, focuses entirely on preventing external noises from entering the recording space. Given the pervasiveness of ambient and transient noise in London—including traffic, construction, and sirens [3]—effective soundproofing requires structural solutions such as double glazing, soundproof doors, and resilient channel systems to enhance isolation and minimize vibration transfer [4, 5]. Soundproofing creates the necessary silent canvas [6].
Acoustic treatment, by contrast, governs how sound behaves within the room [1, 6]. Its objective is to control internal reflections, managing echoes (reverberation), standing waves, and uneven frequency response [6]. This is achieved through the strategic deployment of absorptive materials (like acoustic panels and bass traps) and diffusive materials [7, 8]. The high-end studio advantage lies in this precise balance: the elimination of external interference via isolation, coupled with nuanced internal management that allows the human voice to sound present and natural without excessive reverb [8, 9].
The investment necessary to achieve this level of acoustic integrity in a highly populated city dictates a higher operational cost for facilities. This high cost places a significant financial and professional penalty on production teams that fail to execute flawless captures. Every moment of recording discipline, therefore, becomes a tangible return on the structural acoustic investment, minimizing the necessity for costly and time-consuming post-production repair.
Table 1: Key Differences Between Sound Isolation and Acoustic Treatment
1.2. The Value of the On-Site Engineer
When scheduling time in a London studio, particularly for complex productions or for those new to the environment, leveraging the expertise of an on-site audio engineer is a crucial strategy [11]. These specialists are equipped to manage sound levels, troubleshoot complex technical issues, and ensure that the recording outputs adhere to broadcast standards. Utilizing this specialized personnel minimizes technical friction during the session, allowing the host and guests to concentrate purely on the content and performance, ultimately leading to a more efficient and higher-quality recording.

Image Credit: Finchley Studio
Section II: Insider Tip 1: The Pre-Session Noise Audit (Human & Mechanical Discipline)
The single most consequential step an expert production team can take is to rigorously eliminate all noise sources originating within the studio before recording starts. This proactive, preventative measure yields far cleaner results than relying on even the most sophisticated digital post-production restoration tools.
2.1. Eliminating Appliance and HVAC Hum
Even in acoustically isolated rooms, internal mechanical systems generate continuous noise that can contaminate the signal. Heating, ventilation, and air conditioning (HVAC) systems are common offenders, producing low-frequency hums that necessitate mitigation through acoustic duct lining, silencers, and insulation [6, 12]. Furthermore, all electronic appliances must be audited. This includes computers, laptops, and smartphones, which generate constant low-level hums, and lighting fixtures, which must be chosen specifically to avoid buzzing (e.g., quiet LED lights instead of traditional fluorescent lighting) [3, 12].
The underlying principle here is that an ounce of prevention is worth a pound of cure [13]. Constant background noise, while sometimes treatable in post-production with tools like iZotope RX Voice De-noise [14] or AI Voice Isolators [15], forces the processing to work harder. The cleaner the original capture, the more natural the final result, preventing the 'watery' or 'metallic' digital artifacts that occur when noise reduction is applied aggressively [16].
2.2. Dampening Resonant Surfaces and Furniture
In a professional studio designed for audio capture, reflective surfaces are managed with acoustic treatment [3, 8]. However, furniture can still pose a threat. Hard, reflective surfaces, including untreated tables, can cause unwanted resonance, echo, or distortion [3]. Large, hollow tables, particularly, can resonate when speakers place their hands or materials upon them, often vibrating intensely in the critical low-mid vocal frequency range (approximately 95–125 Hz) [17].
To mitigate this, production teams should ensure tables are covered with soft, dense materials or that acoustic decoupling methods are employed, such as adding mass to the underside of the table or inserting rubber or foam pads between the table surface and its legs [10, 17]. The strategic presence of sound-dampening decor, such as heavy curtains, carpets, or soft furniture, further minimizes reflections and prevents acoustic pitfalls [3, 18].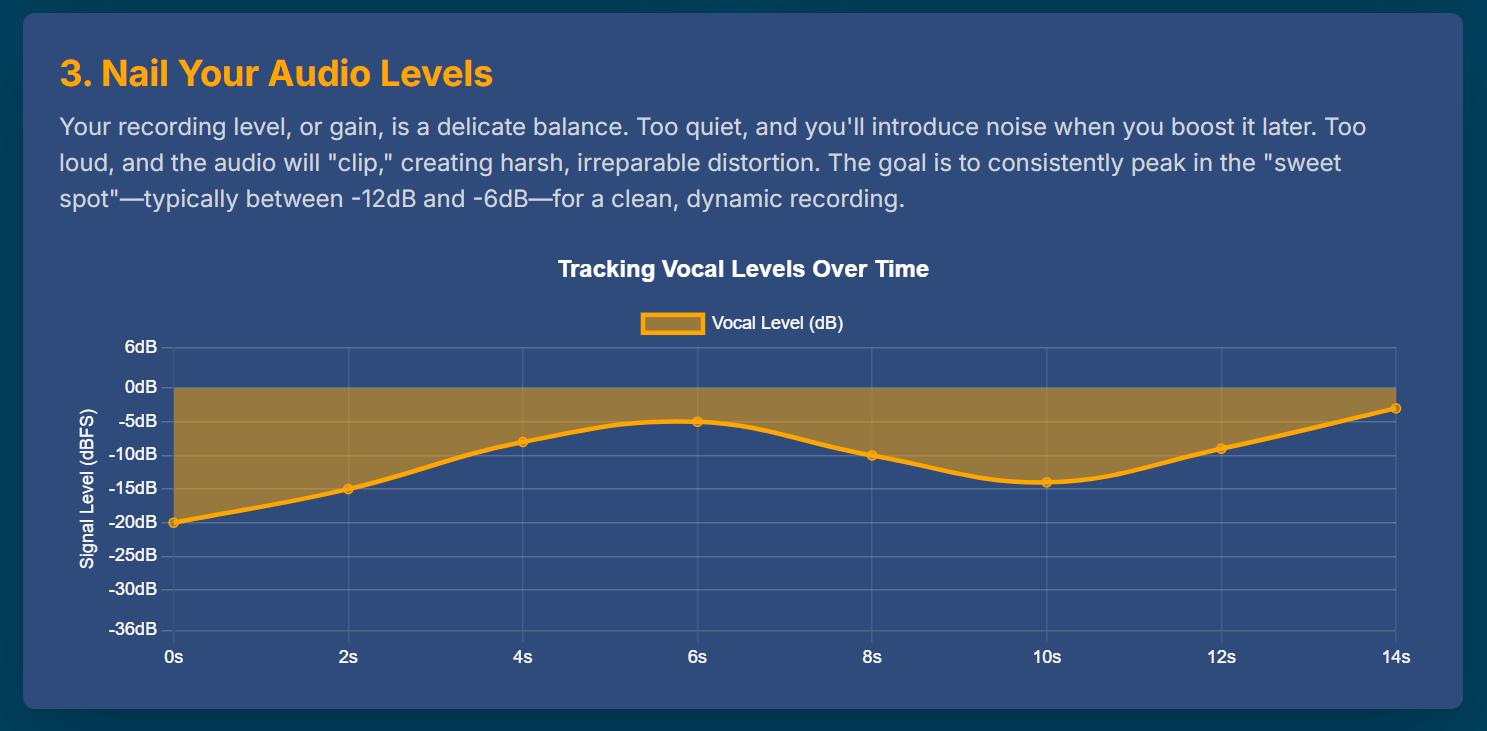
Image Credit: Finchley Studio
2.3. The Etiquette of Silence: Preparing Hosts and Guests
The most insidious forms of noise are often those generated by the hosts and guests themselves. Human noises—shuffling papers, movement in creaking chairs, mouth clicks, or rustling clothing—are classified as transient events [19]. Unlike constant hums, these sudden, intermittent noises are nearly impossible for automated noise reduction software to remove completely without causing audible damage to the adjacent dialogue [20, 21].
Therefore, mastering physical discipline is mandatory:
Hydration: Keep water readily available to minimize disruptive mouth noises, clicks, and dry lips [3].
Movement: Minimize all unnecessary movement; hosts and guests must commit to staying seated and silent when not speaking [3].
Apparel: Avoid noisy accessories, particularly jingling jewelry like bracelets or large necklaces, and choose soft, silent clothing materials over synthetics that rustle loudly [22].
Communication: Clearly communicate the session's agenda and the requirement for quiet discipline to all participants before recording commences [23].
Section III: Insider Tip 2: Achieving Absolute Signal Integrity through Gain Staging
Effective gain staging is the process of setting input levels at the microphone preamplifier (preamp) stage to achieve the optimal signal strength. This technical discipline is the second pillar of high-quality capture, maximizing the usable dynamic range and creating a robust, distortion-free source signal.
3.1. Defining the Target Level: The -18dBFS Sweet Spot
For professional podcast recording, the industry standard mandates that input audio peaks aim for a target range between -18 dBFS (Decibels Full Scale) and -12 dBFS on the Digital Audio Workstation (DAW) meters [24]. This range is strategically chosen because it achieves two critical objectives simultaneously:
Drowning out the Noise Floor: The signal is recorded loud enough to effectively overcome the inherent electronic hiss (noise floor) of the equipment [16, 25].
Maintaining Headroom: It preserves a critical safety buffer, known as headroom, above the average signal level [24]. This headroom accommodates unexpected transient spikes—such as loud laughter, shouting, or sudden vocal bursts—without hitting 0 dBFS, which results in unrecoverable digital clipping and horrible distortion [25].
3.2. Headroom vs. Noise Floor: The Critical Balance
The professional engineer must manage the inevitable trade-off inherent in the signal chain. If the preamp gain is set too high, the risk of clipping the signal (a digital flaw) becomes high. If the gain is set too low, the signal-to-noise ratio is poor, and when the volume is boosted later in the mix, the underlying electronic hiss and ambient noise floor are boosted right along with the voice [25].

Image Credit: Finchley Studio
By prioritizing a clean, robust signal that peaks around -18 dBFS, the recording inherently requires less processing later. When the recorded audio is strong and clean, any necessary noise reduction software can be applied lightly and transparently. Conversely, a weak signal requires aggressive noise removal, which frequently introduces noticeable processing artifacts, compromising the natural vocal sound. Therefore, mastering gain staging is a pre-emptive defense against destructive post-production processing.
Table 2: Professional Gain Staging and Monitoring Standards
Section IV: Insider Tip 3: Precision Mic Technique and Proximity Control
Beyond setting the correct gain, the physical positioning of the speaker relative to the microphone determines the tonal character and the acoustic isolation of the voice. Precision mic technique is the final acoustic tool used at the moment of capture.
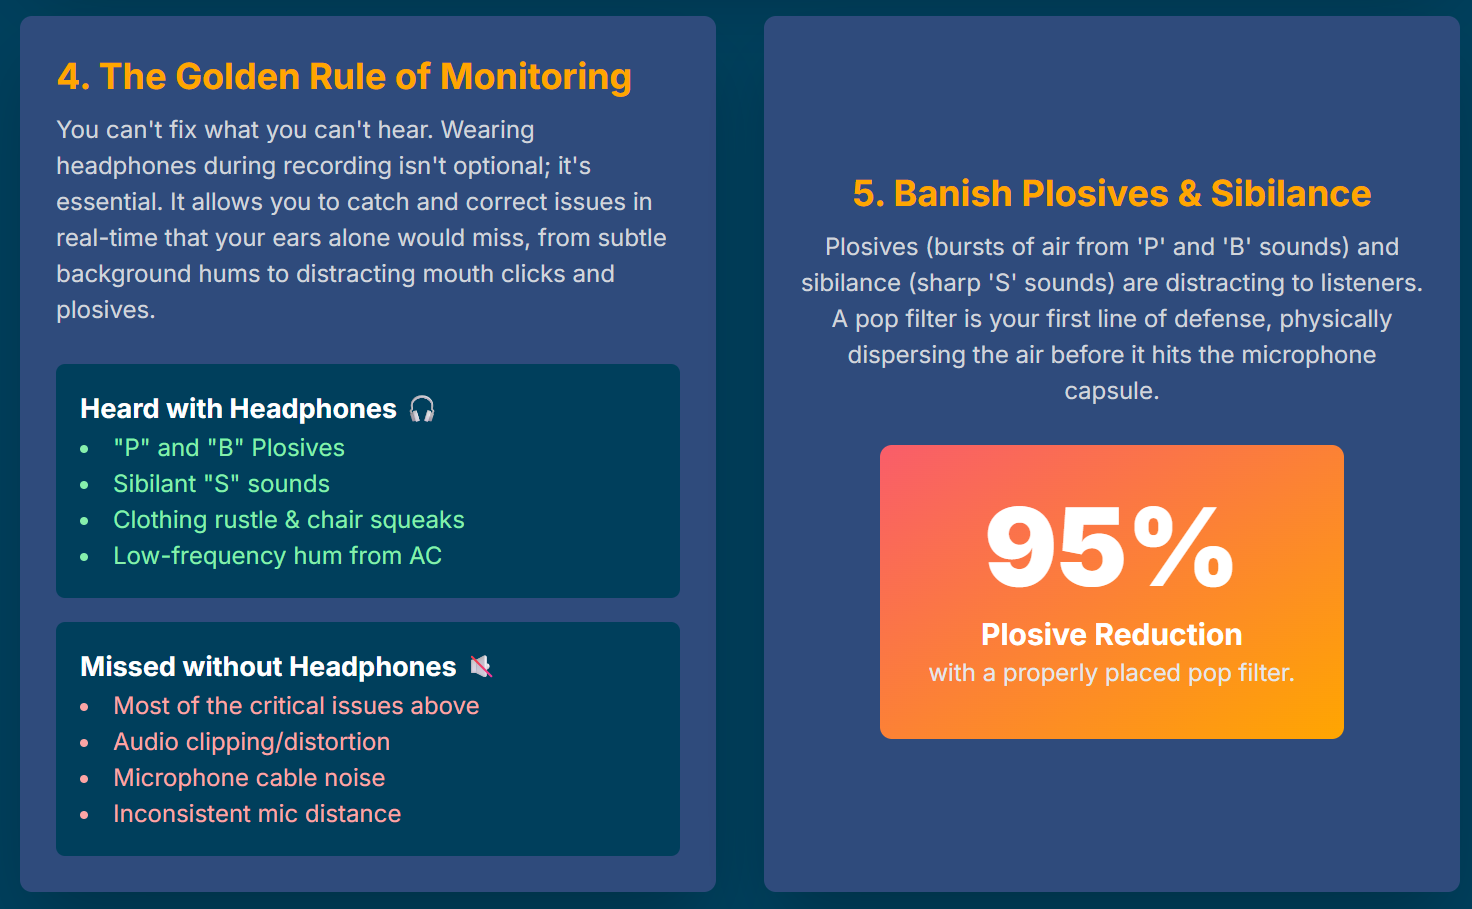
Image Credit: Finchley Studio
4.1. Optimal Distance and Mic Selection
In controlled studio environments, dynamic microphones are frequently preferred due to their heart-shaped (cardioid) pickup pattern, which rejects background sounds and focuses narrowly on the source [22, 31]. Optimal distance is critical; sitting too far away allows residual ambient noise to creep into the recording [32].
For standard dynamic microphones, the recommended distance is 4 to 6 inches (10–15 cm) from the mouth [31]. If using more sensitive condenser microphones, the distance should be increased to 6 to 8 inches to compensate for their broader sensitivity [31].
4.2. Leveraging the Proximity Effect and Managing Plosives
Speaking close to a directional microphone engages the proximity effect, which acoustically enhances the low-end frequencies of the voice, adding significant depth, richness, and perceived "broadcast authority" [31, 33]. This close-micing technique, when combined with proper gain staging (Tip 2), establishes a powerful volume differential between the voice and any distant noise, functioning as a highly effective, natural noise gate [22].
However, closer proximity also heightens the risk of capturing plosives—harsh bursts of air from 'P' and 'B' sounds. Professional mitigation requires two steps: first, the mandatory use of a pop filter or foam windshield to physically disperse the air blast [31, 34]; and second, subtle adjustment of the speaker’s angle. Instead of speaking directly into the capsule, the speaker should angle their mouth slightly off-axis while maintaining the close distance. This reduces the direct impact of air blasts without compromising the desirable proximity effect [34].

Image Credit: Finchley Studio
4.3. Managing Multiple Hosts: Directional Isolation
When multiple participants are recording, the objective shifts to utilizing the directional properties of the microphone to ensure maximum voice isolation and minimum cross-talk (bleedover) [35]. Dynamic cardioid microphones are most responsive in the front and exhibit excellent rejection properties directly behind the capsule [22, 36]. The strategy is to orient the microphone's null point (the point of maximum rejection) towards other noise sources, specifically aiming the back of the mic toward other speakers or monitors. This intentional acoustic discipline ensures that when editing, each voice track remains clean, allowing for independent level processing and minimizing complex spectral separation.
Table 3: Microphone Placement and Proximity Effect Management
Section V: Insider Tip 4: The Performance-Enhancing Headphone Mix
While acoustic and technical settings govern the quality of the signal, the headphone mix governs the quality of the human performance. The delivery of the speaker is the most critical component of resonant audio content [37]. A poorly managed headphone mix can deflate the performer and ruin the entire session [38].
5.1. Sidetone and Vocal Comfort
The engineer must optimize the host’s monitoring experience. A core element of this optimization is the implementation of Sidetone: the ability for the speaker to hear a small, immediate feed of their own voice when speaking into the microphone [30].
When a speaker wears closed-back headphones without Sidetone, their vocal perception is disrupted. This disorientation often leads the speaker to subconsciously raise their voice, causing strain, inconsistent volume levels, and deviation from the natural cadence of speech—the very aural nonverbal cues that define effective audio communication [30, 39]. Providing Sidetone confirms the microphone is working and allows the speaker to naturally modulate their volume, ensuring consistent, high-quality vocal delivery and maintaining the host's focus [30].
5.2. Technical Latency Mitigation for Real-Time Monitoring
Latency, the minor delay between a speaker talking and hearing the sound back in their headphones, is detrimental to performance. Even a slight delay is distracting, undermining vocal confidence and rhythm.
Latency is controlled by the audio interface's buffer size. For the recording phase, the buffer size must be set to a low value, typically 128 or 256 samples, to ensure minimal delay and enhance the real-time communication experience [28, 29]. The engineering requirement to quickly adjust this setting is crucial; it is a direct management tool for host energy. While higher buffer sizes (512 or 1024 samples) are often utilized during CPU-intensive mixing or editing processes, they are strictly prohibited during the live recording of dialogue [28]. Ensuring a lag-free monitoring environment is a critical step in building trust and facilitating optimal performance [38].
Section VI: Insider Tip 5: Strategic Processing: The Commitment Question
In a professional London studio environment, engineers face the strategic decision of whether to apply initial audio processing (like compression or de-essing) using hardware during the recording process, or deferring all effects to non-destructive software plugins later.
6.1. The Analog vs. Digital Trade-off
Hardware compressors provide an appealing "analog flavor," tactile control, and often integrate high-quality onboard processing into the console (e.g., RØDECaster Pro or dedicated channel strips) [40, 41, 42]. Working with hardware forces the engineer to "commit" to a sound direction immediately [43]. Conversely, software plugins are generally more budget-friendly, non-destructive, and offer flexibility for experimentation and infinite revision during post-production [40, 44].
While the sonic gap between high-end hardware and advanced software emulation has narrowed considerably [42], the argument for strategic hardware commitment remains compelling.
6.2. When to Commit: Tracking with Light Compression
Experienced audio engineers often find that applying a light, transparent amount of compression during the tracking stage—usually via dedicated hardware or high-quality console preamps—can yield superior final results and significantly streamline the subsequent workflow [45].
This commitment is fundamentally a time-saving measure. By applying subtle processing during the session, the dialogue is effectively pre-mixed, eliminating the need for excessive second-guessing and extensive parameter adjustments later [43, 45]. Tracking with a committed sound direction allows the engineer to "mix quicker and mix better" by focusing solely on making the final mix elements work, thereby maximizing the efficiency of the highly compensated studio time.

Image Credit: Finchley Studio
6.3. Advanced Transient Management
Compression’s core function for podcasting is to reduce the dynamic range of speech, ensuring consistent volume levels by lowering loud peaks and gently raising quiet sections [41]. For highly managed professional audio, advanced techniques may also be employed to handle sharp transient spikes in the signal. These techniques include using fast-attack compressors, dynamic EQs, or soft clipping plugins [19]. Soft clipping specifically works to "round off the peaks" of loud transients in a controlled and transparent manner, ensuring that the overall output level can be maximized without introducing the harshness of digital distortion, an essential consideration for masters destined for streaming platforms [19].
Section VII: Insider Tip 6 & 7: Post-Session Handover and Restoration Readiness
The final two steps involve establishing professional data integrity standards (Tip 6) and ensuring the necessary forensic audio information is captured to protect the recordings from constant background noise (Tip 7).
Insider Tip 6: Insist on 24-bit/48kHz Recording Specifications
To ensure maximum fidelity, optimal editing precision, and broadcast compatibility, all source audio must be recorded to specific professional digital standards.
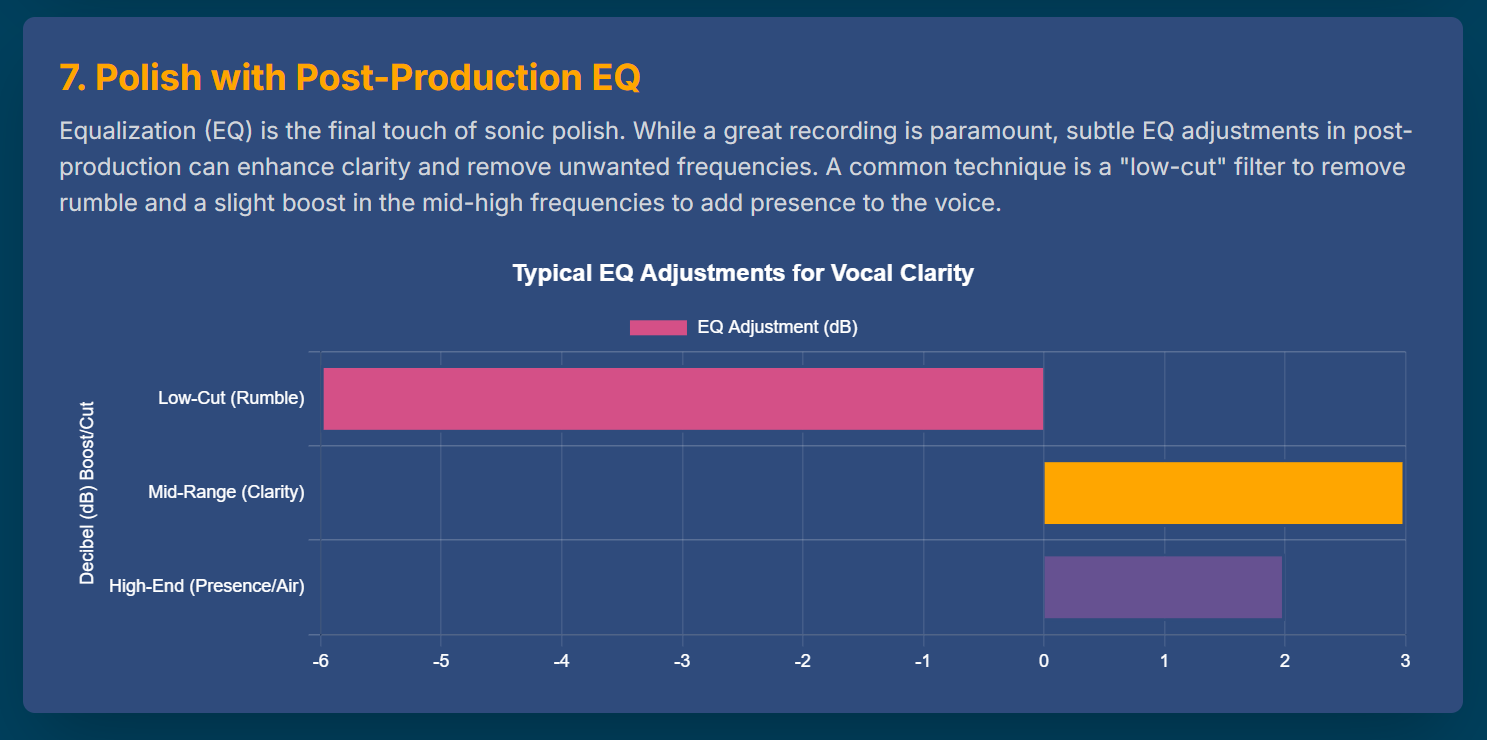
Image Credit: Finchley Studio
7.1. Dynamic Range and Precision: Why 24-bit is Professional
Professional audio production requires recording at a bit depth of 24 bits [26, 27]. While 16-bit is sufficient for consumer playback (CD standard), 24-bit provides a vastly superior dynamic range—approximately 144 dB, compared to 96 dB for 16-bit [27]. This expanded range allows the engineer to capture subtle nuances with much greater accuracy and provides non-destructive precision during editing and mixing [26].
Crucially, the immense dynamic range offered by 24-bit depth mitigates the risk associated with gain staging (Tip 2). Because the 24-bit noise floor is extremely low, the engineer can safely prioritize avoiding clipping (peaking closer to -18 dBFS) without worrying that the electronic noise floor will become audible when the dialogue is normalized to standard loudness targets later.
7.2. Sample Rate Selection and Workflow
The standard professional sample rate for audio intended for broadcast, video, or general media consumption is 48 kHz. Although 44.1 kHz is acceptable for music, 48 kHz is the default synchronicity for video production and ensures the recording integrates seamlessly with any corresponding video elements [29]. Final recordings should always be rendered as raw, uncompressed files (WAV or AIFF) to preserve quality until the final mastering and delivery stage.
Insider Tip 7: Capture Clean "Room Tone" Silence
Before concluding the setup and beginning the session, the engineer must obtain an essential acoustic fingerprint of the environment.
7.3. The Restoration Safety Net
The engineer must record a dedicated segment of absolute room tone silence immediately following the setup, while all necessary equipment (HVAC, computers, monitors) is running, but with zero human noise or speech present [46]. This clip should be 10 to 15 seconds in duration.
This sample is the critical safety net for constant background noise. Modern spectral restoration tools, such as the Sound Remover effect in Adobe Audition [21] or iZotope RX, function by analyzing a selected portion of audio to build an accurate "sound model" of the unwanted noise [21]. The clean room tone provides this highly precise fingerprint, allowing the software to subtractively filter only the constant noise (e.g., HVAC hum or low digital hiss) from the dialogue tracks in post-production with minimal collateral damage [14, 46].
This procedure reinforces the operational reality that while Tip 1 (discipline) handles transient noise, Tip 7 is mandatory protection against the constant, inevitable noise floor of the equipment and architecture.

Image Credit: Finchley Studio
Conclusions and Recommendations
Achieving the best audio quality from any London podcast studio is a systematic process where technical precision is matched by human discipline. The core conclusion derived from an expert analysis of the professional workflow is that quality is secured at the source, maximizing the value of the significant architectural investment made by the studio.
The following seven tips, if implemented rigorously, move the production team beyond basic amateur practices and into the realm of broadcast-grade execution:
Rigorous Pre-Session Noise Audit: Eliminate internal noise sources (HVAC, furniture resonance, jewelry, paper) before capture, recognizing that physical prevention is the only reliable defense against transient noise.
Professional Gain Staging: Aim for vocal peaks between -18 dBFS and -12 dBFS at the preamp stage to maximize the signal-to-noise ratio and preserve critical headroom.
Precision Mic Technique: Utilize close-micing (4–6 inches for dynamic mics) to engage the proximity effect for tonal authority, while applying pop filters and off-axis angling to eliminate plosives.
Performance-Enhancing Monitoring: Optimize the headphone mix by ensuring Sidetone is active and setting the DAW buffer size to 128 or 256 samples to maintain near-zero latency, thereby preserving the host's vocal comfort and natural cadence.
Strategic Processing Commitment: Determine a clear pre-session strategy for utilizing light, transparent hardware compression during tracking. This commitment streamlines post-production by forcing key mixing decisions early, efficiently utilizing costly studio time.
Adhere to 24-bit/48 kHz Standards: Record all files at 24-bit depth and 48 kHz sample rate to secure maximum dynamic range, editing precision, and broadcast compatibility.
Capture Clean Room Tone: Record 10–15 seconds of absolute silence (room tone) at the beginning of the session to provide the necessary acoustic fingerprint for transparent noise floor removal in post-production.
While these insider tips can dramatically improve your sound in any setting, starting with a studio engineered for audio excellence gives you an undeniable advantage. At Finchley Studio, we provide a professional, acoustically treated environment so you can focus on your content, confident that the technical quality is pristine. We are trusted by leading names like the BBC and Lloyds bank to deliver broadcast-quality results every time.
Great audio is just the beginning. We offer a wide array of specialised sets to match your show's visual identity. For intimate conversations, consider our Dialogue Room, the relaxed LOUNGE STUDIO, or the sleek Blackwood Studio. For executive content or larger panel discussions, the premium CEO SET and the spacious GATHERING STUDIO provide a polished, professional backdrop. If your project demands creative flexibility, you can explore our Green Screen Cove, the industrial-chic THE BRICK STUDIO, the clean White Infinity Cove, the dramatic BLACKOUT SET, or even our GIANT GREEN SCREEN for large-scale productions.
To ensure your final product is flawless, our professional Video Editing Service includes sound design and mixing to transform your raw recording into a polished, captivating episode. See why other creators consistently choose us by checking our reviews on Google review and Trust Pilot. With a reputation for technical excellence, Finchley Studio is the partner you need for superior sound.
Ready to record audio that truly stands out? Explore our acoustically optimised spaces and find the perfect fit for your next episode. The team at Finchley Studio is here to help you succeed. Take the next step in your podcasting journey and Book now.
Our studio is conveniently located just two minutes from Finchley Central station on the Northern Line. We provide one free parking space per booking, and for those travelling, we are located adjacent to the Travelodge London Finchley. You can find us easily using Google map, Apple maps, [suspicious link removed], or at our precise What 3 Words address: orders.yards.jokes.
Stay connected with us and see behind-the-scenes content on Instagram, YouTube, TikTok, LinkedIn, and X (Twitter).
If you have any questions, please check our FAQ or get in touch directly via WhatsApp, call us on +447587827200, or send an Email. We look forward to welcoming you to Finchley Studio.
Citation:
Podcast Studio London Equipment Guide - Finchley Studios
TYX Studios | Podcast, Music & Photography Studios in London
Podcast Editing 101: How to Remove Background Noise
Creating Your Sanctuary: A Guide to Soundproofing a Small Studio in London
London Sound Solutions: Soundproofing specialists, music studio builders, companies
Podcast Studio London for Professional Audio Engineering
How to Soundproof for Podcasts: Acoustic Panels, Foam & More
Silencing the Noise: How to Soundproof a Room for Podcasting - Acoustical Solutions
Tech-Free, No-Cost Ways to Dramatically Improve your Podcast Audio | Blog Post
The 16 Best Podcast Studios for Hire in London | Tagvenue UK
The Ultimate Checklist for Designing Acoustically-Optimised Podcast Studios - Sound Zero
Managing Background Noise When Recording Podcasts - YouTube
How to Remove Noise from Dialogue in Podcasts - YouTube
Free Voice Isolator and Background Noise Remover | ElevenLabs
A Podcaster's Guide To Noise Reduction | by Joe Nash - Medium
Tips on damping a large table? : r/audioengineering - Reddit
How to Soundproof a Room for Crisp Voice Recordings | TechSmith
42 – Advanced techniques for processing transients in mastering - One Tribe Studio
Noise removal for podcast : r/audioengineering - Reddit
Reduce noise and restore audio - Adobe Help Center
How to Kill Background Noise When Recording a Podcast
Recording Studio Etiquette: Essential Do's and Don'ts for Podcasters - Finchley Studios
Gain Staging for Beginners - How to Clean up Your Mixes - Soundtrap Blog