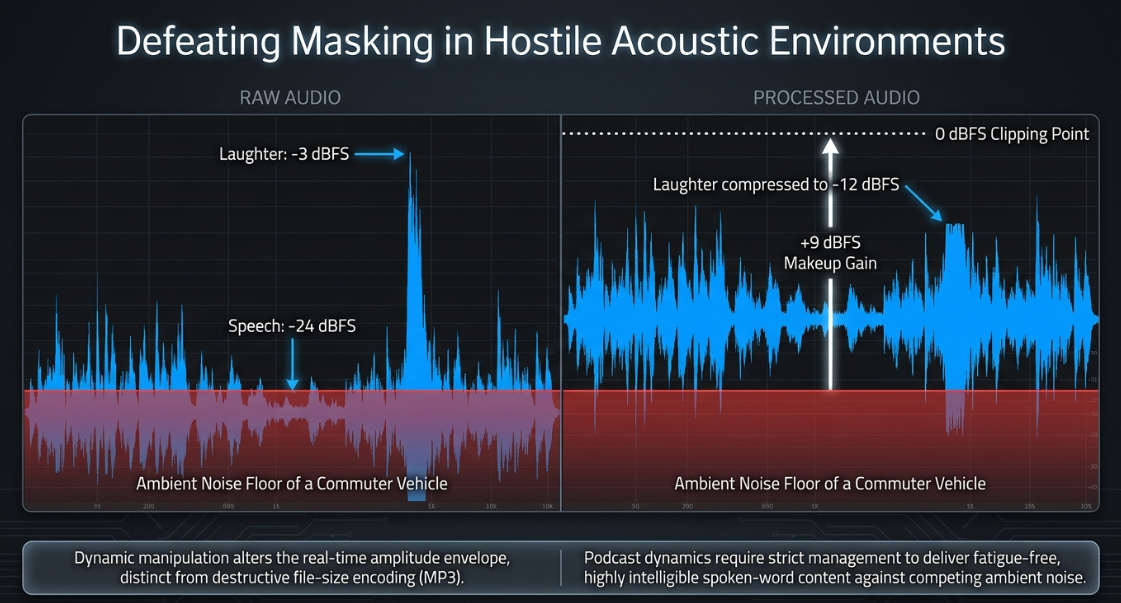
The primary objective of audio post-production in professional podcasting is to deliver highly intelligible, consistent, and fatigue-free spoken-word content1. Unlike music production, where dynamic range serves artistic and emotional purposes, podcasting requires strict management of vocal dynamics1. Listeners frequently consume podcasts in acoustically hostile environments—such as during commutes, in automobiles, or while performing household tasks—where low-level details can easily be masked by ambient noise, and sudden volume peaks can cause physical discomfort1. Differentiating dynamic range compression from file-size compression (such as lossy MP3 encoding which discards inaudible bits, or lossless FLAC compression which preserves raw data) is critical; dynamic compression purely alters the real-time amplitude envelope of the signal1.
Dynamic range compression is the core tool used to address these issues1. By automatically attenuating the loudest portions of an audio signal and allowing the overall level to be safely elevated, compression narrows the gap between the quietest whispers and the loudest outbursts1. For example, if a speaker talks quietly at but laughs at , the raw dynamic range is 3. The engineer cannot boost the speech volume without clipping the laughter; compressing the laughter down to reduces the dynamic range to , allowing a safe boost of the entire track3. Implementing these tools in a professional broadcast workflow requires a deep understanding of compressor mechanics, hardware-emulated topologies, sequential processing architectures, and multi-microphone environmental challenges.
Technical Mechanics of Dynamic Range Compression
A compressor acts as an automated gain control that reacts to the amplitude changes of an incoming signal3. Unlike static equalizers, a compressor is a dynamic, program-dependent processor that functions based on a set of user-defined parameters3.
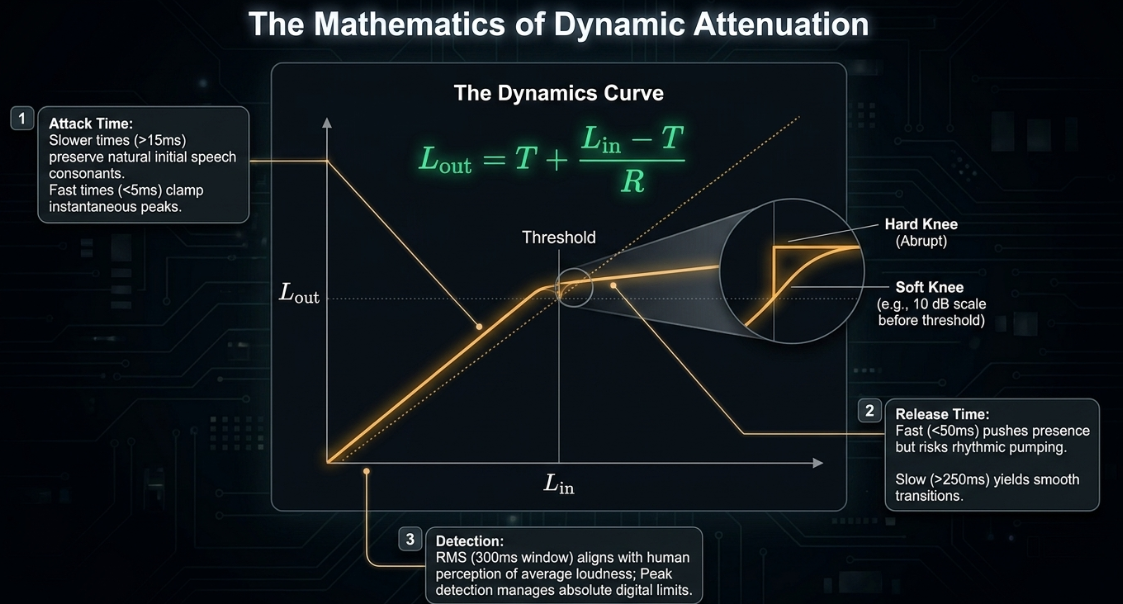
The process begins when the signal level exceeds the Threshold, which is the amplitude boundary (measured in decibels relative to full scale, or dBFS) at which gain reduction is initiated2. Below this threshold, the signal remains unaffected; above it, the compressor attenuates the signal according to a designated Ratio3. The ratio determines the proportion of input-to-output decibel increase above the threshold3. For example, with a ratio of , an input signal that exceeds the threshold by will only increase the output level by 2. The mathematical formula governing the output level () when the input level () exceeds the threshold () is:
where is the compression ratio. Ratios between and are generally considered gentle and appropriate for natural vocal leveling, whereas ratios exceeding function as limiters, establishing a hard ceiling that prevents digital clipping3.
The speed and envelope of the attenuation are determined by the Attack and Release times2. The attack time is the duration required for the compressor to apply the full gain reduction once the threshold is crossed, typically measured in milliseconds (ms)2. Slower attack times () allow the natural initial consonants (transients) of speech to pass through unaltered, preserving articulation and life3. Extremely fast attack times () clamp down instantly on transients to control sudden peaks3. The release time dictates how quickly the compressor returns to unity gain once the signal drops back below the threshold2. Fast release settings () keep the signal loud and forward but risk causing a rhythmic "pumping" artifact1. Slower release settings () yield smoother transitions at the expense of potential over-compression on subsequent words1.
The Knee parameter defines the transition curvature around the threshold3. A hard knee applies the full compression ratio immediately as the signal crosses the threshold, creating an abrupt, noticeable effect5. A soft knee introduces a gradual, progressive application of the compression ratio as the signal approaches the threshold, resulting in a more transparent and musical blend5. For instance, a soft knee will begin applying a gentle, scaled ratio before the signal actually crosses the threshold3.
Advanced modern compressors incorporate features such as Lookahead (or pre-compression), which delays the audible signal by a few milliseconds relative to the sidechain detection circuit3. This enables the compressor to anticipate and smoothly ramp down gain prior to the arrival of a sharp transient, preventing transient clipping3. Dynamic processing can also be based on Root-Mean-Square (RMS) Size detection rather than peak detection3. RMS detection averages the signal amplitude over a window (typically ), responding to the perceived average loudness of the voice rather than instantaneous peaks, which aligns closely with human hearing characteristics and stabilizes vocal tone3.
Furthermore, the design of the sidechain detection circuit relies on one of two routing paths:
Feed-forward Sidechain: The detector circuit analyzes the raw input signal before it enters the gain-reduction element17. This path reacts with absolute speed and mathematical precision, making it highly effective for taming sharp transient peaks17.
Feed-back Sidechain: The detector circuit analyzes the output signal after gain reduction has been applied17. This design creates a self-correcting loop that is inherently smoother and more musical, as the compressor's reaction is tempered by its own historical processing17.
Analog Compressor Topologies and Detection Physics
The physical design of a compressor's gain-reduction circuitry dictates its transient response, dynamic linearity, and harmonic distortion characteristics7. In digital post-production, engineers select software emulations of these hardware topologies to impart specific tonal qualities or transparency19.
Voltage-Controlled Amplifier (VCA)
VCA compressors are highly valued for their clinical precision, predictability, and lack of coloration7. Because they utilize solid-state circuits to control gain based on voltage inputs, they provide precise parameter controls (threshold, ratio, attack, release, and knee)17. This makes them a versatile utility for speech dynamics, allowing engineers to maintain the absolute tonal integrity of the recording without introducing unwanted saturation or low-frequency buildup21.
Field-Effect Transistor (FET)
FET compressors operate using solid-state transistors designed to emulate the soft-clipping characteristics of vacuum tubes17. Their main distinguishing feature is speed, with attack times in the microsecond range17. This allows them to catch the fastest vocal transients, such as plosives and hard consonants3. Unlike standard VCA compressors, many classical FET emulations (such as the 1176) do not feature a threshold control22. Instead, the amount of gain reduction is governed entirely by the input level; driving a hotter signal into the input pushes the circuit deeper past its fixed internal threshold22. When pushed, FET circuits introduce a pleasing harmonic saturation that adds perceived "bite" and "presence" to speech, helping a dialogue track cut through background music or effects without significantly raising its peak volume7.
Optical (Opto)
Optical compressors use an internal light source (such as an LED or an older incandescent bulb) and a light-dependent photoresistor (LDR) to govern the sidechain17. The LDR exhibits physical latency; as the light source changes brightness, the resistance takes time to alter17. This latency creates a slow, smooth, and highly musical attack and release structure17. LED-based optos react faster than older incandescent designs, but both exhibit a non-linear "dual-stage" release curve, returning halfway to unity gain quickly and then slowly trailing off for the remainder of the decay17. This behavior makes Opto compressors well-suited for leveling out the macro-dynamics of a performance without introducing the aggressive clamping or "chatter" associated with faster topologies12.
The Multi-Stage Vocal Processing Chain
The sequence of processors within the vocal signal chain is a critical architectural decision that dictates how each plugin interacts with downstream signals29. Before processing begins, the engineer must isolate vocal edits cleanly, looping spare room-tone underneath any deleted lip-smacks, breaths, or edits to ensure the listener does not detect the drop to absolute digital silence9. To optimize the chain's efficiency, manual clip-gaining or volume automation should be performed first to attenuate sibilants and loud syllables by hand9. This manual preparation reduces the dynamic burden on the plugin chain and avoids over-triggering the downstream processors9.
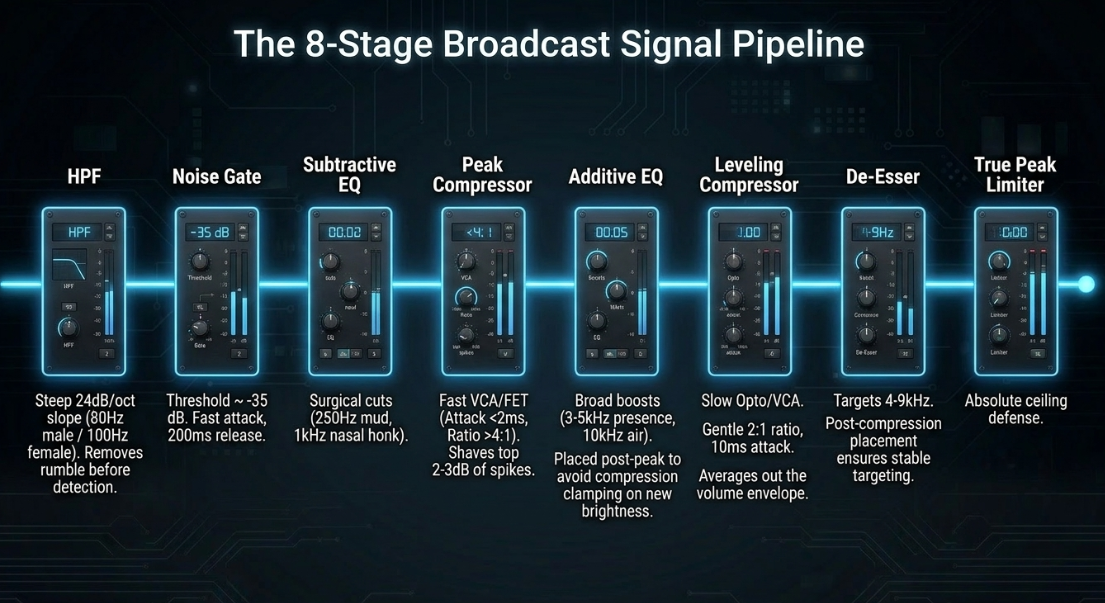
Raw Dialogue ➔ HPF ➔ Noise Gate ➔ Subtractive EQ ➔ Peak Compressor ➔ Additive EQ ➔ Leveling Compressor ➔ De-esser ➔ Limiter
High-Pass Filter (HPF): Positioned first to remove low-frequency acoustic energy ( for males; up to for females) caused by room rumble, mic-stand vibrations, or HVAC hum1. A steep slope of is applied10. Removing this sub-bass energy ensures the downstream compressors do not mistrigger on inaudible mud10.
Noise Gate or Expander: Placed after the HPF so it analyzes a signal free of low-frequency rumble, making the threshold (typically ) easier to calibrate10. A fast attack prevents clipping the start of words, while a slow release () prevents abrupt, unnatural truncation of word endings10.
Subtractive EQ: Utilized to execute narrow cuts to remove surgical resonances14. Typically, a cut is applied in the mud zone (), and harsh nasal honks are notched around 14. This ensures subsequent compressors do not clamp down on unpleasant resonances14.
Peak Compressor: A fast VCA or FET compressor with a fast attack () and a high ratio ( to ) is set to shave off the top of sudden transient peaks, such as laughter or vocal bursts2.
Additive EQ: A gentle presence boost () around enhances speech intelligibility, while a high-shelf boost around adds air1. Placing this after peak compression ensures the compressor does not squash the newly added brightness14.
Leveling Compressor: A slower Opto or VCA compressor is deployed to smooth the overall average volume envelope3. Operating at a gentle ratio, it applies of compression with a slower attack () to allow transient clarity to pass3.
De-esser: Positioned near the end of the chain to target harsh sibilants () that have been highlighted or brought forward by the makeup gain of the preceding compressors4.
True Peak Limiter: Placed at the absolute end of the chain to enforce broadcast ceilings (typically ) and protect against inter-sample clipping5.
The Dynamics of De-Esser Placement
The integration of a de-esser—which is functionally a band-limited compressor targeting high-frequency bands—requires careful positioning33.
If using a fixed-threshold de-esser, placing it after the compressor is critical33. Because the compressor narrows the overall dynamic range, it delivers a highly consistent average level to the de-esser33. This allows the de-esser's fixed threshold to trigger reliably on sibilants throughout the entire recording33. If placed first, the de-esser may over-attenuate loud, clean vowels while failing to catch sibilants during quiet passages33.
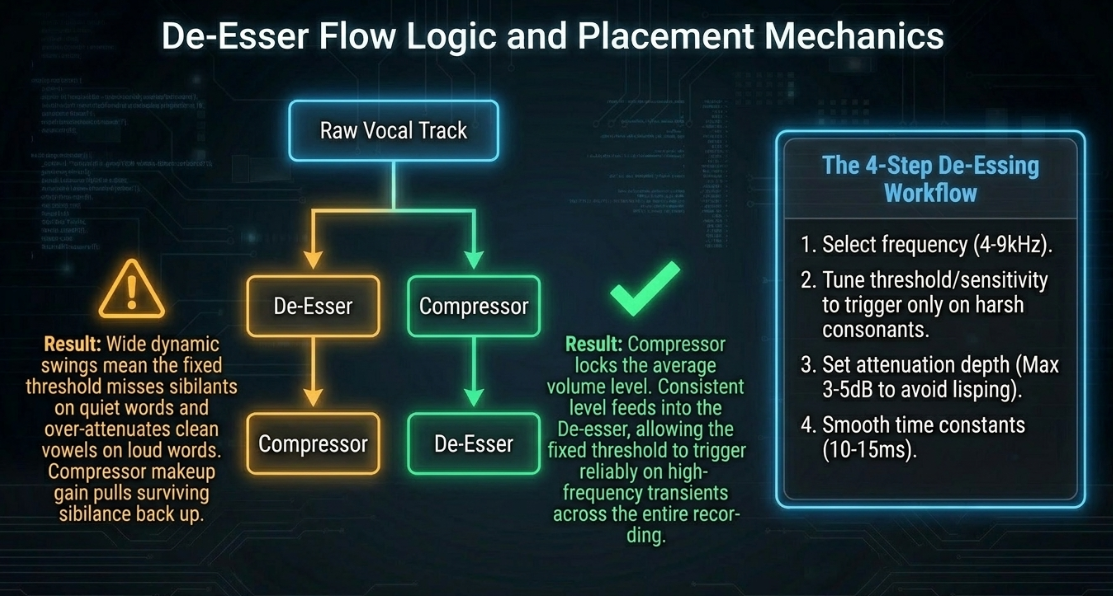
If using a floating-threshold de-esser, it can be placed before compression, but post-compressor placement is still widely preferred33. Compressors tend to let fast sibilant transients slip through during their attack phase, which can then be cleanly caught by a fast-acting downstream de-esser33. Placing a de-esser before compression also carries the risk that any heavy high-frequency cuts will be compensated for by the compressor's makeup gain, pulling sibilance right back up14.
Fixed Threshold: Compressor ➔ De-esser (Highly stable threshold behavior)
Floating Threshold: De-esser ➔ Compressor (Acceptable, but makeup gain may reintroduce sibilance)
Setting up a de-esser involves a precise four-step workflow34:
Frequency Selection: Pinpoint the sibilant center frequency, typically between 4. Some advanced de-essers (such as the stock Logic de-esser) decouple this into a detector frequency (which triggers the gain reduction) and a suppressor frequency (the actual band being ducked) to avoid lisping34.
Threshold/Sensitivity Tuning: Adjust the sensitivity until the de-esser reacts exclusively to harsh consonant sounds ("S", "T", "SH") rather than the body of clean vowels29.
Strength/Attenuation Depth: Adjust the reduction depth to target of attenuation10. Over-attenuating will result in an unnatural lisp14.
Smoothing Time Constants: Adjust the smoothing (equivalent to attack/release) between to ensure natural gain-reduction transitions34.
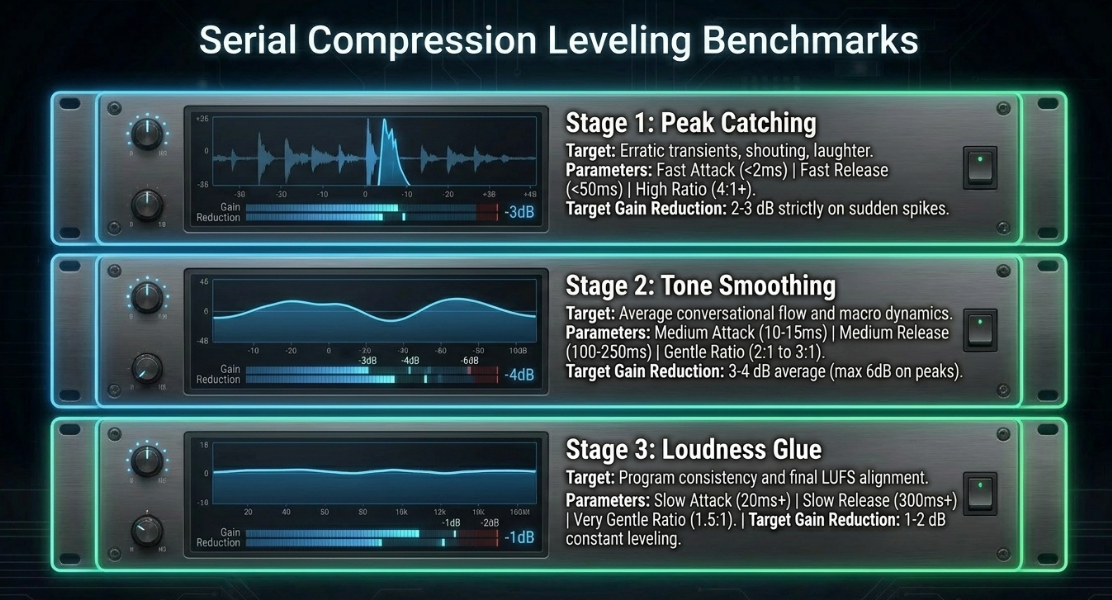
Serial Compression and Leveling Benchmarks
To establish a polished, professional broadcast aesthetic without introducing audible processing artifacts, engineers use serial compression rather than a single, aggressive processor3. Utilizing multiple compressors in tandem allows each unit to handle a small, specific aspect of the dynamic envelope3. This avoids the boomy, squashed, and flat characteristics of pre-printing heavy hardware compression (such as a 10:1 ratio at a low threshold) during tracking, which removes natural vocal inflection and mimics a dated "radio DJ" caricature3.
For beginners or rapid workflows, a highly automated multi-stage leveling processor, such as Sonic Anomaly's Trileveler 2, can be used to simulate this serial processing3. To configure this plugin safely without introducing artifacts, the engineer should set the "Max Gain" parameter to , set the "Max Attenuation" to , and manually trim the input level3. This ensures the plugin never unexpectedly amplifies the background noise floor during pauses, but instead acts purely as an automated downward leveler3.
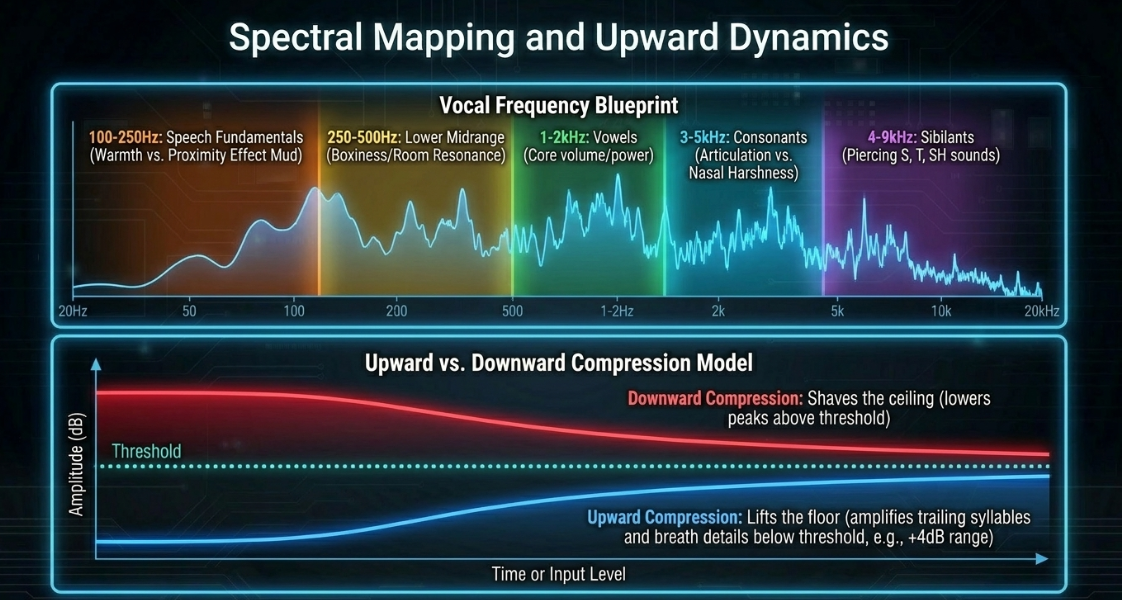
Multiband Spectral Shaping and Upward Dynamics
Human speech is highly complex and spectrally dynamic, with energy constantly shifting across different frequency bands4. Standard broadband compressors cannot account for these shifts, which can result in undesirable tonal changes3.
Speech Frequency Mapping
To target dynamic processing accurately, one must map the specific frequency regions of spoken-word audio:
By dividing speech into these bands, multiband compressors (such as the FabFilter Pro-MB or Waves C6) can target only the frequencies that exceed a threshold, leaving the rest of the vocal spectrum unprocessed12. This avoids the dynamic "dulling" that occurs when a broadband compressor clamps down on the entire signal in response to a localized frequency spike37.
Upward Compression Implementation
Upward compression provides an elegant alternative to heavy downward compression by amplifying low-level details below a threshold rather than attenuating peaks above it40. This preserves transient punch and prevents the "squashed" sound often associated with heavy downward processing40.
To implement upward compression using a modern multiband processor like the FabFilter Pro-MB, the engineer should follow this structural workflow40:
Band Selection: Select the target frequency band40. For general vocal leveling, select the entire spectrum; for targeting specific details, isolate the high-mids or air bands to pull out breath details29.
Flipped Range Configuration: The default range in most multiband compressors is negative, which executes downward compression40. Flip the range control to a positive value (e.g., ) to engage upward compression40. This tells the processor to apply gain when the signal falls below the threshold40.
Time Constant Calibration: Set the attack and release times40. Fast attack times () provide immediate lift, while slower release times () ensure a smooth volume envelope12.
Threshold Adjustment: Set the threshold slightly below the average speaking level40. The processor will now amplify quiet phrases, trailing syllables, and delicate details, while keeping loud passages at unity gain40.
Alternatively, a dedicated dual-stage processor like the Waves MV2 can be used to apply both upward and downward compression simultaneously through a simplified interface40.
Upward Compression: Raw Signal ➔ Below-Threshold Boost ➔ Elevated Quiet Syllables
Downward Compression: Raw Signal ➔ Above-Threshold Cut ➔ Controlled Loud Peaks
Historically, the combining of compression and expansion was referred to as "compansion" in the analog broadcasting era, where audio was compressed before transmission and expanded at the receiver to maintain a high signal-to-noise ratio over long distances42. Modern digital post-production uses these concepts directly in the DAW to sculpt vocal presence without raising the raw noise floor unnecessarily40.
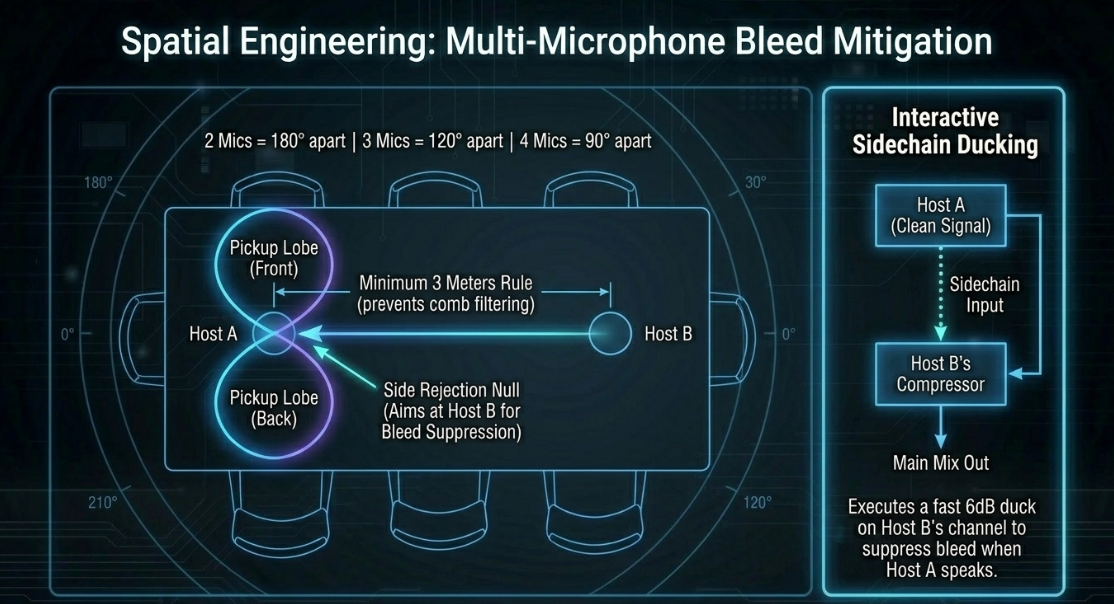
Multi-Microphone Bleed Mitigation and Automixing
Recording multiple speakers in the same physical space inevitably introduces mic bleed, where each microphone captures the voices of neighboring speakers with a slight time delay38. When these tracks are mixed, the time delay causes phase cancellation and comb filtering, resulting in a hollow, thin sound that reduces speech intelligibility44.
Physical and Spatial Controls
Before applying dynamic processors, physical and spatial controls must be optimized to maximize acoustic separation38:
The 3-Meter Rule: Spacing speakers and their microphones at least apart ensures that any bleeding voice is sufficiently delayed and attenuated, minimizing comb filtering when the signals combine46.
Angular Orientation: Place speakers so they face each other directly43. With two mics, point them away from each other43. With three mics, space them at , and with four mics, space them at 43.
Directional Polar Patterns: Utilize highly directional microphones38. True figure-of-eight ribbon microphones are highly effective because they feature a narrow pickup angle at the front and rear, and deep rejection "nulls" at the sides (), which can be aimed directly at competing speakers to reject bleed46. Cardioid and hypercardioid patterns also provide rear rejection, though hypercardioids feature a small rear pickup lobe that must be accounted for46.
Interactive Sidechain Ducking
To prevent compressors on bleeding tracks from amplifying the spill during pauses, engineers configure interactive sidechain ducking11. In a panel setup, a compressor is inserted on Host B's channel, and its sidechain detector is keyed to Host A's clean vocal track11.
Host A Speaks ➔ Signal sent to Host B's Sidechain Input ➔ Host B's Compressor ducks Bleed by 6 dB
The time constants for this type of ducking must be set carefully to ensure transparent operation:
Attack: Fast () to ensure the bleed is ducked immediately when Host A begins speaking12.
Release: Slow () to prevent the background track from pumping up and down during natural pauses or hesitations in the speaker's delivery6.
Ratio: Gentle ( to ) to avoid a hard, unnatural gating effect11.
This is conceptually similar to ducking music beds behind dialogue48. For music ducking, the release time can be calculated mathematically to match the song's tempo, allowing the music to swell back up on a beat12. For example, at a tempo of , a quarter-note release time is calculated as:
Dividing this value by or yields eighth-note () or sixteenth-note () release times, which are ideal for faster, more energetic program transitions24.
Gain-Sharing Automixing
For panels with more than three hosts, manual sidechain routing becomes highly complex44. The industry standard solution is the Dan Dugan speech gain-sharing algorithm44.
The mathematical foundation of the Dugan algorithm ensures that the sum of the gains of all active channels is kept equal to (unity):
where is the gain applied to channel , and is the total number of open microphones44.
If Host A speaks, their channel receives the majority of the system gain (), while the inactive channels are attenuated (), effectively silencing the bleed and background noise on those tracks44. If Host A and Host B speak simultaneously, the algorithm automatically splits the gain (, )44. Because the total system gain never exceeds unity, the overall room tone remains completely constant44. This avoids the sudden, distracting shifts in background noise associated with traditional noise gates, providing a seamless multi-microphone mix44.
In professional console setups (such as the eMotion LV1) or host utilities (such as SuperRack SoundGrid), the Dugan algorithm includes several key controls44:
Weight Control: Adjusts the relative sensitivity of individual channels within the gain-sharing equation44. Increasing a channel's weight allows it to claim gain more easily, which is useful for quiet speakers44.
Channel Override: Instantly routes full gain to a prioritized channel (typically the host's microphone), ducking all other participants regardless of input level44.
Recall Safe: Protects specified channels from snapshot changes, ensuring consistent automixing behavior throughout a live broadcast or session44.
Industry-Standard Software and Metering Specifications
To select the appropriate processing tool for a specific task, post-production engineers must evaluate the capabilities, strengths, and target roles of industry-standard plugins.
For budget-conscious or open-source environments, several high-quality free alternatives can be used to build a professional-grade vocal chain5:
ReaComp: A highly transparent, CPU-efficient digital compressor that features lookahead, RMS size controls, and an adjustable soft knee, making it an excellent primary peak-shaving utility3.
ADHD Leveling Tool: A free, warm optical compressor emulation designed to smooth vocal performances and add analog-style saturation5.
Kotelnikov: A clean mastering compressor that features a unique dual-release engine, making it ideal for final dialogue bus leveling5.
LoudMax: A clean brick-wall limiter that prevents digital clipping during final export5.
Broadcast Metering Standards
Once the dynamic processing chain is established, the engineer must monitor the final mix using precise metering standards5.
Momentary Max: Fast integration (400 ms) ➔ Analyzes immediate vocal syllable swings.
Short Term Max: Medium integration (3 sec) ➔ Monitors structural loudness across sentences.
Integrated LUFS: Continuous project average ➔ Confirms overall broadcast standard compliance.
To ensure a comfortable listening experience across all playback systems, professional mixes should target the following operational benchmarks:
Integrated Loudness Target: for stereo podcast files; for mono spoken-word files3. These levels align comfortably with major streaming platforms like Apple and Google Podcasts5. Targeting these standards prevents streaming platforms from applying secondary, automated compression or limiting that could alter the sound of the mix5.
Loudness Range (LRA): Keep the overall program within a tight range5. Vocals should not swing more than on a momentary scale9.
True Peak Ceiling: Set the final limiter's output ceiling between 5. This headroom prevents inter-sample clipping during lossy MP3 compression and Bluetooth transmission codecs1.
Architectural Synthesis and Practical Recommendations
Integrating these concepts into a repeatable, high-quality post-production template requires structured workflow guidelines:
Prepare the Audio First: Do not use heavy compression to fix poorly recorded audio1. Perform manual clip-gaining, loop room tone under edits, and apply noise reduction before sending the signal to your dynamic plugins9.
Avoid Single-Stage Processing: Do not attempt to control the entire dynamic range with one aggressive compressor3. Use serial compression—such as a fast FET compressor to shave transient peaks by , followed by a slow Opto compressor to smooth the average volume by 5.
Place the De-esser After the Compressor: Always compress the vocal signal before sending it to a fixed-threshold de-esser33. This ensures the sibilants hit the de-esser at a consistent level, allowing the processor to target harsh frequencies accurately without affecting clean vowel sounds33.
Use Multiband and Upward Processing for Detail: Use multiband compressors to target dynamic frequency problems, such as low-end mud or upper-mid harshness, without affecting the rest of the vocal spectrum12. Apply subtle upward compression to elevate quiet, trailing word endings cleanly without raising peak volume40.
Control Multi-Microphone Bleed Spatially and Electronically: Space microphones at least 3 meters apart and utilize directional polar patterns to maximize acoustic separation46. When mixing, use automatic gain-sharing algorithms like the Dugan Speech Automixer or configure sidechain ducking paths to silence inactive microphones, maintaining a natural, phase-coherent mix11.
Works cited
Audio Compression and EQ for Podcasters | Enhance Your Sound — Listen2It Blog, https://www.getlisten2it.com/blog/audio-compression-and-eq-for-podcasters-enhance-your-sound
A guide to vocal compression for podcasters - Acast, https://www.acast.com/en-gb/blog/a-guide-to-vocal-compression-for-podcasters
Compression for Podcasting - Podigy, https://www.podigy.co/compression-for-podcast
A Guide to Audio Processing and FX For Podcasting (GB) - RØDE, https://rode.com/en-gb/about/news-info/a-guide-to-audio-processing-and-fx-for-podcasting
A Guide to podcast Compression and Loudness - Reddit, https://www.reddit.com/r/podcasting/comments/nlrlp5/a_guide_to_podcast_compression_and_loudness/
What's the right approach for podcast compression/mixing? : r/audioengineering - Reddit, https://www.reddit.com/r/audioengineering/comments/1kq8pqo/whats_the_right_approach_for_podcast/
Audio Compressor Types Explained: VCA, FET, Optical & Vari-mu - Simply Mixing, https://www.simplymixing.com/blog/audio-compressor-types
Using Compression in the Home Voiceover Studio - JustAskJimVO, https://justaskjimvo.studio/compression/
7 Tips for Mixing Stellar Podcast Vocals | B&H eXplora, https://www.bhphotovideo.com/explora/pro-audio/tips-and-solutions/7-tips-for-mixing-stellar-podcast-vocals
Vocal Chain Order: What Plugin Goes First? (2026), https://vocalpresets.com/blog/vocal-chain-order
What is Sidechaining? Breakdown for Beginners - TYX Studios, https://tyxstudios.com/blog/what-is-sidechaining
Sidechain Compression: The Ultimate Guide to Audio Dynamic Manipulation, https://acestudio.ai/blog/sidechain-compression-the-ultimate-guide/
Sidechain Compression EXPLAINED: 4 Fundamental Production Techniques | Blog, https://www.waves.com/sidechain-compression-explained-fundamental-techniques
Best Vocal Chain Order 2026 — Correct Plugin Signal Flow - Rys Up Audio, https://rysupaudio.com/blogs/news/best-vocal-chain-order
Top 10 Compressor Plugins - Sage Audio, https://www.sageaudio.com/articles/top-10-compressor-plugins
Perfect Your Audio with These Essential Post-Production Plugins - Voodoo Sound, https://www.voodoosound.com.au/post/perfect-your-audio-with-these-essential-post-production-plugins
Difference in use of VCA/FET or OPTO compressors? - SOS FORUM, https://www.soundonsound.com/forum/viewtopic.php?t=43773&sid=875288d33d611230efccb99971af2af5
Plugins for Audio Post-Production: What the Pros Are Using, https://theproaudiofiles.com/post-production-plugins/
Understanding serial compression: how to use it to control dynamic range - iZotope, https://www.izotope.com/community/blog/serial-compression
Compression Explained: FET, VCA, Optical, Variable-Mu - Mastering.com, https://mastering.com/compression-explained-fet-vca-optical-variable-mu/
The Best Compressor Types for Vocals: Understanding Their Strengths and Applications, https://www.voclio.com/blog/best-compressor-types-for-vocals
Which Compressor Plugin Should I Choose for my Mix? #ProductionHub, https://www.abbeyroad.com/news/which-compressor-plugin-should-i-choose-for-my-mix-productionhub-3043
164: Mastering Vocal Compression: Unleashing the Power of 1176 and LA-2A Compressors - Apple Podcasts, https://podcasts.apple.com/ie/podcast/164-mastering-vocal-compression-unleashing-the-power/id1551795483?i=1000673119674
Maximize Your Mix's Clarity and Groove with Sidechain Compression - Sonarworks Blog, https://www.sonarworks.com/blog/learn/sidechain-compression
Top 10 Audio Plugins for Podcast Production, https://podcastengineeringschool.com/top10/
Perfect Sidechain ducking - perfect attack and release times? : r/audioengineering - Reddit, https://www.reddit.com/r/audioengineering/comments/obf245/perfect_sidechain_ducking_perfect_attack_and/
The Right Audio Compressor Could Boost your Mix: Here's How to Choose - Medium, https://medium.com/@ant-writer/the-right-audio-compressor-could-boost-your-mix-heres-how-to-choose-cec156a4ced0
Best compressor plugins: Our pick of the greatest in-the-box compressors for the budding producer - MusicRadar, https://www.musicradar.com/news/best-compressor-plugin
Vocal Chain, Simplified - Musiciangoods, https://musiciangoods.com/en-us/blogs/mixing-mastering/vocal-chain
Which order should I apply EQ, compression and a Limiter to my audio? - Reddit, https://www.reddit.com/r/AudioPost/comments/am0p8h/which_order_should_i_apply_eq_compression_and_a/
What is de-essing? The dos and don'ts of using a de-esser - iZotope, https://www.izotope.com/community/blog/the-dos-and-donts-of-de-essing
Proper order of plug-ins on a vocal chain/vocal track? : r/audioengineering - Reddit, https://www.reddit.com/r/audioengineering/comments/v5es8u/proper_order_of_plugins_on_a_vocal_chainvocal/
where do u put ur deesser when mixing vocals? : r/mixingmastering - Reddit, https://www.reddit.com/r/mixingmastering/comments/x3im7c/where_do_u_put_ur_deesser_when_mixing_vocals/
How to Use a De-Esser: 4 Simple Steps to a Pro Vocal Mix - Mastering.com, https://mastering.com/de-essing-vocals/
The Basics of De-Essing Vocals in Your Mix | AutoTune, https://www.antarestech.com/community/the-basics-of-de-essing-vocals-in-your-mix
Apply amplitude and compression effects to audio | Audition - Adobe Help Center, https://helpx.adobe.com/uk/audition/using/amplitude-compression-effects.html
Single band or multiband compression for dialogue. : r/AudioPost - Reddit, https://www.reddit.com/r/AudioPost/comments/ij0v31/single_band_or_multiband_compression_for_dialogue/
Reduce Mic Bleed: Tips for Multi-Microphone Podcasting | Music Radio Creative, https://hub.mrc.fm/c/podcasting-tips/managing-multiple-microphones-in-podcasting-tips-for-reducing-mic-bleed
How And When To Use Multiband Compression - Sound On Sound, https://www.soundonsound.com/techniques/how-and-when-use-multiband-compression
How To Use Upward Compression - Md3sign Studio, https://md3signstudio.com/blogs/mixing/how-to-use-upward-compression-md3sign-studio
Expanding on compression: 3 overlooked techniques for improving dynamic range - iZotope, https://www.izotope.com/community/blog/expanding-on-compression-3-overlooked-techniques-for-improving-dynamic-range
Upward Compression on Vocals? : r/audioengineering - Reddit, https://www.reddit.com/r/audioengineering/comments/1mc8c5q/upward_compression_on_vocals/
Optimal Separation of Multiple Microphones in the Same Room, https://podcastengineeringschool.com/optimal-separation-of-multiple-microphones-in-the-same-room/
Dugan Speech – Automixer for eMotion LV1 - Waves Audio, https://www.waves.com/mixers-racks/dugan-speech
Dan Dugan Automixer - Waves Audio, https://www.waves.com/mixers-racks/dugan-automixer
Working With Mic Bleed - Sound On Sound, https://www.soundonsound.com/techniques/working-mic-bleed
How do you deal with mic bleed in multi-mic recordings without losing clarity? - Reddit, https://www.reddit.com/r/audioengineering/comments/1hyrnxs/how_do_you_deal_with_mic_bleed_in_multimic/
What is sidechain compression? And how to use it - iZotope, https://www.izotope.com/community/blog/what-is-sidechain-compression
Advice on reducing mic bleed/spill for podcast with multiple people - Reddit, https://www.reddit.com/r/audioengineering/comments/ol5ywt/advice_on_reducing_mic_bleedspill_for_podcast/
The beginner's guide to sidechaining - Audient, https://audient.com/tutorial/the-beginners-guide-to-sidechaining/
Side-chain Compression In Reason - Sound On Sound, https://www.soundonsound.com/techniques/side-chain-compression-reason
Remove Room & Echo Noise from Multiple Podcast Mics - YouTube, https://www.youtube.com/watch?v=dHEjMZMOgbc
Dan Dugan Automixer Overview | Videos - Waves Audio, https://www.waves.com/dan-dugan-automixer-overview
Auto-Mixing Multiple Mics: Dugan Automixer with eMotion LV1 Classic - Waves Audio, https://www.waves.com/dugan-auto-mixing-emotion-lv1-classic
Waves Dugan Automixer User Guide, https://assets.wavescdn.com/pdf/plugins/dugan-automixer.pdf